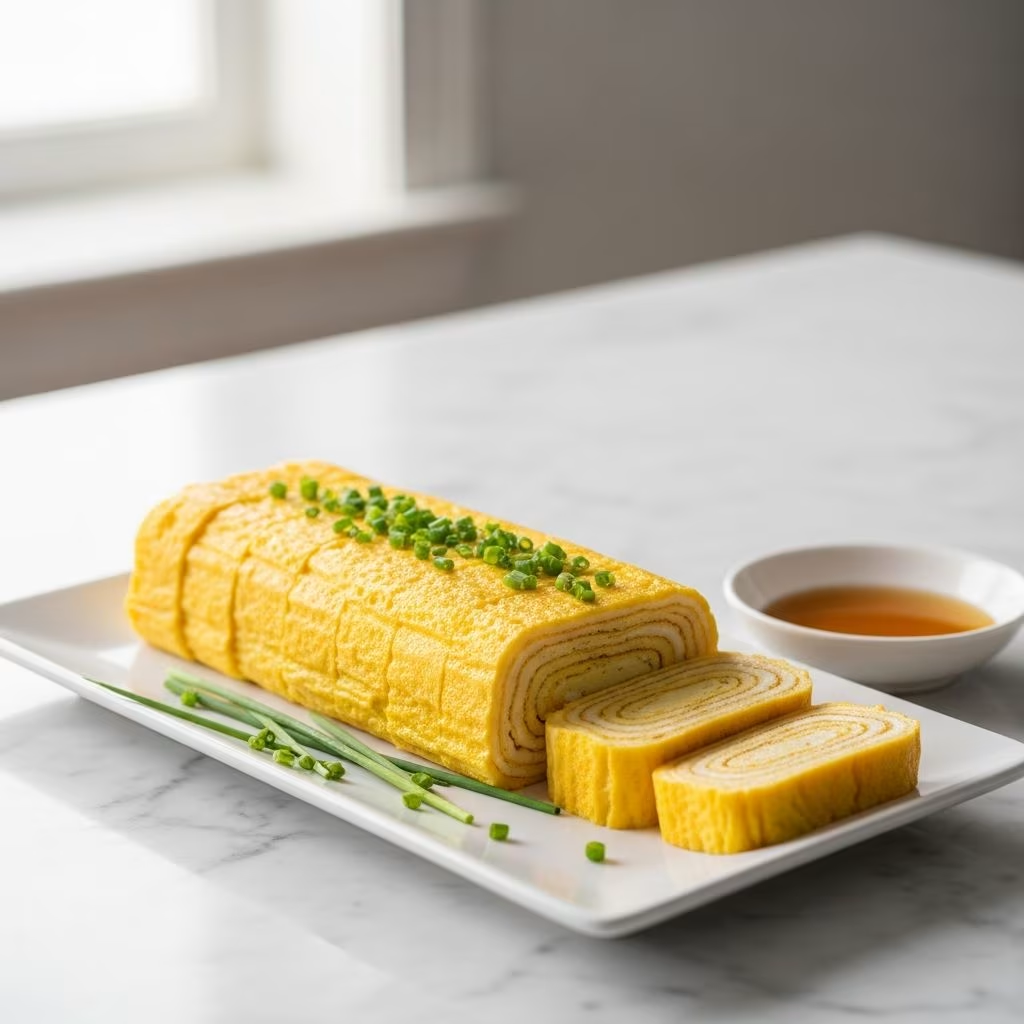
Japanese tamago, also known as tamagoyaki or atsuyaki tamago, represents one of the most elegant and versatile egg preparations in Japanese cuisine. This **rolled omelet** combines simplicity with precision, requiring only basic ingredients yet demanding careful attention to technique. Whether you’re preparing it for bento boxes, sushi accompaniments, or standalone dishes, understanding the fundamentals of tamago preparation will elevate your cooking skills and impress your family and guests.
Understanding Tamago: Origins and Significance
Tamago holds a special place in Japanese culinary tradition, appearing in various contexts from home cooking to professional restaurant kitchens. The name itself derives from the Japanese word for egg, and the preparation method—rolling successive thin layers of cooked egg—creates a distinctive rectangular shape and layered texture. This cooking technique dates back centuries and remains a staple in Japanese bento boxes and as a topping for nigiri sushi.
The beauty of tamago lies in its versatility. While the basic recipe remains consistent, regional variations and personal preferences lead to different sweetness levels, thicknesses, and cooking methods. Some families prefer their tamago sweeter, while others emphasize the savory umami flavors. Understanding these variations allows you to customize the dish to match your preferences.
Essential Ingredients for Authentic Tamago
Creating exceptional tamago begins with selecting quality ingredients. While the ingredient list appears minimal, each component plays a crucial role in achieving the desired flavor profile and texture.
Eggs: The Foundation
**Large eggs** form the base of any tamago recipe. Most traditional preparations use between three and nine eggs, depending on desired portion size and thickness. Each large egg typically weighs approximately 50 grams without the shell. Using fresh, high-quality eggs ensures superior flavor and better texture in the finished product. The size consistency matters because it affects cooking time and the overall outcome of each layer.
Seasoning Components
Traditional tamago seasoning relies on three fundamental flavors:
- Soy Sauce: Light-colored or usukuchi soy sauce works best, as it prevents the finished tamago from turning dark brown. Regular Japanese soy sauce serves as an acceptable substitute if light-colored soy sauce is unavailable. Avoid Chinese light soy sauce, which differs significantly from Japanese varieties and will alter the authentic flavor profile.
- Sugar: Organic cane sugar provides subtle sweetness that balances the savory soy sauce. The amount varies based on personal preference—some recipes call for half a tablespoon while others use up to a full tablespoon for noticeably sweeter results.
- Salt: A small pinch enhances overall flavor without creating excessive saltiness. Some recipes incorporate this ingredient while others rely on the salt content in soy sauce.
Additional Flavor Enhancers
**Dashi stock** elevates tamago to professional quality. This traditional Japanese cooking foundation, made from kombu seaweed and bonito flakes, imparts umami depth that distinguishes exceptional tamago from basic preparations. Quarter-cup portions of dashi typically replace water in more refined recipes. For convenience, commercial memmi sauce—which combines soy sauce, sugar, and bonito extract—offers a quick alternative that captures these traditional flavors in a single ingredient.
Cooking Medium
**Vegetable oil** facilitates the rolling process and prevents sticking. Light neutral oils work best to avoid introducing competing flavors. The amount used remains minimal, typically just enough to coat the cooking surface between each layer.
Equipment Required for Tamago Preparation
While tamago can be prepared in standard cookware, specialized equipment produces superior results and makes the process considerably easier.
| Equipment | Purpose | Notes |
|---|---|---|
| Tamagoyaki Pan | Specialized rectangular pan designed specifically for rolling eggs | Creates uniform rectangular shape; typically 4×5 inches; essential for authentic results |
| Alternative: Round Frying Pan | Adapts standard cookware for tamago preparation | Requires more skill to achieve rectangular shape; works for beginners |
| Measuring Cup with Spout | Allows precise pouring of thin egg layers | Easy-to-pour design ensures better control |
| Chopsticks or Wooden Spatula | Essential for mixing egg mixture and manipulating cooked layers | Metal utensils can damage non-stick surfaces |
| Fine-Mesh Sieve (Optional) | Strains egg mixture for ultra-smooth texture | Improves visual appearance and consistency |
| Bamboo Sushi Mat (Optional) | Wraps finished tamago while hot to set shape | Helps achieve perfectly rectangular form |
Preparing the Egg Mixture: Technique Matters
The method used to combine ingredients significantly impacts the final texture and appearance of tamago. Proper mixing technique prevents incorporating excess air, which creates unwanted bubbles during cooking.
The Cutting Motion Method
Rather than whisking or beating vigorously, authentic tamago preparation employs a gentle **cutting motion**. Using cooking chopsticks with tips touching the bowl bottom, move them in a zig-zag pattern to blend ingredients. This technique combines eggs, sugar, soy sauce, water or dashi, and salt without introducing air bubbles. The motion takes approximately one to two minutes and requires patience and care.
Optional Refinement: Straining
For exceptional results, pass the combined egg mixture through a fine-mesh sieve once or twice. This step removes any remaining air bubbles and creates an incredibly smooth, uniform texture. While optional, straining produces noticeably refined results that justify the minimal extra effort.
Ingredient Proportions Reference
- 3 large eggs + ½ tablespoon sugar + 1 pinch salt + 1 teaspoon light soy sauce + 1 tablespoon water
- 9 large eggs + 1½ tablespoons oil + 4 tablespoons water + 1 tablespoon memmi sauce (alternative method)
- 3 large eggs + ¼ cup dashi stock + 1 teaspoon light soy sauce + 1 teaspoon sugar (premium version)
Mastering the Cooking Technique
Successful tamago preparation requires understanding heat management, timing, and rolling mechanics. This section breaks down the process into manageable steps.
Pan Preparation and Heat Management
Preheat your tamagoyaki pan or round skillet over medium heat for approximately 90 seconds. This ensures even heating throughout the cooking surface. Add oil and use a paper towel to spread it evenly across the pan. Once oil begins smoking slightly across the entire surface, the pan has reached optimal temperature. Turn off the heat briefly—when smoke clears, the pan is ready for the first egg layer.
Temperature control throughout the cooking process proves critical. Rather than adjusting stovetop heat, experienced cooks manage temperature by lifting the pan away from the heat source. This prevents eggs from sticking to the pan while ensuring proper cooking.
First Layer Application
Turn heat back on to low or medium setting. Pour approximately one-quarter of the egg mixture into the pan, quickly tilting to coat the entire cooking surface evenly. The layer should be thin but complete, without bare spots. Using chopsticks or a wooden spatula, immediately pop any air bubbles that form. These bubbles, if left unaddressed, create visible holes in the finished tamago.
Cooking to Optimal Doneness
Cook the first layer for approximately 10 seconds, watching carefully for visual changes. The bottom should set while the top remains slightly runny—this is the ideal state for rolling. The egg shouldn’t appear completely cooked; instead, it should be approximately 70 percent cooked with visible moisture on the surface. This moisture allows the next layer to bond properly with the previous one.
Rolling Mechanics
Once the bottom sets while the top remains partially cooked, begin rolling the egg from the back edge of the pan toward the front. Use chopsticks or a spatula to facilitate smooth rolling. Roll gently but firmly enough to maintain the layer’s integrity. The rolled portion should move to one side of the pan, creating space for the next layer.
Building Successive Layers
Lightly oil the empty pan space, then pour approximately one-third of the remaining egg mixture. Lift the rolled egg mass to allow new mixture to flow underneath—this creates adhesion between layers and builds the characteristic laminated structure. Repeat the cooking and rolling process until all egg mixture is incorporated.
Each subsequent layer follows the same basic steps: even coverage, bubble removal, 70-percent cooking, and careful rolling. The rolled structure grows progressively larger with each addition. By the final layer, you’re working with a substantial mass that requires more care to roll smoothly.
Final Shape Setting
Once all layers are rolled, press down firmly on the tamago to flatten and compress it into a neat rectangular block. Push it gently against the sides of the pan to reinforce the rectangular shape. For aesthetic preference, lightly brown the exterior surfaces by allowing contact with the hot pan.
Finishing and Serving Suggestions
Proper finishing techniques help set the shape and develop flavor.
- Immediate Wrapping: Transfer the hot tamago to a cutting board and wrap it with a bamboo sushi mat while still warm. This optional step helps maintain the rectangular shape as it cools.
- Cool-Down Period: Allow the tamago to rest for approximately five minutes. This resting time permits residual heat to complete cooking while the structure sets firmly.
- Slicing: Use a sharp knife and cut the cooled tamago into equal portions, typically half-inch to three-quarter-inch thickness.
- Garnish Options: Serve with grated daikon radish, a small mound of grated wasabi, or a light soy sauce drizzle.
Customization and Variations
While the basic tamago recipe provides an excellent foundation, numerous variations accommodate different tastes and dietary preferences. Adjusting sugar content creates noticeably sweeter or more savory versions. Some cooks add mirin for additional depth, while others incorporate vegetable additions like finely minced onions or shrimp for protein variations. Experimenting with dashi-to-water ratios intensifies or lightens umami characteristics based on preference.
Troubleshooting Common Issues
Eggs Sticking to Pan
Insufficient oil application or excessive heat causes sticking. Ensure each layer receives a light oil coating and manage heat by lifting the pan rather than adjusting the stove.
Visible Air Bubbles in Finished Product
Pop bubbles immediately as they appear during each layer’s initial cooking phase. Alternatively, strain the egg mixture before cooking to eliminate pre-existing bubbles.
Dark Coloring Instead of Golden Appearance
Use light-colored soy sauce exclusively. Regular dark soy sauce creates brown tamago. Avoid excessive browning by controlling heat and cooking time carefully.
Difficulty Rolling Without Tearing
Ensure eggs are only 70 percent cooked before rolling. Fully cooked eggs become brittle and tear easily. The surface must retain visible moisture to maintain pliability during rolling.
Frequently Asked Questions
Can I make tamago without a specialized pan?
Yes, a standard round frying pan works adequately, though achieving a perfectly rectangular shape requires additional skill. The tamagoyaki pan’s rectangular design naturally produces the traditional shape.
How long does tamago keep when refrigerated?
Properly stored tamago maintains quality for three to four days when kept in an airtight container in the refrigerator. It can be eaten cold directly from storage or briefly reheated.
Is tamago suitable for freezing?
Freezing tamago is not recommended, as the texture becomes grainy and unpleasant after thawing. Fresh preparation yields optimal results.
What distinguishes tamago from a standard omelet?
Tamago’s distinctive characteristics include the rolling technique that creates multiple layers, Japanese-specific seasonings including dashi or soy sauce, and the rectangular shape. Standard omelets typically use different cooking methods and ingredients.
Can vegetarians modify tamago recipes?
Yes, vegetarians can prepare tamago using vegetable-based dashi instead of dashi containing bonito. All other ingredients remain animal-free when using vegetable oil and ensuring soy sauce contains no animal derivatives.
Professional Tips for Excellence
Restaurant-quality tamago results from attention to seemingly minor details. Maintain consistent pan temperature by adjusting distance from heat rather than changing stove settings. Use chopsticks with finesse—aggressive stirring or poking damages the delicate structure. Time each layer consistently for uniform appearance and texture. Allow adequate cooling before slicing to prevent crumbling. Practice patience; tamago mastery develops through repetition and observation rather than rushing the process.
References
- Classic Tamagoyaki (Japanese Rolled Omelette) — Just One Cookbook. 2024. https://www.justonecookbook.com/tamagoyaki/
- Tamagoyaki (Japanese Rolled Omelet) — Drive Me Hungry. 2024. https://drivemehungry.com/tamagoyaki-japanese-rolled-omelet/
- Tamagoyaki (Japanese Rolled Omelet) — Vermicular. 2024. https://www.vermicular.us/recipes/tamagoyaki
- Japanese Cuisine and Egg Preparations — Traditional Japanese Cooking Methods. Published research on Japanese culinary techniques. 2023.