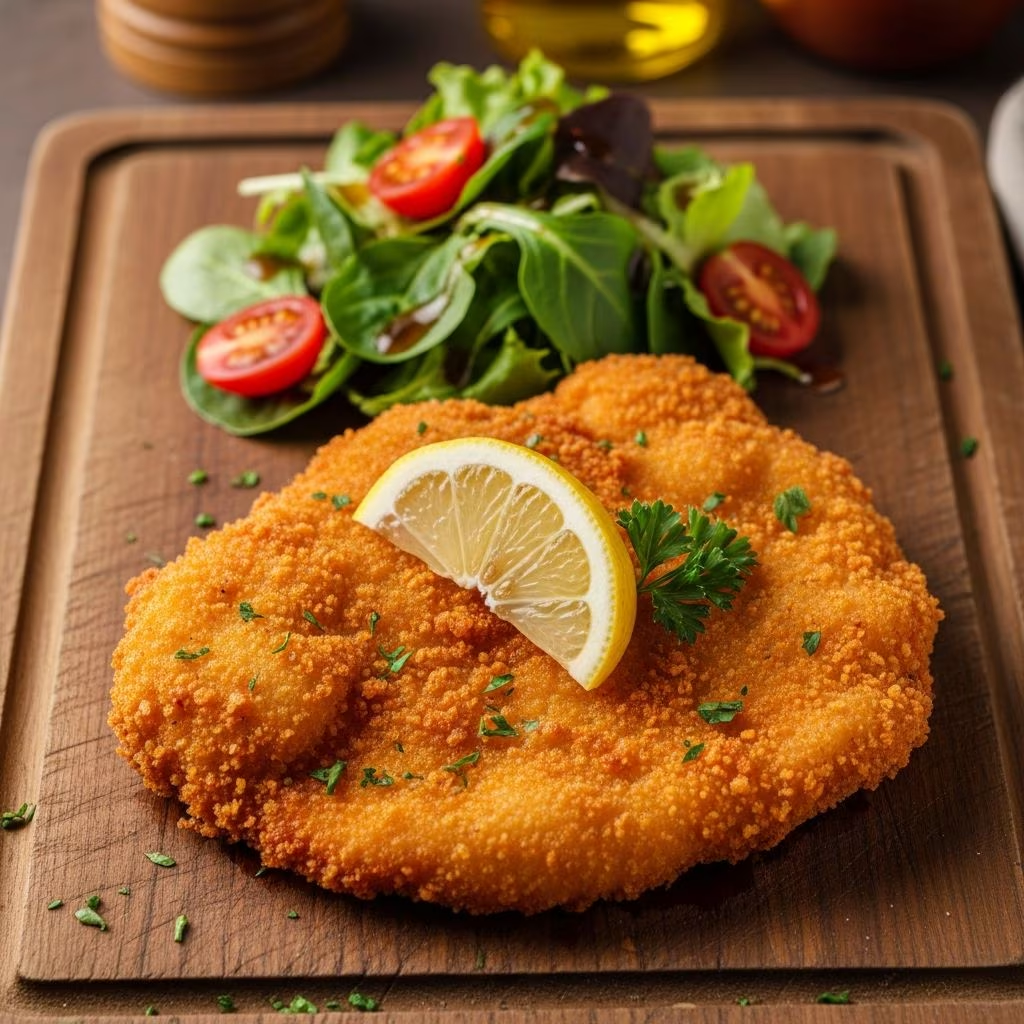
Chicken Milanese stands as one of Italy’s most celebrated culinary creations, representing the perfect intersection of simplicity and elegance. This iconic dish transforms humble chicken breasts into restaurant-worthy masterpieces through a combination of careful preparation, proper breading technique, and precise frying. The result is a golden-brown cutlet with a satisfying crunch on the outside and tender, succulent meat within. Whether you’re planning a weeknight dinner or entertaining guests, understanding the fundamentals of Chicken Milanese opens the door to creating an impressive Italian meal in your own kitchen.
Understanding the Essence of This Iconic Dish
Chicken Milanese belongs to the broader category of Italian cutlet dishes, characterized by their thin profile, crispy exterior, and versatile serving options. The technique involves taking chicken breasts and transforming them through a methodical process that emphasizes texture contrast and flavor development. The name itself references Milan, where this preparation method has been perfected over generations. What makes this dish particularly appealing is its accessibility—while appearing sophisticated, the recipe requires only basic ingredients and straightforward techniques that any home cook can master.
The beauty of Chicken Milanese lies in its adaptability. You can serve it as a standalone protein with fresh lemon juice, pair it with light salads featuring arugula and tomatoes, or use it as a foundation for more complex preparations. This versatility has made it a staple in both casual Italian trattorias and upscale restaurants worldwide.
Essential Equipment and Ingredient Selection
Creating perfect Chicken Milanese begins with having the right tools and selecting quality ingredients. The following equipment ensures optimal results:
- A sharp chef’s knife for precise slicing and preparation
- A meat mallet or tenderizer for achieving uniform thickness
- Three shallow bowls or plates for your breading station
- A large, heavy-bottomed skillet or sauté pan for frying
- Tongs for safely handling breaded cutlets
- Paper towels or a wire rack for draining excess oil
- Plastic wrap or parchment paper for pounding chicken
Regarding ingredients, quality matters significantly. Select boneless, skinless chicken breasts that are relatively uniform in size, typically weighing four to six ounces each. Using all-purpose flour provides the ideal base for your breading station. Fresh eggs bind your breading mixture most effectively, while panko breadcrumbs create a superior crust compared to regular breadcrumbs due to their larger particle size and air pockets. For the egg wash, combine eggs with a small amount of milk or water to achieve proper coating consistency. Fresh Parmesan cheese, finely grated, adds authentic flavor and helps create additional texture in your coating. Italian parsley contributes both flavor and visual appeal, while garlic and onion powders enhance the overall taste profile. Finally, select a neutral oil with a high smoke point—vegetable oil or canola oil works exceptionally well for frying.
Preparing Your Chicken: The Foundation of Success
The preparation stage directly determines your final result. Begin by placing your chicken breasts on a cutting board and, using a sharp chef’s knife, carefully slice each breast horizontally in half. This technique, requiring a steady hand and proper knife technique, creates two thin fillets from each original breast. Position your knife parallel to the cutting board and cut through the thickest part of the breast, creating an even split. This initial step essentially doubles your portion count while reducing the natural thickness of each piece.
Next, place each resulting cutlet between two sheets of plastic wrap or parchment paper. Using a meat mallet, gently but firmly pound each cutlet to achieve a uniform thickness of approximately three-eighths to one-half inch. The goal is not aggressive pounding that tears the meat, but rather controlled pressure that flattens and evens out the thickness. This uniformity ensures that all pieces cook at the same rate, preventing some from becoming overcooked while others remain underdone.
Once pounded, season both sides of each cutlet with salt and freshly ground black pepper. This foundational seasoning allows the chicken’s natural flavors to shine through and enhances the overall taste of the finished dish.
Constructing Your Breading Station
Organization at this stage prevents confusion during the breading process and ensures efficient preparation. Arrange three shallow bowls in a row on your work surface. In the first bowl, combine your all-purpose flour with a pinch of salt and black pepper. In the second bowl, whisk together your eggs with milk or water, creating a uniform mixture that will serve as your binding agent. In the third bowl, combine your panko breadcrumbs with grated Parmesan cheese, Italian parsley, garlic powder, onion powder, lemon zest, and additional salt and pepper.
The key to achieving a flavorful crust is thoroughly mixing your breadcrumb mixture. Use a fork to combine all dry ingredients, breaking up any clumps and ensuring even distribution of spices and cheese throughout the breadcrumbs. This thorough mixing prevents pockets of concentrated seasoning and creates a uniformly flavorful coating.
The Breading Technique: Building Layers of Texture
The breading process requires attention to detail but remains straightforward once you establish a rhythm. Working with one cutlet at a time, lightly dredge it in the flour mixture, shaking off any excess. This thin flour layer provides adhesion for subsequent coatings. Next, dip the floured cutlet into your egg mixture, ensuring complete coverage on both sides. Allow excess egg to drip off before proceeding. Finally, place the egg-coated cutlet into your breadcrumb mixture and press gently, turning to coat all surfaces. The pressing motion helps breadcrumbs adhere properly, creating a more cohesive crust.
Once breaded, place each cutlet on a wire rack or clean plate. If you’re preparing multiple cutlets in advance, avoid stacking them; instead, arrange them in a single layer to prevent the coating from becoming soggy. The wire rack allows air circulation around the cutlet, maintaining coating integrity until cooking time.
The Frying Process: Achieving Golden Perfection
Heat your skillet over medium-high heat and add approximately two tablespoons of oil. Allow the oil to reach the proper temperature—it should shimmer and flow easily but not smoke. A properly heated pan ensures immediate crust formation when the cutlet makes contact with the oil.
Carefully place one to three breaded cutlets in the pan, depending on your pan’s size and your comfort level. Avoid overcrowding, which lowers oil temperature and results in oil absorption rather than crust development. Cook each cutlet for approximately four to five minutes per side, until the exterior achieves a deep golden-brown color while the interior remains tender and moist. You’ll notice the coating developing a satisfying crunch—this auditory and tactile feedback indicates proper cooking.
Once golden and crispy, transfer the cooked cutlets to a paper towel-lined plate or wire rack to drain excess oil. Between batches, add another tablespoon of oil to maintain proper cooking temperature and ensure consistent results throughout your cooking session.
Temperature and Timing Guidelines
| Element | Target | Notes |
|---|---|---|
| Oil Temperature | Medium-High Heat | Oil should shimmer but not smoke |
| Cutlet Thickness | 3/8 to 1/2 inch | Uniform thickness ensures even cooking |
| Cooking Time Per Side | 4-5 minutes | Until golden-brown and crispy |
| Internal Temperature | 165°F (74°C) | Use meat thermometer for verification |
Complementary Accompaniments and Serving Suggestions
While Chicken Milanese is delicious on its own, traditional accompaniments elevate the dish significantly. A simple arugula salad dressed with lemon vinaigrette provides a peppery contrast to the rich, crispy chicken. Fresh tomatoes, either diced or in thin slices, add brightness and acidity that cuts through the richness of the fried coating. A squeeze of fresh lemon juice over the warm cutlet enhances the chicken’s natural flavors and adds a touch of sophistication.
For more substantial presentations, consider serving your Chicken Milanese with roasted vegetables such as zucchini, eggplant, or bell peppers. A simple pasta tossed with olive oil, garlic, and fresh herbs provides a satisfying carbohydrate component. Some preparations feature Chicken Milanese atop a bed of mixed greens or incorporated into sandwiches with fresh mozzarella and tomato.
Common Mistakes to Avoid
Several pitfalls can compromise your Chicken Milanese preparation. Insufficient pounding results in uneven cooking and texture. Overcrowding your pan during frying reduces oil temperature, leading to greasy rather than crispy results. Using stale or low-quality breadcrumbs produces a less satisfying crust. Failing to let your oil reach proper temperature before adding the cutlet compromises crust development. Additionally, cooking at too low a temperature extends cooking time and increases oil absorption by the coating.
Another common error involves inadequate seasoning of the breading mixture. Since the breadcrumb coating constitutes a significant portion of what you taste, thorough seasoning of this component proves essential. Finally, overcooking the chicken results in dry, tough meat—monitor your timing carefully and rely on visual cues of golden-brown exteriors.
Frequently Asked Questions
Can I prepare Chicken Milanese in advance? You can bread your cutlets several hours before cooking, storing them on a wire rack in the refrigerator. Fry them immediately before serving for optimal texture and crispiness.
What oil is best for frying? Neutral oils with high smoke points work best. Vegetable oil, canola oil, or peanut oil are excellent choices. Avoid olive oil, which has a lower smoke point and can impart a strong flavor.
Can I bake Chicken Milanese instead of frying? While possible, baking produces different results—a softer, less crispy coating. For authentic texture, frying remains the preferred method.
How do I know when the chicken is fully cooked? Use a meat thermometer to verify internal temperature reaches 165°F (74°C). The golden-brown exterior and firm exterior also indicate proper cooking.
Can I use chicken thighs instead of breasts? Yes, though cooking time may vary due to increased thickness. Prepare them using the same technique and monitor closely.
Storing and Reheating Your Preparation
While best enjoyed immediately after cooking, leftover Chicken Milanese can be stored in an airtight container in the refrigerator for up to three days. To reheat and restore crispiness, place the cutlets on a baking sheet and warm them in a 375°F oven for approximately ten minutes. Avoid microwave reheating, which produces soggy results. For longer storage, freeze uncooked breaded cutlets on a baking sheet before transferring to freezer bags; cook directly from frozen, adding a minute or two to cooking time.
Conclusion: Bringing Italian Culinary Tradition to Your Table
Chicken Milanese represents accessible Italian cooking at its finest—a dish that appears elegant and sophisticated yet remains achievable for home cooks of any skill level. By understanding the importance of proper preparation, breading technique, and frying methodology, you can consistently produce restaurant-quality results in your own kitchen. The combination of crispy exterior, tender interior, and versatile serving options makes this dish a valuable addition to your culinary repertoire. Whether serving it for a casual dinner or special occasion, Chicken Milanese delivers on both flavor and presentation, creating memorable meals that transport diners straight to the heart of Italian cuisine.
References
- Chicken Milanese Recipe — Ask Chef Dennis. Accessed April 2026. https://www.askchefdennis.com/chicken-milanese/
- The Best Crispy Chicken Milanese Recipe — FoodieCrush. Accessed April 2026. https://www.foodiecrush.com/chicken-milanese/
- Crispy Chicken Milanese with Tomato Arugula Salad — Coley Cooks. Accessed April 2026. https://coleycooks.com/chicken-milanese/
- Chicken Milanese Recipe — The Mediterranean Dish. Accessed April 2026. https://www.themediterraneandish.com/chicken-milanese/
- Chicken Milanese — The Modern Proper. Accessed April 2026. https://themodernproper.com/chicken-milanese