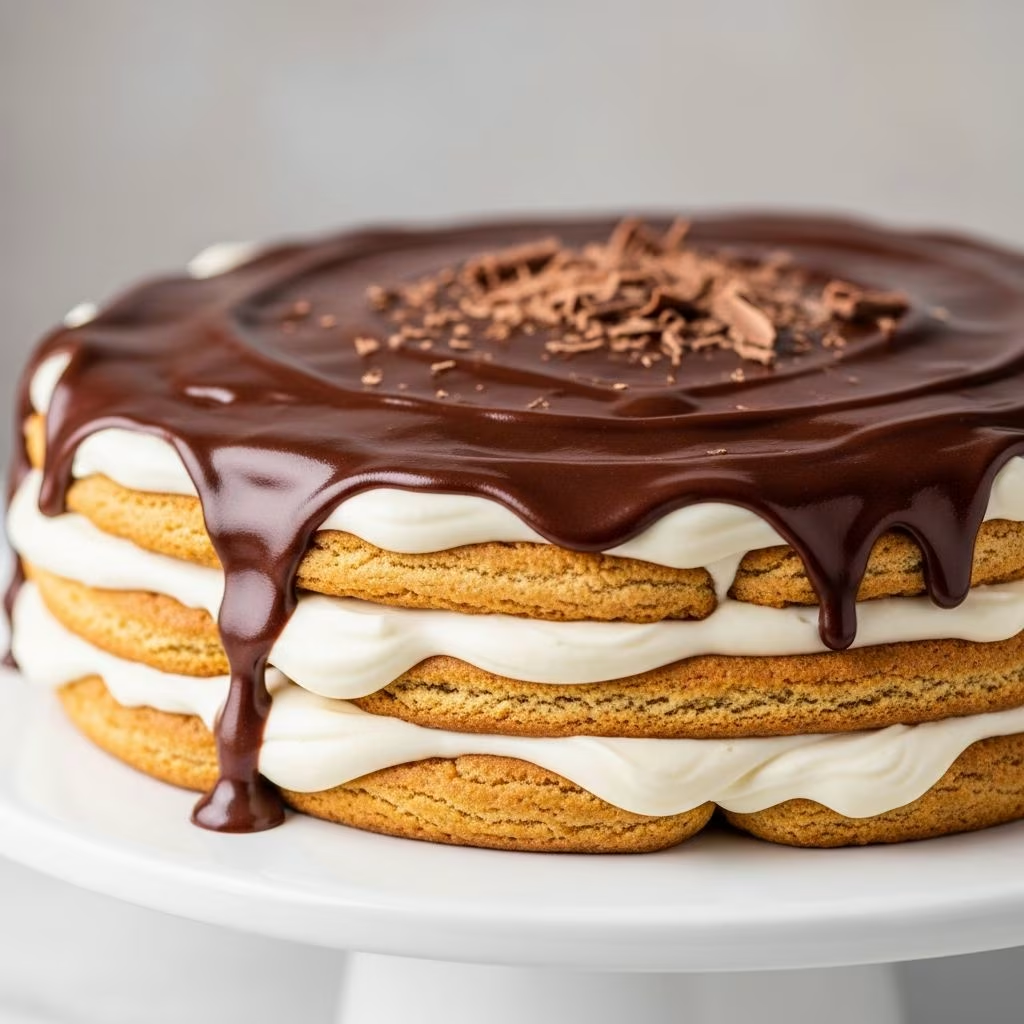
When it comes to creating an impressive dessert without turning on the oven, few treats can rival the elegance and simplicity of a chocolate eclair cake. This beloved no-bake creation brings together the best characteristics of French pastries and American comfort desserts into one stunning layered creation. The beauty of this dessert lies not only in its sophisticated appearance but also in its straightforward preparation process that requires minimal culinary experience.
Understanding the Roots of This Classic Dessert
The no-bake chocolate eclair cake represents a clever reimagining of traditional French éclairs, transforming them into an accessible format that anyone can prepare at home. Rather than requiring the technical skill needed to craft delicate pastry shells and fill them individually, this dessert captures those same elegant flavors through an ingenious layered approach. The result is a dessert that tastes remarkably similar to authentic éclairs while eliminating the complexity and time investment typically associated with French pastry-making.
This particular dessert has become especially popular throughout the Midwest and has earned a reputation as a reliable crowd-pleaser for family gatherings, potlucks, and special celebrations. Its appeal extends across generations because it satisfies both the desire for something homemade and special while respecting the reality that many home cooks have limited time and energy for complicated recipes.
The Essential Components That Make This Dessert Work
Understanding what each ingredient contributes to the final product helps you appreciate why this simple combination creates such satisfying results.
Graham Crackers as the Structural Foundation
Graham crackers serve as the backbone of this dessert, providing both structural support and textural contrast. When layered and chilled overnight, they gradually absorb moisture from the pudding mixture above them, transforming from their characteristically crisp texture into something more cake-like and tender. This softening process is essential to the eating experience—it allows each bite to have the proper consistency rather than delivering a jarring contrast between hard crackers and creamy filling.
The flavor profile of graham crackers complements both vanilla pudding and chocolate frosting beautifully. Their subtle sweetness and hint of honey create a harmonious base that doesn’t compete with other flavors but rather supports them.
Vanilla Pudding: Creating the Creamy Middle
Instant vanilla pudding mix forms the heart of this dessert, providing the signature creamy texture that makes each spoonful so satisfying. Using instant pudding rather than cooked pudding from scratch eliminates a significant portion of preparation time while delivering consistent, reliable results. The pudding’s smooth, velvety texture creates an appealing contrast with the eventual softened graham cracker layers.
The vanilla flavor acts as a neutral canvas that allows both the sweetness of the graham crackers and the intensity of the chocolate frosting to shine through without overpowering one another.
Whipped Topping for Lightness and Volume
Folding whipped topping into the pudding mixture serves multiple important functions. It lightens the overall texture of the filling, creating a more delicate and less dense eating experience than pudding alone would provide. This incorporation of air makes the dessert feel less heavy while still maintaining substantial richness.
The whipped topping also expands the volume of filling, allowing you to create a more substantial dessert that adequately fills the 9×13 inch pan without requiring excessive quantities of pudding mix.
Chocolate Frosting: The Elegant Finishing Touch
A silky chocolate frosting or ganache creates the impressive final layer that transforms this dessert into something restaurant-quality in appearance. The chocolate layer needs to be thick enough to provide substantial flavor and visual impact, yet smooth enough to spread evenly across the top graham cracker layer without cracking or creating an uneven surface.
Ingredient Selection and Variations
While the basic formula for this dessert remains consistent, thoughtful ingredient choices can customize the final result to match your preferences and dietary needs.
- Pudding Mix Options: While vanilla pudding is traditional, French vanilla pudding offers a slightly more sophisticated flavor profile. Some variations use chocolate pudding for an even richer result, though this creates a darker final appearance.
- Milk Choices: Whole milk creates the creamiest texture and richest flavor, though 2% or low-fat milk can be substituted if desired. The type of milk affects both the final consistency and the richness of the pudding layer.
- Whipped Topping Alternatives: While commercial whipped topping offers convenience and stability, freshly whipped heavy cream can be used for enhanced flavor. Some recipes use a combination of both for optimal texture.
- Graham Cracker Varieties: Honey graham crackers provide subtle additional sweetness, while cinnamon varieties add spice. For dietary restrictions, gluten-free graham crackers work effectively while maintaining the intended texture and flavor profile.
- Chocolate Frosting Approaches: Homemade chocolate frosting made with butter, cocoa powder, and sugar offers richer flavor control, while quality store-bought versions provide reliability and consistency.
Step-by-Step Assembly Process
Preparing the Pudding Mixture
Begin by combining your instant pudding mix with cold milk in a large mixing bowl. Whisk vigorously for approximately two to three minutes until the pudding reaches the proper consistency—it should be thick enough to hold its shape but still easily spreadable. This timing is crucial; under-whisking results in a too-thin mixture that won’t hold the graham cracker layers properly, while over-whisking can create a lumpy texture.
Allow the pudding to sit for an additional minute or two before proceeding. This resting period ensures the mixture has fully thickened and achieved its final texture. Once the pudding has reached the correct consistency, gently fold in your thawed whipped topping using a rubber spatula or wooden spoon, taking care to incorporate it thoroughly without deflating the air you’ve introduced.
Creating the Foundation Layer
Pour your prepared pudding and whipped topping mixture into a 9×13 inch baking dish, spreading it into an even layer across the bottom. This filling layer should be approximately one-half inch thick, creating a substantial base that will support the subsequent layers. The key is achieving an even distribution so that every portion of the graham crackers will have consistent filling beneath it.
Now carefully arrange a single layer of graham crackers across the entire bottom of the pan, breaking individual crackers as necessary to fill any gaps and create complete coverage. The crackers should sit flat against the filling layer, with minimal air pockets beneath them.
Building the Middle Layers
Spread half of your remaining pudding and whipped topping mixture across the graham cracker layer you’ve just placed, creating an even distribution that reaches from edge to edge of the pan. This second pudding layer should be slightly thicker than the first, providing adequate moisture that will gradually soften the next graham cracker layer as the dessert chills.
Arrange a second complete layer of graham crackers directly over this pudding layer, using the same technique as before to ensure complete coverage with minimal gaps.
Applying the Chocolate Frosting
The final step involves spreading your chocolate frosting or ganache across the top layer of graham crackers. The frosting should form a smooth, even layer that completely covers the top graham crackers while providing visual appeal and protecting them from the refrigeration process. If you’re using homemade ganache, allow it to cool for thirty minutes after preparation so it’s spreadable but not so warm that it melts into the graham crackers.
Critical Chilling Instructions
After assembly is complete, cover your dessert with plastic wrap and refrigerate overnight—this step is not optional but rather essential to achieving the intended final result. During this chilling period, several crucial transformations occur: the graham crackers gradually absorb moisture from the pudding mixture and become softer and more cake-like in texture, the flavors have time to meld and develop more complex taste profiles, and the structure sets firmly enough for clean slicing and serving.
Never attempt to slice and serve this dessert before it has chilled for at least eight hours; doing so will result in a crumbly, poorly structured presentation that lacks both visual appeal and the proper eating experience.
Serving Suggestions and Presentation
Once properly chilled, slice the dessert into generous squares using a sharp knife that has been dipped into hot water and wiped between cuts. This technique helps create clean, attractive slices with minimal crumbling. Each serving should showcase the distinct layers—the softened graham crackers, creamy pudding mixture, and silky chocolate frosting top.
This dessert serves approximately fifteen to twenty people depending on portion size, making it ideal for family gatherings and potlucks. It can be made one full day in advance and keeps well in the refrigerator for up to three days when properly covered.
Common Questions and Troubleshooting
What causes lumpy pudding?
Lumpy pudding typically results from insufficient whisking or milk that is too warm. Ensure you whisk for the full recommended time using cold milk for best results.
Why is my chocolate frosting grainy?
Grainy chocolate frosting usually occurs when chocolate isn’t melted properly or cocoa powder isn’t fully incorporated. Whisk thoroughly and ensure heat is controlled to avoid overheating the chocolate.
Can I make this dessert ahead?
Yes, this dessert actually improves when made one day in advance, allowing flavors to meld and the texture to develop fully. It maintains quality in the refrigerator for up to three days when properly covered.
Is there a way to make individual servings?
This dessert can be assembled in individual cups or small mason jars using crumbled graham crackers and the same layering technique, though the presentation differs from the traditional sheet pan version.
References
- Easy Chocolate Eclair Cake (No-Bake Dessert) — Rose Bakes. https://rosebakes.com/easy-chocolate-eclair-cake-no-bake-dessert/
- Easy No-Bake Chocolate Eclair Cake Recipe — Mom Loves Baking. https://www.momlovesbaking.com/easy-no-bake-chocolate-eclair-cake-recipe/
- No Bake Chocolate Eclair Cake Perfect for Potlucks and Parties — Our Crafty Mom. https://ourcraftymom.com/chocolate-eclair-cake/