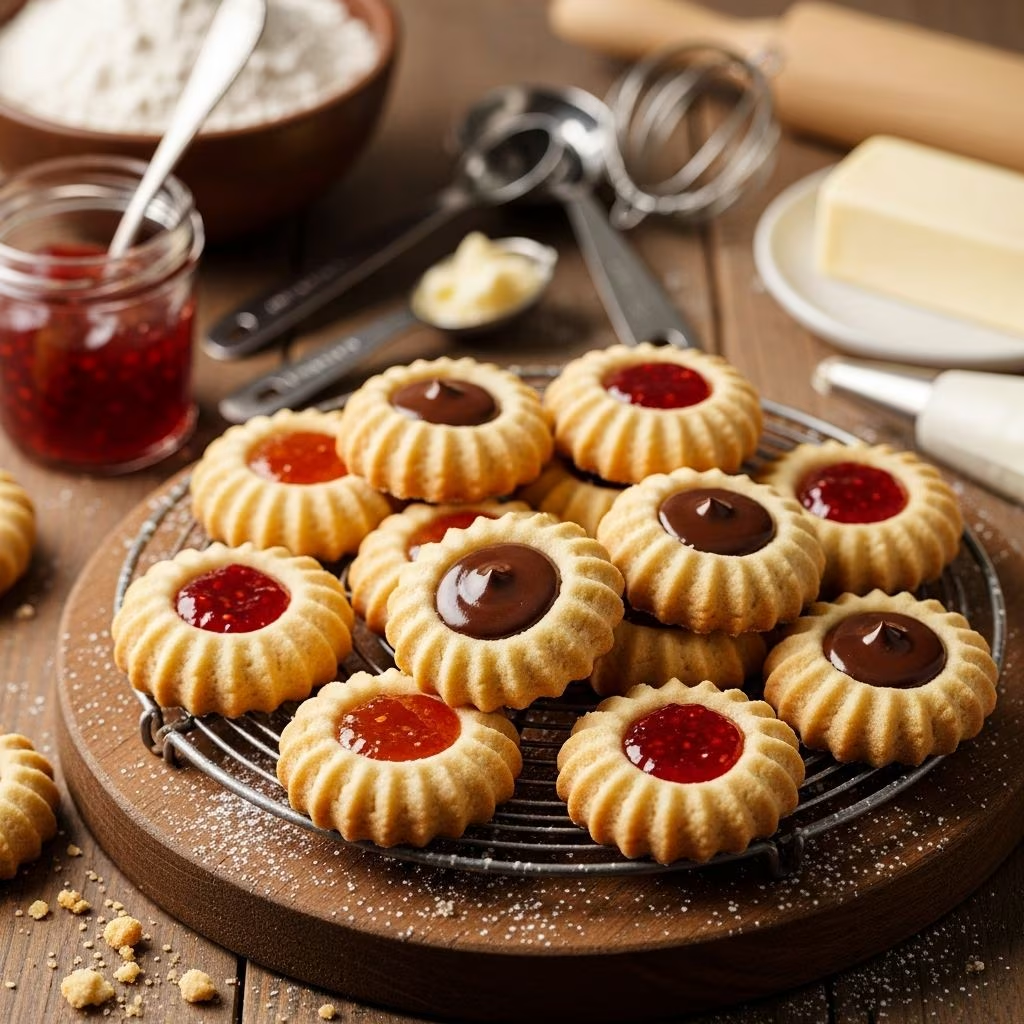
Thumbprint cookies represent one of the most beloved and timeless treats in home baking. These charming little confections combine simplicity with elegance, making them perfect for holiday gatherings, cookie exchanges, or simply satisfying a sweet craving. The beauty of thumbprint cookies lies in their straightforward construction: a tender, buttery base adorned with a jewel-toned filling that creates both visual appeal and delightful flavor complexity.
Whether you’re a seasoned baker or someone embarking on their baking journey for the first time, thumbprint cookies offer an accessible entry point into the world of homemade sweets. The recipe requires minimal specialized equipment and uses ingredients that most home cooks already have in their pantry. Yet despite their simplicity, these cookies deliver sophisticated results that rival any bakery offering.
Understanding the Foundation: Cookie Dough Essentials
The backbone of any successful thumbprint cookie starts with a well-crafted dough. Unlike some cookie varieties that benefit from chilling before shaping, thumbprint cookie dough works best when you understand the relationship between your ingredients and their role in creating the perfect texture.
The Role of Butter in Your Cookie Base
Butter forms the critical foundation of thumbprint cookie dough, providing both richness and structure. Using softened, room-temperature butter allows it to incorporate air more effectively when creamed with sugar, resulting in a lighter, more tender final cookie. Unsalted butter gives you complete control over the salt content in your recipe, allowing you to adjust seasoning precisely to your preference.
The creaming process—beating butter and sugar together—is not merely mixing ingredients; it’s a crucial step that determines your cookie’s ultimate texture. As you beat the butter and sugar, tiny air pockets form throughout the mixture, creating cookies that are light and delicate rather than dense and heavy.
Sugar’s Contribution to Texture and Flavor
Thumbprint cookie recipes typically combine granulated sugar with light brown sugar, each contributing distinct properties. Granulated sugar encourages spread and creates a crispier exterior, while brown sugar adds moisture and develops deeper, more complex caramel notes. The ratio of these sugars influences whether your finished cookies lean toward crispy-edged with tender centers or remain uniformly soft throughout.
Egg and Vanilla: Binding and Flavoring Agents
Eggs serve the crucial function of binding all cookie ingredients together while adding moisture and contributing to browning. Most thumbprint cookie recipes use egg yolks rather than whole eggs; yolks provide richness and binding power without adding excess moisture that might cause spreading issues. Vanilla extract enhances the overall flavor profile, allowing other ingredients to shine while adding subtle aromatic complexity.
Ingredient Composition and Measurements
Creating consistent, beautiful thumbprint cookies requires attention to precise ingredient ratios. Here’s a breakdown of typical ingredient components:
| Ingredient | Typical Quantity | Function |
|---|---|---|
| Unsalted Butter | 1 cup (226g) | Provides richness and structure |
| Granulated Sugar | ⅓ to ¾ cup | Sweetness and spread |
| Light Brown Sugar | ⅓ to ¾ cup | Moisture and caramel flavor |
| Egg Yolks or Whole Eggs | 1-2 large | Binding and moisture |
| Vanilla Extract | ¾ to 1 teaspoon | Flavor enhancement |
| All-Purpose Flour | 2¼ to 3 cups | Structure and texture |
| Salt | ½ teaspoon | Flavor enhancement |
Understanding how these components interact helps you troubleshoot when results don’t meet expectations and adapt recipes to your preferences.
The Preparation Process: Step-by-Step Instructions
Creaming for Success
Begin by placing softened butter in your mixing bowl. Beat it alone for approximately one minute until it achieves a creamy consistency. This pre-creaming step helps incorporate air into the butter before adding sugar. Then gradually add your combined sugars, increasing mixer speed to medium-high. Continue beating for 30 to 60 seconds until the mixture becomes noticeably fluffy and lighter in color—this visual cue indicates proper aeration.
Incorporating Wet Ingredients
Add your egg yolks (or whole eggs, depending on your recipe) and vanilla extract to the creamed mixture. Beat well until these ingredients are thoroughly incorporated and the mixture appears smooth and homogeneous. This step should take approximately one to two minutes of mixing.
Combining Dry Ingredients
In a separate bowl, whisk together flour, cornstarch (if using), and salt. Cornstarch, a common addition to thumbprint cookies, creates a more tender crumb structure similar to shortbread. When you’re ready to combine wet and dry ingredients, add the flour mixture gradually while mixing on low speed. Beat only until combined—overmixing develops gluten, resulting in tough rather than tender cookies.
Dough Preparation and Chilling
Some recipes require chilling the dough for several hours or even overnight, while others can be shaped immediately. Chilled dough is easier to work with and produces more uniform cookies; however, room-temperature dough that’s handled carefully also yields excellent results. If your recipe calls for chilling, press the dough into a disc, wrap it tightly in plastic wrap, and refrigerate until firm.
Shaping and Creating the Characteristic Indentation
Rolling Dough Balls
Once your dough reaches the appropriate consistency, divide it into portions roughly the size of a tablespoon. Roll each portion between your palms into a smooth ball. Consistency in ball size ensures even baking across your entire batch.
Optional Coating Treatments
Many thumbprint cookie variations include a coating before baking. Rolling dough balls in sparkling sugar creates an elegant, textured appearance and adds subtle crunch. Alternatively, dipping balls in beaten egg white and rolling them in finely chopped nuts—almonds being particularly popular—creates a sophisticated presentation with textural contrast.
Creating the Thumbprint
The signature thumbprint indentation is created by pressing your thumb (or the back of a measuring spoon for more uniform results) firmly into the center of each dough ball. Press deeply enough to create a well that will hold your filling without the cookie closing back over it during baking. A ½-teaspoon measuring spoon offers excellent control and creates consistent indentations across your batch.
Filling Your Cookies: Flavor Possibilities
Classic Jam and Preserves
Traditional thumbprint cookies feature fruit jams and preserves—raspberry, strawberry, and apricot being particularly popular choices. These classic fillings provide bright, fruity flavor and beautiful visual appeal. Fruit preserves work particularly well because they maintain their shape during baking.
Beyond Traditional Fillings
Contemporary bakers have expanded the filling possibilities considerably. Caramel adds rich, complex sweetness; chocolate ganache provides decadent depth; and lemon curd offers bright, zesty contrast to the buttery cookie base. You can even mix different fillings within a single batch, creating a varied assortment.
Application Technique
Fill each indentation with approximately ½ to 1 teaspoon of your chosen filling, depending on the well’s depth and size. The filling should reach nearly to the rim without overflowing. Slightly underfilled cookies are preferable to overfilled ones, which may leak filling during baking and create messy results.
Baking Fundamentals
Temperature and Timing
Preheat your oven to 375°F (190°C). Most thumbprint cookies bake for 11 to 14 minutes, depending on your oven’s individual characteristics and your cookies’ size. Bake until the edges just begin turning golden brown—this indicator tells you the cookies have set while remaining tender in the center. Overbaking results in dry, crumbly cookies, while underbaking leaves them too soft to handle cleanly.
Spacing and Pan Preparation
Arrange cookies at least 2 inches apart on parchment paper–lined baking sheets. This spacing allows air to circulate evenly around each cookie, promoting uniform browning. Parchment paper prevents sticking and makes cleanup effortless.
Batch Baking Strategy
When baking multiple sheets, allow your oven to return to the proper temperature between batches. Some bakers prefer baking one sheet at a time to ensure consistent results, particularly if their oven has hot spots.
Cooling and Storage Techniques
Immediate Cooling Protocol
Allow thumbprint cookies to cool completely on the baking sheet before removing them. This cooling period allows the structure to set properly, preventing breakage when transferring cookies to serving or storage containers. Attempting to move warm cookies often results in structural failure.
Long-Term Storage
Once fully cooled, store thumbprint cookies in an airtight container at room temperature for up to one week. Properly stored cookies maintain their texture and flavor throughout this period. For extended storage, freeze baked cookies in freezer-safe containers for up to three months.
Troubleshooting Common Challenges
Dough Cracking During Shaping
If your dough develops large cracks when you press your thumb to create the indentation, the mixture likely needs additional moisture. Add 1 tablespoon of milk or water and mix gently until the dough becomes more pliable. This adjustment allows the dough to compress without breaking.
Cookies Spreading Excessively
Excessive spreading indicates your dough was too warm or your oven temperature was too low. Ensure butter was properly softened but not melted, and verify your oven temperature with an oven thermometer for accuracy.
Filling Leaking During Baking
Overfilled indentations commonly result in filling leakage. Use the recommended ½ to 1 teaspoon filling amount, ensuring the wells are deeply pressed. Thicker, more viscous fillings (such as jam) perform better than thin, runny fillings.
Creative Variations and Adaptations
Flavor Enhancement Options
Incorporate almond extract alongside vanilla for subtle nuttiness. Add lemon zest or espresso powder for nuanced complexity. Toast your nuts before chopping and rolling the dough balls for deeper, more developed flavor.
Seasonal Adaptations
Winter thumbprint cookies might feature cranberry or lingonberry preserves; spring versions could showcase lemon curd; summer cookies shine with peach or berry fillings; and autumn editions pair beautifully with apple butter or pumpkin preparations.
Frequently Asked Questions
Can I prepare thumbprint cookie dough in advance?
Yes, thumbprint cookie dough can be prepared up to 24 hours in advance. Wrap it tightly and refrigerate, allowing it to come to room temperature for approximately 10 minutes before shaping to prevent cracking.
What’s the best way to freeze shaped, unfilled cookies?
After shaping and creating indentations, freeze dough balls on a baking sheet until solid, then transfer to freezer bags. When ready to bake, add filling and bake directly from frozen, adding 1 to 2 minutes to baking time.
How do I prevent my filling from hardening during storage?
Choose fillings that remain relatively soft at room temperature. Avoid fillings that crystallize or harden, such as certain types of chocolate. Store cookies in airtight containers with parchment paper between layers.
Can I use store-bought dough?
While store-bought sugar cookie dough can be adapted for thumbprint cookies, homemade dough yields superior flavor and texture. However, using quality store-bought dough is preferable to not baking at all.
References
- Thumbprint Cookies — Sugar Spun Run. Accessed April 2026. https://sugarspunrun.com/thumbprint-cookies/
- A Master Thumbprint Cookies Recipe — By Lauren Cermak. Accessed April 2026. https://www.bylaurencermak.com/a-master-thumbprint-cookies-recipe/
- Easy Thumbprint Cookies (Use Any Jam) — Preppy Kitchen. Accessed April 2026. https://preppykitchen.com/thumbprint-cookies/
- Easy Thumbprint Cookies Recipe (video) — Tatyanas Everyday Food. Accessed April 2026. https://tatyanaseverydayfood.com/thumbprint-cookies-recipe/
- Thumbprint Cookies Recipe — BettyCrocker.com. Accessed April 2026. https://www.bettycrocker.com/recipes/thumbprint-cookies/1852da77-2cff-4e8d-92ca-f745d626eb8f