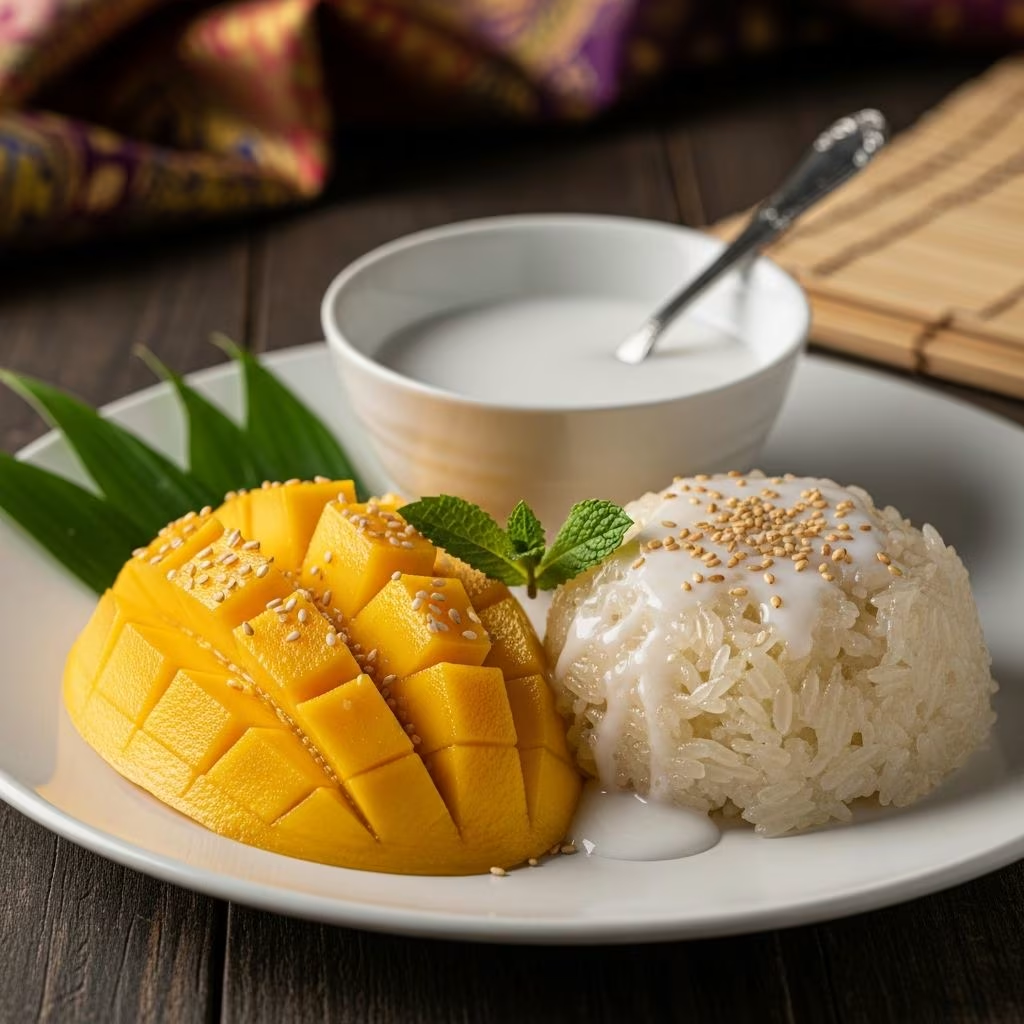
Thai mango sticky rice, known locally as khao niew mamuang, stands as one of Thailand’s most cherished desserts. This harmonious blend of chewy glutinous rice, creamy coconut sauce, and juicy ripe mangoes captures the essence of tropical indulgence. Originating from street vendors in bustling markets, it has evolved into a global favorite, prized for its balance of sweet, salty, and fresh flavors.
The Allure of This Timeless Thai Treat
What makes Thai mango sticky rice irresistible? The dessert’s magic lies in its contrasts: the sticky rice’s firm chewiness against the mango’s soft succulence, paired with a coconut sauce that dances between sweetness and a subtle saltiness. Traditionally served warm, it evokes memories of Thai beachside eateries where the dish is prepared fresh daily during mango season, typically from April to June.
Its popularity extends beyond Thailand, appearing on menus worldwide. Home cooks appreciate its relative simplicity, requiring just a handful of ingredients yet demanding precision in technique to achieve authenticity. Mastering this recipe elevates everyday desserts to restaurant-quality levels.
Essential Ingredients for Success
Gathering the right components is crucial. Here’s a breakdown:
- Glutinous rice (sweet sticky rice): 1 cup (200g). This short-grain variety, also called jasmine or Thai sticky rice, is key for its high starch content that creates the signature chew.
- Full-fat coconut milk: 1-1.5 cups (240-355ml). Opt for canned, high-quality brands like Aroy-D for rich creaminess without additives.
- Sugar: ½ cup (100g) granulated white sugar for the main sauce; adjust to taste.
- Salt: ½-1 teaspoon, fine table salt to balance sweetness.
- Rice flour or cornstarch: ½-1 teaspoon for thickening the topping sauce.
- Ripe mangoes: 2-3 large, preferably Ataulfo or Nam Dok Mai varieties for their sweet, non-fibrous flesh.
- Optional garnishes: Toasted sesame seeds or crispy mung beans for crunch.
These ingredients ensure the dish’s authenticity, with coconut milk providing the luscious base that permeates the rice.
Step-by-Step Preparation Guide
Preparation demands patience, especially with soaking and steaming, but the results are worth it. Follow these detailed steps for flawless execution.
1. Preparing the Glutinous Rice
Begin by rinsing 1 cup of glutinous rice under cold running water 3-5 times. Agitate vigorously with your hands until the water runs nearly clear, removing excess starch that could make the rice gummy. Drain thoroughly.
Soak the rinsed rice in fresh water covering it by 1 inch for 4-10 hours, or overnight for best results. For a quicker method, use boiling water and soak for 20-30 minutes. This step hydrates the grains evenly, ensuring they cook uniformly without cracking.
2. Steaming the Rice to Perfection
Drain the soaked rice and place it in a steamer basket lined with cheesecloth or parchment to prevent sticking. Set the basket over a pot with 1-2 inches of boiling water, ensuring the rice doesn’t touch the water.
Steam covered for 20-25 minutes. At the 10-minute mark, gently flip the rice with a spatula for even cooking. The grains should turn translucent, chewy, and tender but not mushy.
Pro Tip: If lacking a steamer, improvise with aluminum foil balls in a pot to elevate a plate of rice above simmering water.
3. Crafting the Coconut Sauce
While the rice steams, prepare the sauce. In a saucepan over medium heat, combine 1 cup coconut milk, ½ cup sugar, and ½ teaspoon salt. Stir until the sugar dissolves, then simmer gently for 2-3 minutes without boiling to preserve the coconut’s freshness.
Reserve ¼ cup of this mixture for the topping sauce. Immediately pour the remaining hot sauce over the freshly steamed rice in a shallow dish. Gently fold to coat evenly, then cover tightly with plastic wrap and a lid. Let rest for 30-40 minutes; the rice absorbs the liquid, becoming infused with flavor.
4. Thickening the Topping Sauce
For the drizzle, mix the reserved coconut sauce with ½ teaspoon rice flour or cornstarch and a pinch of salt. Simmer for 30-60 seconds until it thickens slightly. Cool to room temperature. This creates a silky contrast to the rice.
5. Selecting and Preparing Mangoes
Choose mangoes that yield slightly to gentle pressure, with fragrant skin and golden-yellow hue. Peel and slice into thin strips or cheeks, avoiding the pit for maximum yield. Arrange fan-like for visual appeal.
6. Assembly and Serving
Scoop warm sticky rice onto plates, forming a rounded mound. Position mango slices alongside or atop. Drizzle generously with thickened sauce and sprinkle sesame seeds. Serve immediately for optimal warmth and texture.
Ingredient Substitutions and Variations
Adapt the recipe while preserving authenticity:
| Original Ingredient | Substitution | Notes |
|---|---|---|
| Glutinous rice | Jasmine rice (short-grain) | Less sticky; steam longer for chewiness. |
| Full-fat coconut milk | Light coconut milk | Thinner sauce; add more thickener. |
| Fresh mango | Frozen mango or other fruits | Use ripe alternatives like papaya in off-season. |
| Granulated sugar | Palm sugar or coconut sugar | Deeper flavor; dissolve fully. |
For colorful rice, infuse soaking water with natural dyes like butterfly pea flower. Add mung beans for crunch.
Troubleshooting Common Pitfalls
- Mushy rice: Over-stirring or overcooking. Handle gently post-steaming.
- Hard rice center: Insufficient soaking. Extend to overnight.
- Separated coconut sauce: Boiled too vigorously. Simmer only.
- Not sticky enough: Wrong rice type. Always use glutinous.
These fixes ensure consistent success.
Nutritional Profile and Dietary Notes
A serving (about 1 cup rice + ½ mango) provides roughly 400-500 calories, rich in carbohydrates from rice, healthy fats from coconut, and vitamins A and C from mango. It’s naturally gluten-free and vegan. Portion control balances its indulgent nature.
Storage and Reheating Tips
Store leftovers covered in the fridge for up to 2 days. Reheat rice gently in a steamer or microwave with a splash of coconut milk to revive stickiness. Sauce keeps separately for 3 days. Avoid freezing, as texture suffers.
Pairing Suggestions
Enjoy post-Thai meal with iced Thai tea or fresh lime soda. For brunch, pair with savory dishes like pad Thai.
Frequently Asked Questions (FAQs)
Can I make this without soaking the rice?
Quick soak in boiling water works but yields less tender results. Overnight is ideal.
What’s the best mango variety?
Ataulfo or Thai Nam Dok Mai for sweetness and creaminess.
Is regular rice okay?
No—glutinous rice is essential for stickiness.
How do I know when rice is done steaming?
Grains are translucent, chewy, no hard core.
Can I prepare ahead?
Steam rice and make sauce day before; assemble fresh.
Perfecting Your Home Version
Practice timing: sauce ready just as rice finishes. Taste-test sauce for sweet-salt harmony—increase salt slightly for topping. This dessert rewards attention to detail, transforming simple elements into a symphony of flavors.
References
- AUTHENTIC Thai Mango with Coconut Sticky Rice Recipe — Scientifically Sweet. 2023. https://scientificallysweet.com/thai-mango-with-coconut-sticky-rice/
- Mango Sticky Rice Recipe — Hot Thai Kitchen. 2023. https://hot-thai-kitchen.com/mango-sticky-rice/
- Thai Sticky Rice With Mango | Good Times with Jen — YouTube/Tastemade. 2023. https://www.youtube.com/watch?v=osGfh5A7ta0
- Mango Sticky Rice (a Thai dessert!) — Joyous Apron. 2023. https://www.joyousapron.com/thai-mango-sweet-sticky-rice/
- Sweet Coconut Sticky Rice with Mango — Kitchen Confidante. 2023. https://kitchenconfidante.com/sweet-coconut-sticky-rice-with-mango-recipe
- Mango Sticky Rice — The Foodie Takes Flight. 2023. https://thefoodietakesflight.com/mango-sticky-rice/