Understanding the Appeal of Sheet Pan Desserts
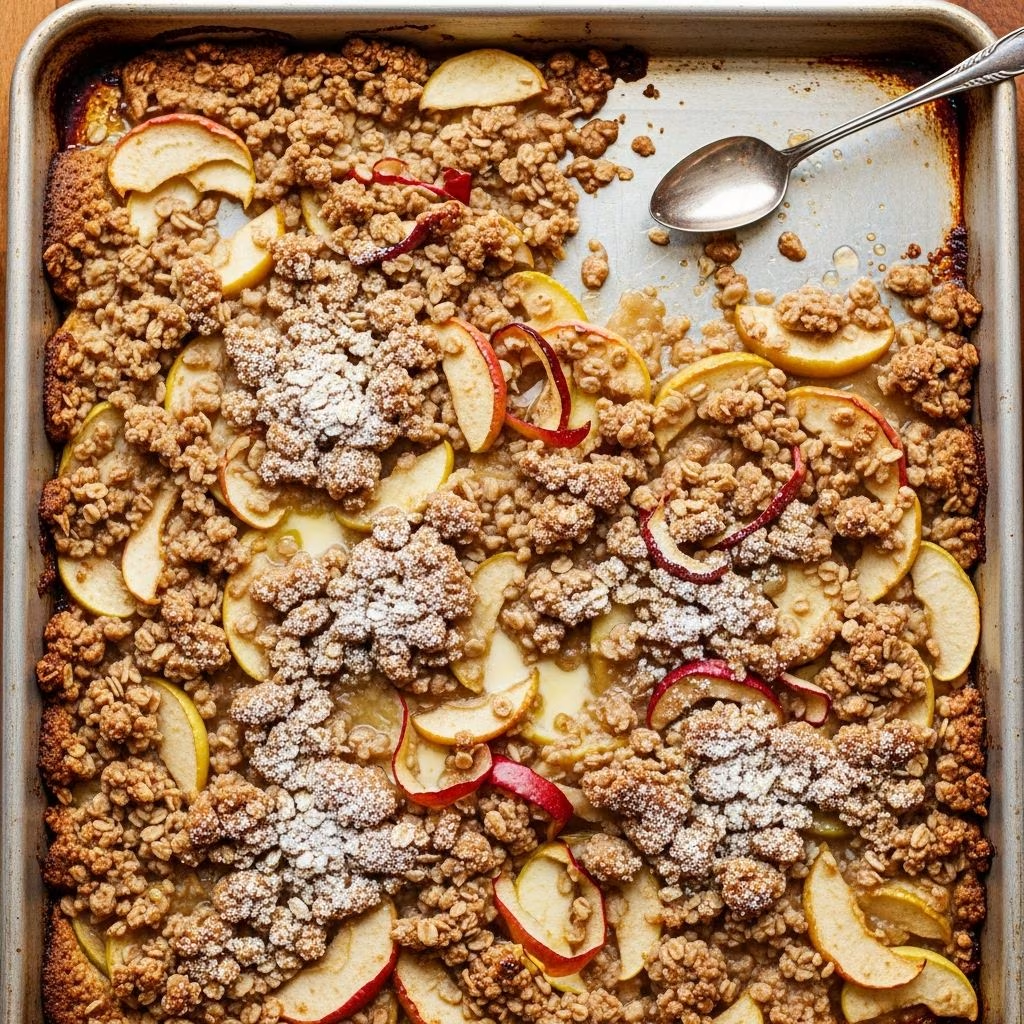
Baking desserts in sheet pans has transformed home cooking by making elegant treats accessible to everyone. Unlike traditional deep-dish casseroles that concentrate filling thickness, sheet pans create a broader cooking surface that distributes heat more evenly and allows for a superior texture contrast. The shallow design produces a higher ratio of crispy topping to fruit filling, delivering a more satisfying textural experience with every spoonful. This format also proves practical for feeding groups, as the pan’s generous dimensions yield multiple servings without requiring individual portioning before baking.
The evolution of baking methods has shown that sheet pans aren’t merely convenient tools—they fundamentally change how desserts develop flavor and texture. The increased surface area allows the fruit to release its juices gradually while the topping achieves an optimal crispness that traditional preparations sometimes struggle to reach. This approach has gained popularity among both experienced bakers and novices because it simplifies the entire process while delivering professional-quality results.
Selecting and Preparing Your Apples
The foundation of any exceptional crisp begins with thoughtful apple selection. Different apple varieties contribute distinct flavor profiles and textural qualities to the finished dessert. Varieties such as Braeburn, Gala, Honeycrisp, and Pink Lady maintain their structural integrity during baking, resisting the tendency to become mushy. These firm varieties hold their shape while still softening enough to become tender and flavorful. If your kitchen doesn’t stock specialty varieties, any apples available will produce satisfactory results—the fundamental principles remain consistent regardless of type.
Preparation technique significantly influences the final outcome. Slicing apples uniformly at approximately one-quarter inch thickness ensures consistent cooking throughout the filling. This standardized thickness allows all pieces to soften simultaneously, preventing a mixture where some slices remain firm while others deteriorate into applesauce. Before combining apples with other filling ingredients, consider the benefit of removing the peel—while leaving skin intact adds fiber and visual interest, peeling creates a smoother, more refined texture that some prefer.
Building the Foundation: Apple Filling Components
Creating the ideal apple filling involves balancing multiple elements to achieve complexity without overwhelming the palate. The primary components work together to enhance the natural sweetness and tartness of the fruit:
- Natural sweeteners like maple syrup or brown sugar dissolve gradually, creating a syrupy consistency that coats each apple slice while developing deeper caramelized flavors during baking
- Acidic elements such as fresh lemon juice and zest brighten the filling, preventing it from becoming cloying while highlighting the fruit’s intrinsic complexity
- Aromatic spices including cinnamon and nutmeg introduce warmth and depth, creating flavor layers that evolve as the dessert cools
- Thickening agents like tapioca flour or cornstarch transform the released fruit juices into a cohesive sauce rather than a watery pool at the pan’s bottom
- Flavor enhancers such as vanilla extract add subtle background notes that integrate all other components into a harmonious whole
The technique for combining these elements matters as much as the ingredients themselves. Tossing all components together in a large mixing bowl ensures even distribution before the mixture reaches the baking vessel. This preliminary mixing allows the sugar to begin dissolving and flavors to meld slightly before heat application. Spreading the coated apple slices into an even layer on the sheet pan promotes uniform cooking and allows steam to circulate effectively around each piece.
Crafting the Textured Topping
The crumble topping represents the textural counterpoint to the soft, jammy filling. This component requires careful balance between structure and richness. Traditional topping ingredients typically include:
- Rolled oats that provide structure and chewiness while baking
- All-purpose flour that creates binding structure when combined with butter
- Cold butter cut into small pieces that creates pockets of moisture during baking, resulting in the characteristic crispy-tender texture
- Brown sugar that adds moisture, sweetness, and promotes browning
- Optional nuts such as walnuts or almonds that introduce crunch and complexity
Preparation technique proves critical for achieving the desired texture. Combining dry ingredients first ensures even spice distribution throughout the topping. Adding cold butter pieces and then using fingertips or a pastry cutter to incorporate the butter creates irregular clumps that translate into varied textures once baked. The mixture should resemble coarse breadcrumbs or cookie dough rather than a homogeneous paste. This slightly uneven consistency produces some areas that crisp considerably while others remain tender, creating the textural complexity that defines excellent crisps.
Temperature Control and Baking Timing
Proper oven temperature management determines whether the finished dessert achieves the ideal balance of golden topping and tender-yet-intact filling. Most recipes indicate temperatures between 350°F and 425°F, with variation depending on the specific preparation method. Lower temperatures around 350°F allow gentler, more gradual cooking that reduces the risk of overcooking the filling or burning the topping. This slower approach works particularly well for thicker fillings or when using apples with higher water content.
Moderate temperatures around 400°F represent a middle ground, providing faster cooking without excessive browning risk. This temperature range typically produces doneness within 30 to 40 minutes, depending on oven characteristics and ingredient variations. Many home bakers find this temperature optimal because it cooks the filling thoroughly while allowing the topping to develop rich color without requiring careful monitoring.
Regardless of temperature selection, the baking duration requires attention rather than strict adherence to timing. The topping should achieve a light golden-brown color, while the filling should show slight bubbling at the pan’s edges—indicators that the apples have softened adequately and the thickening agents have begun setting the juices. Rotating the sheet pan halfway through baking promotes even browning when oven hot spots exist.
Post-Baking Considerations and Cooling
The period immediately following baking significantly impacts the final texture and eating experience. Allowing the crisp to cool for at least 15 minutes before serving permits the filling to set slightly, preventing excessive juiciness that might cause the topping to become soggy. This cooling period doesn’t require complete room-temperature cooling—warm crisps with slightly softened topping remain delicious and often preferred by those who enjoy the contrast between warm filling and partially crisp topping.
Room-temperature serving offers different advantages, presenting a denser texture and more pronounced crunch in the topping. The filling achieves full body and coherence at room temperature, making this the ideal temperature for those who prefer their desserts less juicy or who plan to serve them the following day.
Storage Techniques and Longevity
Proper storage extends the enjoyment of homemade crisps beyond the initial serving. Covered containers in the refrigerator preserve quality for three to four days, maintaining both filling integrity and topping texture reasonably well. The topping will gradually soften due to moisture migration from the filling, but the dessert remains perfectly palatable and sometimes preferred by those who enjoy a cake-like consistency throughout.
Reheating stored crisps presents options for restoring textural qualities. Gentle warming in a low oven at 300°F for 10 to 15 minutes revives some of the topping’s crispness without further drying the filling. Alternatively, serving directly from refrigeration appeals to those who appreciate the denser texture and appreciate the reduced sweetness perception that accompanies cold serving.
Creative Ingredient Variations
While the classic formula produces exceptional results, thoughtful variations maintain the fundamental appeal while introducing novelty:
| Variation Element | Modification Options | Impact on Flavor Profile |
|---|---|---|
| Filling Sweetener | Honey, agave, coconut sugar | Introduces subtle flavor notes while adjusting caramelization intensity |
| Spice Additions | Ginger, cardamom, cloves | Adds sophisticated warmth and complexity |
| Topping Ingredients | Pecans, almonds, pumpkin seeds | Changes textural qualities and introduces different flavor dimensions |
| Filling Fruit | Mixed berries, pears, stone fruits | Maintains structural principles while offering seasonal variety |
| Dietary Accommodations | Gluten-free oats, alternative flours | Maintains textural integrity while broadening accessibility |
Serving Suggestions and Pairings
Accompaniments enhance the fundamental dessert without overpowering its inherent appeal. Vanilla ice cream creates classic temperature contrast while its richness complements the crisp’s fruit-forward flavor profile. Whipped cream offers a lighter alternative, adding airiness without excessive dairy richness. Greek yogurt introduces tang that brightens the overall eating experience, particularly appealing when the crisp contains caramelized or deeply spiced elements.
For those seeking non-dairy options, coconut milk-based products or cashew cream provide richness and complement the warm spices effectively. Serving the crisp on its own remains equally valid, highlighting the balance achieved through careful ingredient selection and preparation technique.
Frequently Asked Questions
What should I do if my topping doesn’t brown adequately?
If the topping remains pale after the recommended baking time, increase the oven temperature by 25°F and continue baking for several additional minutes, watching carefully to prevent burning. Alternatively, brushing the topping lightly with melted butter or milk before baking promotes browning through the Maillard reaction.
Can I prepare this dessert in advance?
Yes, combining the filling ingredients in the sheet pan and preparing the topping separately several hours ahead works well. Cover both components with plastic wrap and store in the refrigerator. Assemble just before baking and add approximately five minutes to the baking time since the components will be cold.
My filling seems too watery—what went wrong?
Insufficient thickening agent, excess moisture from very juicy apples, or insufficient baking time can produce watery results. For future preparations, increase the thickening agent slightly or extend baking time by five minutes. If the current dessert is already baked, drain excess liquid carefully and thicken it with a slurry of cornstarch and water, then redistribute over the crisp.
How can I make this recipe gluten-free?
Substitute all-purpose flour with certified gluten-free flour blends in both the filling and topping components. Use certified gluten-free rolled oats and ensure all other ingredients carry appropriate certifications. The texture and baking behavior may require minor adjustments to timing and temperature.
Is it better served warm or cold?
Personal preference determines the ideal serving temperature. Warm crisps highlight the fruit’s natural sweetness and spice warmth, with a softer topping that contrasts with still-firm fruit. Cold crisps offer denser texture, more pronounced crunch, and work well for next-day serving or when preparing several hours ahead.
References
- Culinary Institute of America — The Culinary Institute of America. 2023. https://www.ciachef.edu/
- USDA FoodData Central: Apple, raw — U.S. Department of Agriculture. 2024. https://fdc.nal.usda.gov/
- The Science of Cooking — McGee, Harold. Food and Cooking: Science and Lore of the Kitchen. Scribner, 2004. Academic Foundation.
- Baking Fundamentals — America’s Test Kitchen Foundation. 2023. https://www.americastestkitchen.com/
- Food Safety Guidelines for Storage — U.S. Food and Drug Administration. 2024. https://www.fda.gov/food