When it comes to creating an impressive centerpiece for holiday gatherings or special family dinners, few dishes deliver the combination of visual appeal and sophisticated flavor quite like a well-prepared pineapple-glazed ham. This classic preparation brings together savory and sweet elements in a harmonious blend that appeals to diverse palates. Whether you’re hosting Thanksgiving dinner, Christmas celebrations, Easter brunch, or any formal gathering, understanding the fundamentals of ham preparation and glazing techniques ensures success every time you step into the kitchen.
Understanding Your Ham Selection
Choosing the right ham is the foundation of this dish. The most commonly available options at grocery stores include spiral-cut hams and bone-in varieties, both of which work excellently with pineapple glazing. Spiral-cut hams offer convenience since they arrive pre-sliced, making serving effortless and presentation elegant. These typically weigh between 8 to 10 pounds and serve 12 to 16 people comfortably. Bone-in hams provide a more traditional presentation and are often considered by some cooks to offer superior flavor due to the bone marrow contribution during cooking. The choice between boneless and bone-in primarily depends on your serving needs and personal preference, though both deliver outstanding results when properly glazed and baked.
Pre-cooked hams, which constitute the vast majority of retail ham sales, require only gentle reheating rather than full cooking. This distinction matters significantly when calculating oven time and temperature. Always verify whether your ham is fully cooked or requires cooking by reading the packaging label carefully.
Essential Ingredients for the Perfect Glaze
Creating a memorable pineapple glaze involves balancing several flavor components that work in concert. The foundation typically includes:
- Pineapple juice from canned pineapple rings serves as the primary liquid element, providing both natural sweetness and acidity that prevents the glaze from becoming cloying
- Brown sugar contributes molasses notes and creates the caramelized exterior that makes glazed ham so visually stunning
- Honey adds depth, natural sweetness, and a glossy finish that amplifies the attractive appearance
- Butter enriches the glaze, helping it adhere to the ham surface and creating a luxurious mouthfeel
- Dijon mustard introduces subtle tanginess and complexity that balances sweetness
- Warm spices including cinnamon, nutmeg, allspice, and ginger create aromatic warmth and complement pineapple’s tropical character
- Worcestershire sauce adds umami depth and savory undertones
The precise proportions allow customization based on your sweetness preference. Those preferring a more pronounced sweet flavor can increase brown sugar quantities, while those favoring balance can emphasize the mustard and Worcestershire components.
Preparation and Setup
Proper preparation determines whether your ham emerges from the oven tender and succulent or dry and disappointing. Begin by completely thawing your ham overnight in the refrigerator if frozen. This gradual thawing ensures even heating throughout the entire piece.
Position your oven rack in the lower-middle section and preheat to 325°F, a temperature that gently reheats pre-cooked ham without scorching the exterior. This moderate temperature allows the glaze to caramelize gradually, developing complex flavors without burning.
Select a large roasting pan with substantial sides—at least 3 inches high—since the ham releases considerable liquid during cooking that would spill over in shallow pans. Place the ham cut-side down in the pan and add approximately 1 cup of water to the bottom. This moisture maintains humidity in the oven, preventing the ham from drying out during the extended cooking time.
Glazing Technique and Application
While the ham begins its initial heating phase covered with foil, prepare your glaze by combining all ingredients in a saucepan. Bring the mixture to a gentle boil, then reduce heat to medium-low, stirring occasionally. Allow the glaze to simmer until it thickens slightly, typically 5 to 10 minutes. If the glaze becomes too thick, thin it with additional pineapple juice. The consistency should coat a spoon but still pour smoothly.
Allow the ham to bake covered for approximately 1 hour before beginning the glazing process. This initial period brings the internal temperature up sufficiently for proper glaze adherence. Remove the foil carefully to avoid steam burns and begin basting with your prepared glaze.
Apply glaze every 20 to 30 minutes throughout the remaining cooking time, using a pastry brush to coat the exposed surfaces evenly. This repetitive application builds layers of flavor and creates the signature shiny, caramelized appearance. After each basting, replace the foil loosely to prevent excessive browning while allowing some air circulation for glaze setting.
Temperature Monitoring and Timing
| Ham Weight | Total Cooking Time | Target Internal Temperature | Basting Frequency |
|---|---|---|---|
| 8-9 pounds | 2.5 to 3 hours | 140°F to 145°F | Every 20-30 minutes |
| 10-12 pounds | 3 to 3.5 hours | 140°F to 145°F | Every 20-30 minutes |
| Over 12 pounds | 3.5 to 4 hours | 140°F to 145°F | Every 20-30 minutes |
Use an instant-read meat thermometer to verify doneness by inserting it into the thickest part of the ham, avoiding contact with bone if applicable. Pre-cooked hams need only reach 140°F to be safely served, though many cooks prefer 145°F for optimal warming throughout. This conservative approach ensures that every portion reaches proper serving temperature without overcooking the outer edges.
Decorative Pineapple and Cherry Arrangement
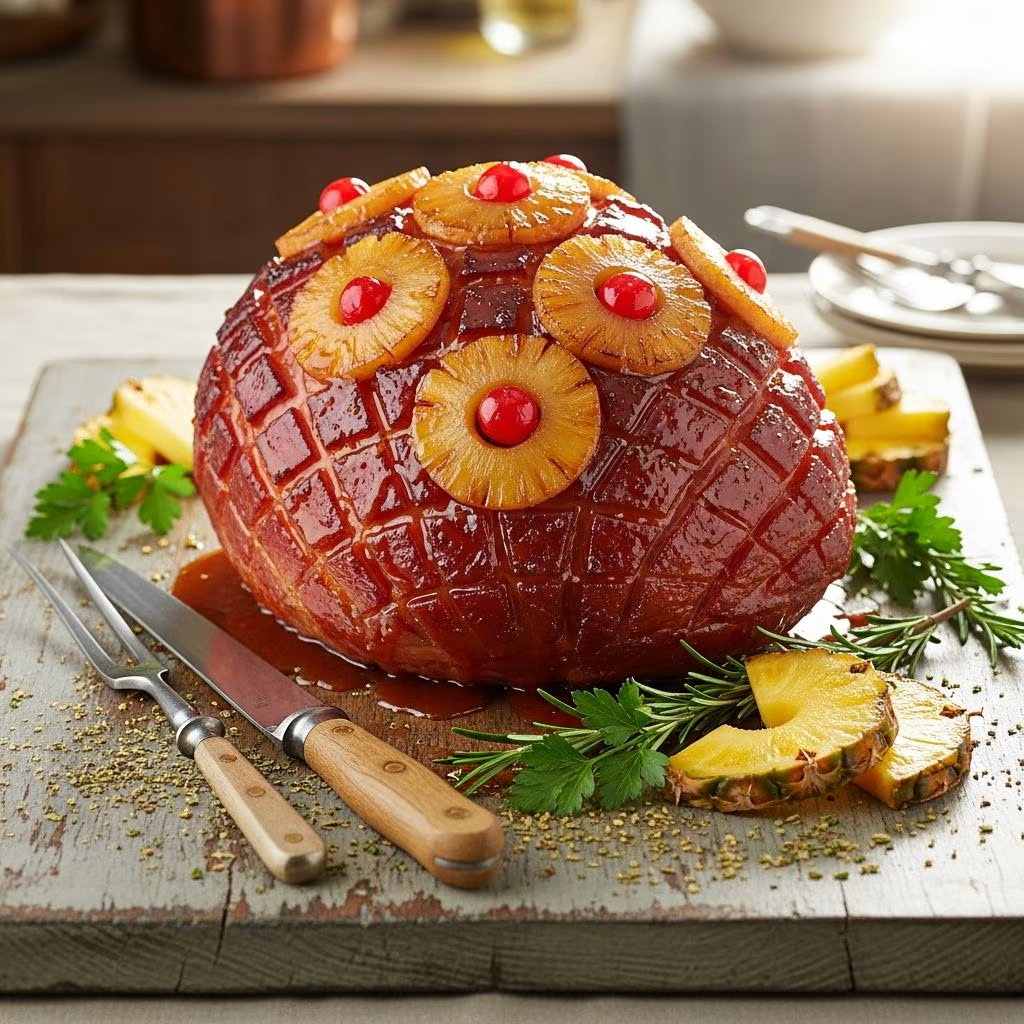
Beyond flavor, presentation distinguishes an ordinary ham from a showstopper. During the final stages of cooking, arrange canned pineapple rings across the ham surface, securing each with a maraschino cherry in the center held in place with toothpicks. This arrangement adds visual interest and ensures portions receive fruit garnish during serving.
Some cooks prefer studding the ham with whole cloves before applying pineapple rings, creating additional aromatic complexity. Space cloves approximately 2 inches apart across the surface. While cloves impart wonderful flavor, remember to remove them before slicing for safer eating, or clearly alert diners to their presence.
Final Cooking and Resting
During the final 15 to 20 minutes of cooking, if you’ve covered the ham throughout, remove the foil to allow direct heat exposure. This allows the glaze to set and develop additional caramelization. Some cooks prefer finishing under the broiler for 2 to 3 minutes, watching carefully to prevent burning while achieving a burnished, professional appearance.
Once the internal temperature reaches 140°F, remove the ham from the oven and allow it to rest for 5 to 10 minutes before carving. This resting period allows juices to redistribute throughout the meat, resulting in moister slices and more flavorful portions.
Carving and Serving
For spiral-cut hams, slicing is straightforward—simply separate individual slices that were already partially separated by the butcher. For bone-in or boneless non-spiral hams, slice against the grain using a sharp carving knife, creating uniform slices approximately ¼ inch thick. Arrange slices on a serving platter and drizzle with reserved pan juices combined with any remaining glaze.
Serve the ham garnished with the cooked pineapple rings and cherries, or reserve these as a side accompaniment. Pan juices make an excellent finishing element, adding glossy appearance and extra flavor to individual portions.
Storage and Make-Ahead Strategies
Leftover glazed ham stores well refrigerated in an airtight container for up to 5 days, making it ideal for holiday meals where advance preparation reduces day-of stress. Sliced ham can be frozen for up to 2 months when wrapped tightly in plastic wrap and placed in freezer-safe containers. The glaze can be prepared up to 2 days in advance and refrigerated, then gently reheated before application to the ham.
Troubleshooting Common Issues
- Dry ham: Ensure adequate moisture in the roasting pan and cover the ham for the majority of cooking time. Don’t exceed the recommended internal temperature.
- Glaze that doesn’t stick: Verify the ham surface is mostly dry before initial glaze application. Pat with paper towels if necessary and ensure glaze is thick enough to coat.
- Burned exterior: Lower the oven temperature by 25°F and cover more of the cooking time with foil. Avoid broiling in final stages if browning too rapidly.
- Overly sweet flavor: Increase mustard and Worcestershire sauce quantities in future preparations, or reduce brown sugar while maintaining other components.
Flavor Variations and Adaptations
While traditional pineapple glazing is exceptional, creative variations can personalize this dish. Substituting maple syrup for a portion of brown sugar introduces subtle smoky sweetness. Adding chipotle powder or sauce creates a sweet-spicy profile that appeals to those enjoying heat. Ginger ale can replace a portion of pineapple juice for lighter, more effervescent character. Fresh pineapple chunks scattered over the glaze during final cooking add textural variety beyond traditional rings.
Complementary Side Dishes
Glazed ham pairs beautifully with a variety of sides that either complement or contrast its sweetness. Roasted root vegetables provide earthiness and textural contrast. Tangy salads with vinaigrette dressing balance the richness. Creamy potato preparations offer comfort and substance. Steamed or roasted green vegetables introduce color and freshness to the plate.
Frequently Asked Questions
- Can I prepare this ham the day before serving?
- Yes. You can glaze and cook the ham the day before, then refrigerate it. Slice it cold or reheat gently at 325°F for 20-30 minutes before serving.
- What if my ham is smaller than 8 pounds?
- Reduce cooking time proportionally. Calculate approximately 10-12 minutes per pound for pre-cooked ham at 325°F, always verifying internal temperature rather than relying solely on timing.
- Can I use fresh pineapple instead of canned?
- Fresh pineapple juice works well, but canned pineapple in juice is more convenient and provides consistent sweetness. Fresh pineapple rings are superior for garnishing due to their appearance and can be added during the final cooking stages.
- Is a bone-in ham better than boneless?
- Both deliver excellent results. Bone-in hams may offer slightly deeper flavor, while boneless options are easier to carve and serve. Choose based on personal preference and presentation goals.
- How much ham should I plan per person?
- Plan for ½ to ¾ pound per person for bone-in ham and approximately ⅓ pound per person for boneless ham, accounting for the removed bone weight.
References
- Pineapple Baked Ham (Juicy and NOT dry!) — Joyous Apron. Accessed April 2026. https://www.joyousapron.com/pineapple-baked-ham/
- Pineapple-Glazed Ham — Goya Foods. Accessed April 2026. https://www.goya.com/en/recipes/pineapple-glazed-ham/
- Brown Sugar Pineapple Ham with Cherries — Savory Experiments. Accessed April 2026. https://www.savoryexperiments.com/pineapple-ham-recipe/
- Easy Brown Sugar Pineapple Ham in Oven — Blogghetti. Accessed April 2026. https://blogghetti.com/easy-brown-sugar-pineapple-ham-in-oven/
- Easy Pineapple Glazed Ham Recipe — My Dominican Kitchen. Accessed April 2026. https://mydominicankitchen.com/pineapple-chipotle-glazed-ham/