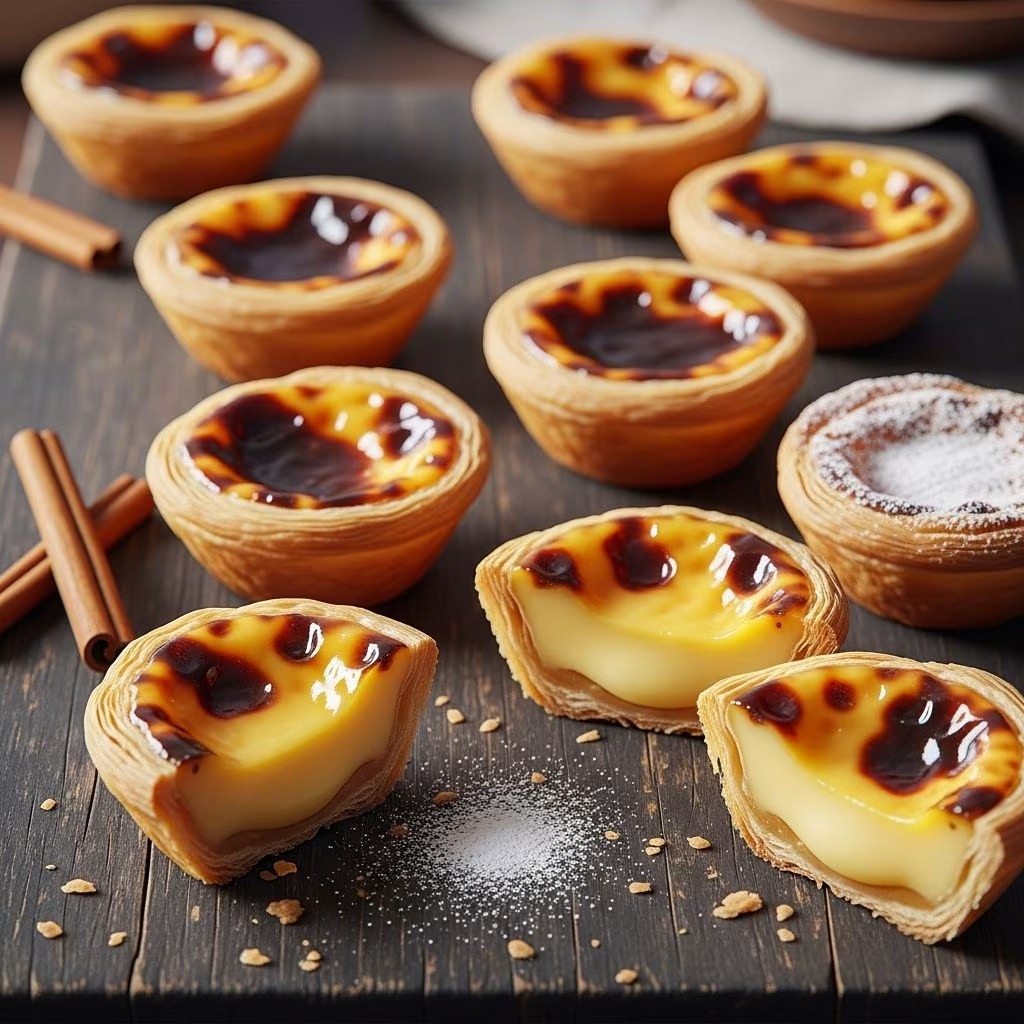
These delightful treats combine a shatteringly crisp pastry shell with a creamy, lightly caramelized custard filling, making them one of Portugal’s most beloved exports. Originating from Lisbon, Pastéis de Nata have captivated palates worldwide with their simple yet exquisite balance of textures and flavors.
The Allure of Pastéis de Nata
Pastéis de Nata, often simply called Portuguese custard tarts, feature a delicate puff pastry cup filled with a rich egg custard that bubbles and browns dramatically in a very hot oven. The contrast between the flaky, buttery exterior and the silky, slightly scorched interior creates an irresistible dessert that’s enjoyed warm or at room temperature.
- Signature look: Blistered, caramelized tops with frilled pastry edges.
- Flavor profile: Sweet vanilla custard hints of cinnamon and citrus.
- Versatility: Perfect for afternoon tea, holidays, or casual gatherings.
Historical Roots in Portugal
The story of Pastéis de Nata traces back to the 19th century at the Jerónimos Monastery in Belém, Lisbon. Monks used egg yolks for starch whitening, repurposing whites for confections and yolks for these tarts. When the monastery closed in 1834, local pastry shops continued the tradition, with Pastéis de Belém becoming the gold standard.
Today, millions are produced annually, protected by trade secrets while home cooks adapt recipes using accessible ingredients.
Essential Ingredients Breakdown
Authentic recipes rely on high-quality staples. Here’s a comparison of common components across traditional methods:
| Component | Traditional Amount | Role | Substitution Notes |
|---|---|---|---|
| All-purpose flour (for dough) | 2 cups (272g) | Base for layered pastry | Gluten-free blends work with adjustments |
| Unsalted butter | 1 cup (227g), room temp | Creates flaky layers | European-style for higher fat content |
| Whole milk | 1-1.25 cups | Custard base | Combine with cream for richness |
| Granulated sugar | 1.33 cups (264g) | Sweetens syrup | Avoid brown sugar to prevent color change |
| Egg yolks | 2-6 (varies) | Thickens custard | Whole eggs for lighter versions |
| Cinnamon stick & lemon zest | 1 each | Infuses aroma | Remove before straining |
Step-by-Step Guide to Perfect Pastry Dough
Creating the signature flaky shell starts with a simple dough that’s repeatedly folded with butter, mimicking professional lamination without machinery.
Mix the base: Combine flour, salt, and water in a stand mixer with a dough hook until a soft, pillowy ball forms that pulls away from the bowl sides. This takes about 30 seconds.
Rest and shape: Pat into a 6-inch square on a floured surface, cover, and rest 15 minutes to relax gluten.
Layer butter: Roll dough into a 10×14-inch rectangle. Spread softened butter over two-thirds, fold like a letter, and chill 30 minutes.
Repeat folds: Roll and fold twice more, chilling between each for 30 minutes. Final dough should have visible layers.
Roll into log: Roll to 17×21 inches, roll tightly from short end into a log, wrap, and chill 2 hours or overnight.
Cut the log into 12 equal pieces, each about 1.5 inches thick, for standard muffin tins.
Craft the Signature Custard Filling
The custard is a symphony of syrup and thickened milk, cooked gently to avoid curdling.
Prepare syrup: In a saucepan, combine sugar, water, cinnamon stick, and lemon zest. Heat to 220°F (104°C) without stirring, then cool 15 minutes. This creates a clear, aromatic base.
Thicken milk base: Whisk flour with 1/4 cup cold milk until smooth. Heat remaining milk to a simmer, temper into flour mixture, then cook over medium-low, whisking until steaming and coating the pan.
Combine: Slowly whisk cooled syrup into hot milk mixture off heat. Add egg yolks one at a time, then vanilla. Strain to remove lumps and spices.
Cool slightly: Cover surface with plastic to prevent skinning, cool 15-30 minutes before filling.
Patience with low heat ensures a smooth, pourable custard that sets perfectly in the oven.
Assembly Techniques for Pro Results
Speed is crucial during assembly to prevent soggy pastry.
- Prep tins: Grease muffin pans generously.
- Shape shells: Place a dough disc in each cup, press firmly up sides and into corners for even walls. Aim for thin bases and tall sides.
- Fill precisely: Spoon or pipe custard to 3/4 full, leaving 1/4-inch headspace for rising.
- Immediate bake: Preheat oven fully before filling.
High-Heat Baking Mastery
A screaming-hot oven (475-550°F / 245-290°C) is non-negotiable for the characteristic blistering.
- Position rack in upper third for intense top heat.
- Bake 10-17 minutes until pastry is golden-frilled and custard bubbles darkly. Rotate halfway if needed.
- Cool in tins 5 minutes, then on racks. Dust with powdered sugar and cinnamon.
Variations: Use store-bought puff pastry sheets for quicker prep, cut into rounds.
Troubleshooting Common Pitfalls
| Issue | Cause | Solution |
|---|---|---|
| Soggy bottoms | Custard too hot or slow assembly | Cool custard to lukewarm, work fast |
| Cracked pastry | Dough overworked | Rest adequately between folds |
| Pale tops | Oven not hot enough | Broil 1-2 minutes at end, watch closely |
| Lumpy custard | High heat or poor straining | Gentle whisking, double-strain |
| Weeping filling | Undercooked | Extend bake time until blistered |
Make-Ahead and Storage Tips
Plan ahead for best results:
- Dough: Prepare up to 3 days ahead, freeze log up to 1 month.
- Custard: Refrigerate up to 2 days, stir before use.
- Baked tarts: Best day-of, but store airtight at room temp 1 day or freeze 1 month. Reheat at 350°F for crispness.
Flavor Variations and Twists
While traditionalists stick to the classic, creative bakers experiment:
- Chocolate: Add 2 tbsp cocoa to syrup.
- Citrus boost: Orange zest instead of lemon.
- Spiced: Cardamom or nutmeg in custard.
- Gluten-free: Specialized flour blends yield comparable flakiness.
- Mini version: Use mini tins for bite-sized treats, bake 8-10 minutes.
Nutrition and Pairing Suggestions
Each tart (standard size) offers about 350 calories, rich in calcium from milk and yolks. Pair with strong espresso or port wine for authentic enjoyment. Serve warm for peak texture.
Frequently Asked Questions
Can I use puff pastry instead of homemade dough?
Yes, frozen puff pastry shells or sheets simplify the process while delivering excellent flakiness. Cut 3.5-inch rounds and press into tins.
Why is my custard not browning?
The oven must reach 500°F+ for Maillard reaction. Convection helps; broil if needed, but monitor to avoid burning.
How do I achieve the professional spiral pastry?
Roll the laminated log tightly before slicing. Press firmly into tins, rotating for even distribution.
Are these tarts freezer-friendly?
Fully baked tarts freeze well up to 1 month. Thaw at room temp and reheat briefly for freshness.
What’s the difference between Pastel de Nata and Pastéis de Nata?
Pastel is singular; Pastéis plural. Both refer to the same iconic tart.
References
- Portuguese Custard Tarts (Pasteis de Nata) — The Woks of Life. 2023-05-15. https://thewoksoflife.com/portuguese-custard-tarts-pasteis-de-nata/
- Portuguese Custard Tarts — Taste of Artisan. 2022-11-10. https://tasteofartisan.com/portuguese-custard-tarts/
- Portuguese Custard Tarts (Pastéis de Nata) — Bigger Bolder Baking. 2024-01-20. https://www.biggerbolderbaking.com/portuguese-custard-tarts-pastel-de-nata/
- Anna Olson Makes Portuguese Custard Tarts! | Food Travel Diaries — YouTube (Food Network Canada). 2023-08-05. https://www.youtube.com/watch?v=vSccM-sZY24
- Pastel de Nata – Famous Portuguese Custard Tarts — Fed by Sab. 2023-02-14. https://fedbysab.com/pastel-de-nata/
- Pastal de Nata ~ Portuguese Custard Tarts — Leite’s Culinaria. 2021-06-12. https://leitesculinaria.com/7759/recipes-pasteis-de-nata.html