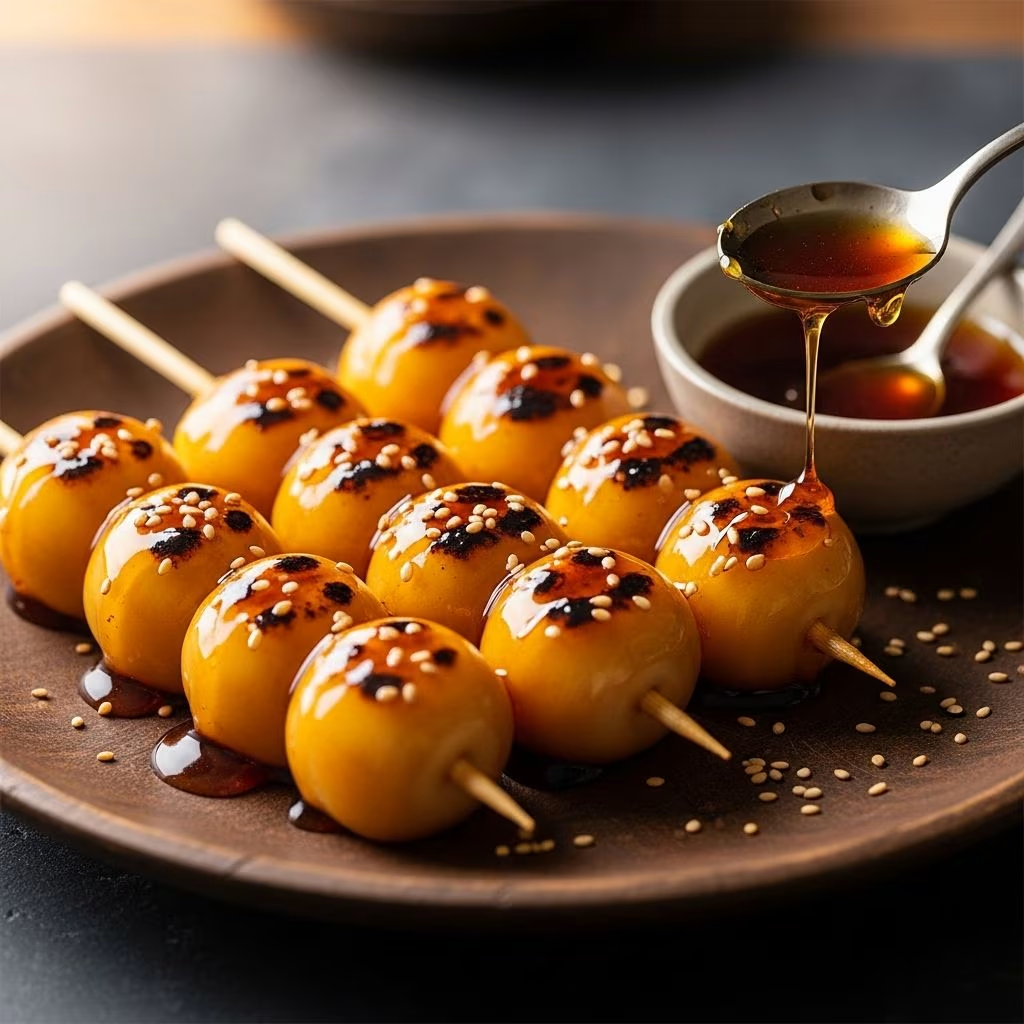
Japan’s street food scene thrives on simple yet irresistible snacks, and **mitarashi dango** stands out as a timeless favorite. These glossy, skewered rice dumplings, brushed with a rich sweet-soy glaze, evoke memories of bustling festivals and temple visits. Originating from the Edo period, mitarashi dango transformed humble rice flour into a chewy delight that pairs perfectly with its savory-sweet coating. This guide dives deep into recreating this treat at home, from selecting the right ingredients to achieving that professional shine and bounce.
The Allure of Mitarashi Dango in Japanese Culture
Mitarashi dango isn’t just food; it’s a cultural staple. Named after the mitarashi ponds at temples—symbolizing purification—these dumplings represent balance between earthiness and sweetness. Vendors thread five or so balls per skewer, grill them lightly for a charred edge, and dunk them in a thickened soy glaze. The result? A snack that’s chewy inside, crisp outside, and irresistibly sticky.
Today, you’ll find them year-round at convenience stores and markets, but homemade versions shine brighter. Using **shiratamako** flour yields the signature mochi-like texture that’s soft yet springy, far superior to regular rice flour mixes. This flour, made from finely milled glutinous rice, absorbs water evenly for consistent results.
Essential Ingredients for Authentic Results
Success starts with quality components. Here’s what you need for about 16 dumplings (4 skewers):
- Shiratamako flour: 90 grams – The star for that perfect chew. It’s wet-milled glutinous rice flour, unlike dry joshinko.
- Water: ¼ cup + ½ tablespoon – Adjust for humidity; aim for earlobe-like softness.
- Salt: ¼ teaspoon – Enhances flavor subtly.
- Bamboo skewers: 4-5 inch lengths, soaked to prevent burning.
For the **glaze** (enough for 4 skewers):
- Water: ¼ cup
- Mirin: 2 tablespoons – Adds mellow sweetness.
- Rice syrup (or honey/corn syrup): 1 tablespoon – For glossy shine via invert sugars.
- Brown sugar (kokutou, Demerara, or muscovado): 1 tablespoon – Earthy depth.
- Soy sauce: 2 teaspoons – Preferably dark Japanese style for umami.
- Potato starch (or kudzu): 1 teaspoon – Thickens without gumminess.
These ingredients are accessible online or at Asian markets. Invert sugars like rice syrup prevent crystallization, ensuring a smooth, lip-gloss-like sauce.
Step-by-Step: Crafting the Perfect Dough
Begin with the dough, the foundation of great dango.
- Mix dry ingredients: In a bowl, whisk 90g shiratamako and ¼ tsp salt. This flour’s fine grind hydrates quickly.
- Add water gradually: Pour in ¼ cup + ½ tbsp water. Stir until crumbly—no dry pockets.
- Knead to smoothness: Use hands to form a cohesive mass. It should mimic playdough or your earlobe: soft, smooth, slightly tacky. Too sticky? Add shiratamako 1 tsp at a time. Too dry? Knead in water drops. Knead 2-3 minutes.
Temperature and humidity affect moisture, so test a small piece: it should hold shape without cracking.
Portioning and Shaping Tips
Precision ensures even cooking.
- Weigh portions at 9.5g (⅓ oz) each for 16 balls. Or roll into a 1-inch rope and slice.
- Roll between palms into smooth spheres. Avoid overworking to prevent toughness.
- Thread 4 balls per skewer, leaving space between for even glazing.
Pro tip: Dust hands lightly with shiratamako if sticking occurs.
Cooking Methods: Boil, Grill, and Glaze
Dango requires two-stage cooking: boiling sets the shape, grilling adds char.
Boiling for Structure
- Bring a large pot of water to a rolling boil. Use a wide pot for batches if doubling.
- Gently drop balls in; cook undisturbed 1 minute.
- Stir gently to prevent sticking; simmer until they float (3-4 minutes total).
- Remove with a slotted spoon; cool in ice water 1 minute for firmness, then drain.
This step firms the exterior while keeping insides tender.
Grilling for Flavor
Heat a cast-iron skillet or grill pan over high heat—no oil needed.
- Place skewers in; sear 1-2 minutes per side until golden-brown spots appear.
- Press lightly with a spatula for even contact. Aim for toasty aroma, not burnt.
- Home ovens work too: broil on high, 4 inches from heat, 2 minutes per side.
Grilling caramelizes surfaces, enhancing the glaze’s adhesion.
Preparing the Signature Mitarashi Sauce
The glaze defines mitarashi dango—thick, shiny, and balanced.
- In a small pan, whisk ¼ cup water, 2 tbsp mirin, 1 tbsp rice syrup, 1 tbsp brown sugar, 2 tsp soy sauce, and 1 tsp potato starch until smooth.
- Heat over medium, stirring constantly. Simmer until thickened (2-3 minutes)—it should coat a spoon thickly.
- Remove from heat; it firms as it cools.
Potato starch or kudzu creates a translucent gel that stays silky, unlike cornstarch’s gumminess. For shine, the invert sugar blend is key.
Assembly and Serving
While sauce cools slightly (still pourable), brush or dip grilled skewers generously. For extra gloss, double-dip after a quick re-grill. Serve warm; pairs with green tea.
Yield: 4 skewers. Prep time: 20 min. Cook time: 15 min.
Ingredient Substitutions and Variations
| Ingredient | Substitution | Notes |
|---|---|---|
| Shiratamako | 50/50 joshinko + glutinous flour | Less chewy; approximate only. |
| Rice syrup | Honey or corn syrup | Maintains shine; adjust sweetness. |
| Brown sugar | Dark brown sugar | Any fine-ground works for earthiness. |
| Potato starch | Kudzu root starch | Both yield non-gummy thickness. |
| Soy sauce | Tamari (gluten-free) | Keeps umami intact. |
Variations: Add matcha powder to dough for green tea dango, or sesame seeds atop glaze.
Troubleshooting Common Issues
- Dough too sticky: Knead in more shiratamako; flour absorbs ambient moisture.
- Dumplings disintegrate in boil: Ensure even hydration; boil gently.
- Sauce not thickening: Starch wasn’t fully dissolved; whisk vigorously.
- Lack of shine: Use more invert sugar; avoid overcooking.
- Too tough: Over-kneaded or under-boiled; refine next batch.
Practice yields perfection—texture like fresh mochi is the goal.
Storage and Make-Ahead Strategies
Fresh is best, but:
- Uncooked dough: Wrap airtight; refrigerate 1 day.
- Boiled dango: Cool, store in airtight container; fridge 2 days. Reheat by grilling.
- Glaze: Refrigerate 1 week; reheat gently.
- Frozen: Boil-ready balls freeze 1 month; thaw before boiling.
Avoid microwaving assembled dango—it soggies the texture.
Health Notes and Nutritional Snapshot
Per skewer (4 balls + glaze): ~200 calories, mostly from rice carbs. Glutinous rice provides quick energy; glaze adds sugars. Naturally gluten-free with tamari. Moderate for snacks; pair with protein.
Frequently Asked Questions (FAQs)
What makes shiratamako special for dango?
Its wet-milled nature creates a hydrated, springy dough impossible with dry flours.
Can I bake instead of grill?
Yes, 400°F convection for 10 minutes, flipping halfway. Less char, but viable.
Is mitarashi dango vegan?
Yes, with plant-based mirin and no honey.
How many dumplings per skewer traditionally?
Usually 4-5, mimicking shrine torii gates.
Why potato starch over cornstarch?
It forms a clearer, less gummy gel, especially after chilling.
Pairing Ideas and Serving Occasions
Enjoy at cherry blossom picnics, tea ceremonies, or as dessert. Pair with sencha or hojicha. For parties, make mini skewers (2 balls each).
Scaling up? Double ingredients but boil in batches to avoid crowding.
References
- Mitarashi Dango (Sweet Soy Glazed Rice Dumplings) — No Recipes. Accessed 2026. https://norecipes.com/mitarashi-dango/