The timeless appeal of lemon meringue pie has captivated dessert enthusiasts for generations. Its bright citrus notes combined with fluffy meringue and buttery crust create an irresistible combination that feels both indulgent and refreshing. However, the traditional approach to creating this beloved dessert demands considerable time, skill with pastry dough, and careful technique to prevent common pitfalls like soggy crusts or weeping meringue. For contemporary home cooks seeking to deliver restaurant-quality desserts without the extensive preparation and cleanup, reimagining this classic in individual glass servings offers an elegant solution that maintains all the flavors you love while dramatically simplifying the execution.
Why Glass Servings Transform Your Dessert Experience
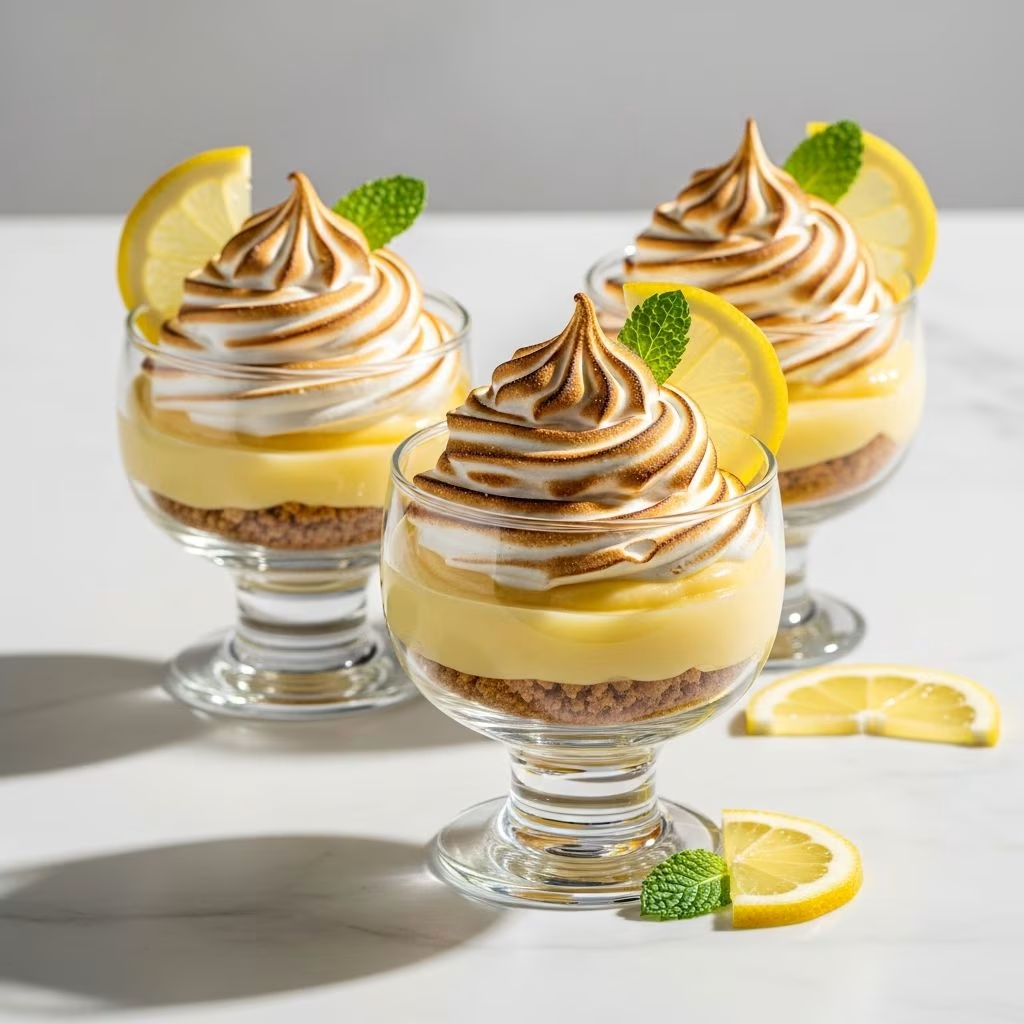
Presenting lemon meringue in individual glasses revolutionizes both the preparation process and the dining experience. The transparent nature of glassware showcases the beautiful layering of components, allowing diners to see the distinct elements that compose their dessert. This visual presentation elevates the perceived sophistication of your offering, making even casual gatherings feel like refined culinary experiences. Beyond aesthetics, glassware-based desserts eliminate the structural constraints of traditional pie construction, where crust integrity and filling stability determine success. Instead, each layer stands independently yet harmoniously, forgiving minor imperfections while maintaining impressive presentation.
Understanding Your Foundation: The Crust Layer
The base of your glass dessert requires a crust component that provides textural contrast without demanding elaborate preparation. Rather than rolling and fitting pastry dough into glass vessels, most approaches employ pre-made cookie or cracker crumbs combined with melted butter. This method offers multiple advantages: it requires no special equipment, bakes reliably, and adapts easily to different flavor profiles. Common choices include traditional graham crackers, which provide gentle sweetness and familiar flavor, or gingersnap cookies, which introduce warm spice notes that complement lemon’s brightness.
To prepare your crust base, combine your chosen crumb with melted butter in proportions that create a mixture resembling wet sand—typically one part butter to four or five parts crumbs by volume. The exact ratio depends on your crumb’s moisture content and desired density. Some recipes incorporate a small amount of sugar to enhance sweetness, though cookies and crackers often provide sufficient sugar already. Divide this mixture evenly among your glasses, pressing gently against the bottom and slightly up the sides to create a firm, even layer approximately one-quarter inch thick. This moderate density prevents the crust from becoming either crumbly and unstable or dense and heavy. Allow this foundation to set briefly before adding subsequent layers, which prevents mixing and ensures clean visual separation.
Creating Vibrant Lemon Filling: Two Primary Approaches
The lemon filling represents the heart of your dessert, delivering the citrus-forward flavor that defines the entire experience. Two distinct methodologies produce excellent results, each offering different advantages in terms of texture, flavor intensity, and preparation time.
The Condensed Milk Method
This streamlined approach combines sweetened condensed milk with egg yolks and fresh lemon juice, creating a silky filling that requires no stovetop cooking. Sweetened condensed milk serves as both sweetener and stabilizer, containing milk solids that contribute body and richness while natural proteins help set the mixture as it chills. Simply whisk together three egg yolks, one fourteen-ounce can of sweetened condensed milk, and one-half cup of fresh lemon juice until thoroughly combined. Adding the zest of one fresh lemon introduces pronounced citrus aromatics and visual interest through flecks of lemon oil distributed throughout the filling. This mixture is ready to portion immediately—no cooking required—making this approach ideal for time-constrained preparations or when you prefer minimizing food safety considerations around uncooked eggs. The filling will thicken as it chills during the subsequent baking of meringue and during final refrigeration.
The Cooked Curd Method
Traditional lemon curd involves gently cooking egg yolks with sugar, lemon juice, and butter until the mixture reaches sufficient temperature to safely consume while developing rich, complex flavor. Begin by placing egg yolks, sugar, and fresh lemon juice in a heatproof bowl positioned over simmering water, creating a double boiler environment that provides gentle, even heat. Constantly whisk this mixture as it slowly warms, watching carefully for the moment when it transitions from liquid to custard-like consistency—typically requiring eight to twelve minutes depending on your heat level and bowl size. A candy thermometer proves invaluable here, indicating when the mixture reaches 160 degrees Fahrenheit, a temperature that safely pasteurizes eggs while preventing overcooked scrambling. Once thickened appropriately, strain the mixture through fine mesh to eliminate any coagulated egg solids, then whisk in room-temperature butter and lemon zest. This technique produces a more luxurious texture with deeper lemon flavor and superior shelf stability compared to the condensed milk method. The additional cooking step requires more attention but rewards that effort with noticeably superior results.
Layering Your Components for Visual Appeal
Strategic layering transforms your glass desserts from merely functional to visually stunning. After your crust has set, portion your prepared lemon filling carefully into each glass, leaving adequate space at the top for meringue—typically three-quarters to one inch depending on your glass size and how dramatically you wish to crown your creation. Some recipes employ pastry bags with round tips to pipe filling with precision, which maintains clean glass sides and creates professional appearance. Others use simple spoons to portion filling more casually. The choice depends on your comfort level and desired aesthetic. A helpful technique involves using a small funnel to direct fillings down the glass interior, preventing drips and splatters that compromise presentation. If gaps remain between filling and glass sides after initial portioning, gently tap each glass against a work surface to encourage settling and redistribution. This step prevents meringue from directly contacting glass walls, which could cause moisture problems and visual separation.
Mastering Meringue: The Crowning Element
Meringue represents the final layer and most technically demanding component of your dessert. Creating stable meringue begins with room-temperature egg whites—cold whites incorporate air more slowly and produce less stable foam. Using completely clean, grease-free equipment proves essential, as even microscopic lipid residue prevents proper foam formation. Start beating egg whites at medium speed, continuing until they become foamy and opaque. At this point, add cream of tartar (approximately one-eighth teaspoon per egg white), which stabilizes the foam by lowering pH and strengthening protein networks. Gradually introduce sugar—typically three tablespoons per egg white—while maintaining constant beating. The incorporation of sugar occurs gradually to allow each granule to fully dissolve, creating silky texture rather than gritty consistency. Continue beating until stiff peaks form, indicated by peaks that stand upright when you lift your beaters from the mixture. This stage typically requires six to eight minutes of total beating time, though exact duration depends on your mixer’s power and ambient temperature.
Transfer your meringue to a piping bag fitted with a large star tip, which creates attractive ridges and peaks as you pipe. Working systematically, pipe meringue onto each glass, starting from the center and spiraling outward and upward to create dramatic peaks and valleys. Some practitioners prefer building multiple layers of piped meringue, creating more pronounced height and more surface area for browning. Others favor a single generous layer. Both approaches succeed—your preference determines the final appearance. Ensure meringue extends to the glass rim and makes contact with the lemon filling to prevent separation during baking.
The Baking and Finishing Process
Bake your prepared glasses at 350 degrees Fahrenheit for eight to ten minutes, watching carefully as meringue transforms from glossy white to golden brown. The meringue’s surface should develop light tan coloring with perhaps slightly deeper brown peaks, indicating proper cooking. Under-baking leaves meringue wet and sticky, while over-baking causes excessive browning and can result in tough texture. This relatively brief baking time ensures your lemon filling stays cool and set while the meringue cooks through without curdling from excessive heat. Some practitioners employ kitchen torches to precisely brown meringue peaks, offering greater control over browning intensity than oven baking alone. This technique works particularly well for garnish purposes, allowing you to add decorative caramelization just before serving.
Storage, Make-Ahead Considerations, and Serving Tips
Individual glass desserts offer remarkable flexibility regarding preparation timing. The crust layer can be prepared a full day in advance, covered and refrigerated without degradation. Similarly, lemon filling holds safely refrigerated for up to two days, allowing you to prepare this component on the day before your gathering. The only component requiring last-minute preparation involves meringue, which should be prepared shortly before baking to maintain optimal foam stability. After baking and browning, your completed desserts benefit from at least two hours of refrigeration before serving, though overnight refrigeration works equally well and may actually improve texture by allowing flavors to meld. Store finished desserts covered with plastic wrap or in sealed containers to prevent meringue from absorbing ambient moisture, which would compromise its texture. Under proper refrigeration, these desserts remain fresh and delicious for up to two days, though meringue gradually softens over time as it naturally absorbs small amounts of atmospheric moisture.
For optimal presentation, retrieve desserts from refrigeration approximately fifteen to twenty minutes before serving, allowing them to transition to pleasant coolness rather than being ice-cold. This temperature adjustment enhances flavor perception and makes the dessert more enjoyable to eat. Consider garnishing each glass with a thin lemon wheel or small lemon wedge perched on top of the meringue, adding visual interest and reinforcing the dessert’s citrus theme. Fresh mint leaves or a light dusting of lemon zest also provide beautiful finishing touches that signal careful, thoughtful preparation.
Adapting and Personalizing Your Creation
The basic framework of lemon meringue in glasses welcomes numerous creative variations. Consider experimenting with alternative cookies or crackers for your crust layer—digestive biscuits provide buttery complexity, while almond biscotti contribute subtle nuttiness. Your lemon filling can incorporate additional aromatics such as vanilla extract or cardamom, which add depth without overshadowing lemon’s brightness. Some practitioners add a tablespoon of limoncello or other lemon liqueur to their filling, introducing subtle sophistication and complexity. The meringue itself adapts well to stabilization techniques, such as incorporating a tablespoon of cornstarch per egg white, which produces meringue that maintains superior texture and moisture resistance over extended periods—particularly valuable if you need to prepare these desserts several hours before serving.
Frequently Asked Questions
Can I prepare these desserts entirely in advance?
You can prepare the crust and filling in advance, but meringue should be prepared and baked within a few hours of serving for optimal texture. Meringue gradually absorbs moisture from the air, becoming softer and less structurally impressive over time.
What if I’m concerned about consuming raw or undercooked eggs?
Using the cooked curd method ensures eggs reach safe temperatures. Alternatively, consider using pasteurized eggs available at most supermarkets, or use heat-stabilized meringue recipes that incorporate cornstarch or other stabilizers.
Can I use store-bought lemon curd instead of making my own?
Absolutely. High-quality purchased lemon curd produces excellent results and saves considerable time. Simply layer it into your prepared glasses according to your preferred ratio.
What glassware works best for this application?
Any heat-safe glassware with roughly two-thirds cup capacity works well—wine glasses, parfait glasses, small mason jars, or even clear mugs. Ensure your chosen vessels can withstand oven temperatures if you plan to bake the meringue.
How do I prevent meringue from weeping or separating?
Ensure meringue contacts the filling and glass sides completely, which prevents air gaps and moisture accumulation. Avoid opening your oven during baking, as temperature fluctuations can cause meringue to weep.
Conclusion
Lemon meringue desserts served in glasses represent an elegant resolution to the dilemma of wanting impressive, sophisticated desserts without enduring traditional pie preparation’s demands. By deconstructing the classic into distinct layers, eliminating pastry work, and embracing individual servings, you create an approach that remains approachable for home cooks while delivering results that feel professionally executed. Whether you choose the simplified condensed milk method or embrace traditional curd preparation, whether you ice your meringue peaks with torch-delivered caramelization or opt for gentle oven browning, you’re creating desserts that celebrate lemon meringue’s timeless appeal while embracing contemporary convenience and presentation sensibilities.
References
- Lemon Meringue Pie in a Glass Recipe — Allrecipes. https://www.allrecipes.com/lemon-meringue-pie-in-a-glass-recipe-7500599
- Lemon Meringue Cups with Gingersnap Crust — The Lemon Apron. https://thelemonapron.com/lemon-meringue-cups-with-gingersnap-crust/
- Mini Lemon Meringue Pies — Honest Cooking. https://honestcooking.com/mini-lemon-meringue-pies/
- Mason Jar Lemon Meringue Pies — Let’s Dish Recipes. https://letsdishrecipes.com/mason-jar-lemon-meringue-pies/
- Food Safety Guidelines for Egg Products — United States Department of Agriculture. https://www.usda.gov/