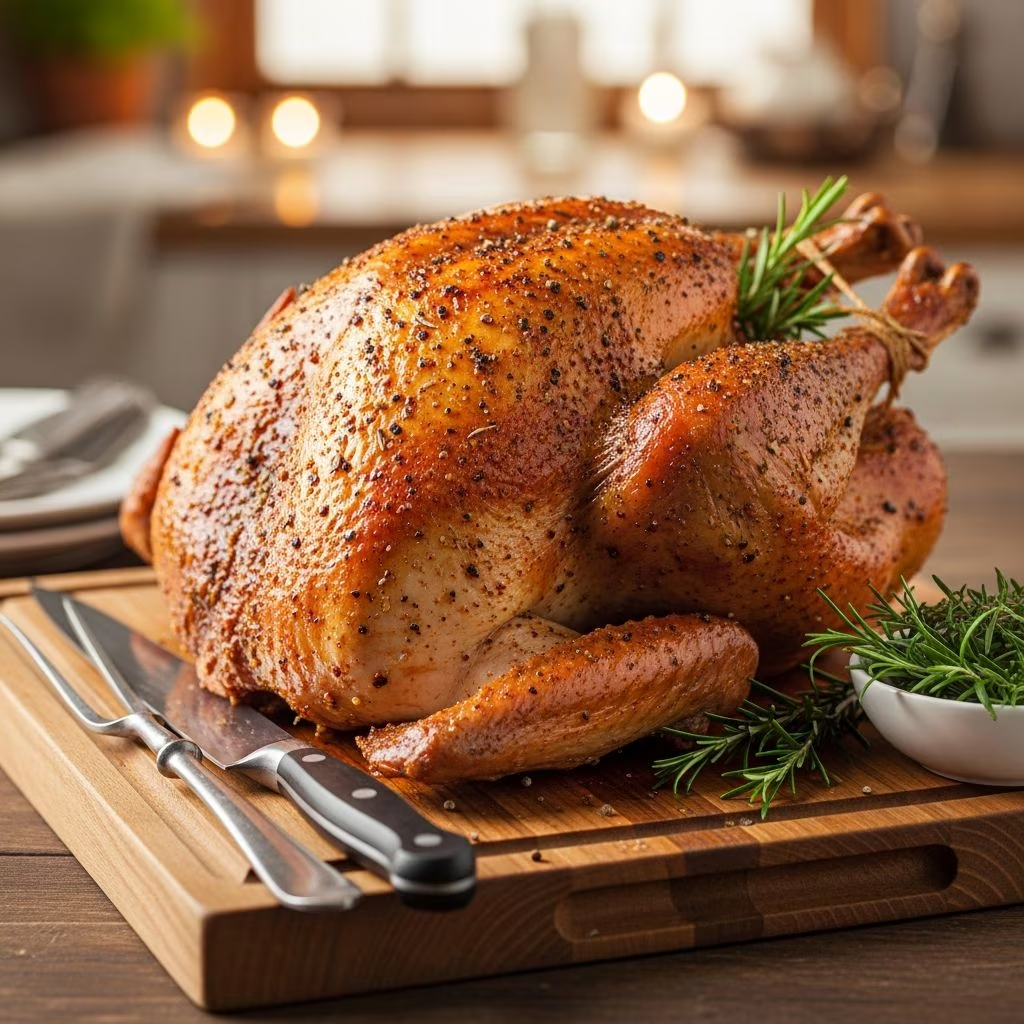
Roasting a turkey that emerges from the oven with mahogany skin, succulent meat, and complex flavor requires precision, patience, and understanding the fundamentals of poultry preparation. The dry-rub method, combined with strategic temperature management and basting techniques, represents one of the most reliable approaches to achieving exceptional results. This comprehensive guide explores the philosophy behind dry-rubbed turkey preparation, the science of flavor development, and practical techniques that transform a traditional holiday bird into a centerpiece worthy of celebration.
Understanding the Dry-Brining Foundation
The cornerstone of outstanding dry-rubbed turkey begins with the dry-brining process, a technique that differs significantly from traditional wet brining methods. Unlike submerging poultry in saltwater solutions, dry-brining involves applying a carefully calibrated mixture of salt, sugar, and seasonings directly to the bird’s surface and interior. This approach initiates a biochemical transformation within the meat that extends well beyond surface-level seasoning.
When salt contacts the turkey’s surface, osmotic pressure gradually draws moisture from the meat’s exterior into the salt, creating a concentrated brine that reabsorbs into the protein structure over 12 to 48 hours. This process denatures muscle proteins, allowing them to retain moisture more effectively during the high-heat roasting phase. Unlike wet brining, which can result in waterlogged skin that refuses to crisp, dry-brining maintains the skin’s surface integrity while ensuring internal moisture retention.
The ideal dry-brine formula combines kosher salt as the primary component—approximately one tablespoon per four pounds of poultry—with light brown sugar that contributes subtle sweetness and aids in Maillard reaction browning. Additional dried herbs, ground spices, and aromatics create layers of flavor that develop and concentrate as the bird rests in the refrigerator.
Crafting Your Custom Spice Blend
The spice component of your dry rub determines the flavor profile of your finished dish. While salt and sugar provide essential chemical reactions, aromatic elements create the sensory experience that distinguishes memorable poultry from ordinary preparations.
- Garlic powder: Provides concentrated umami depth without the moisture of fresh garlic, which could create wet spots that prevent browning
- Dried rosemary: Contributes piney, herbaceous notes that complement poultry’s natural flavors and add Mediterranean character
- Fresh herbs: When finely chopped and incorporated into softened butter, fresh sage, thyme, and rosemary create aromatic butter that flavors the breast meat from beneath the skin
- Black pepper: Adds gentle heat and complexity without overwhelming delicate poultry flavors
- Optional additions: Paprika for subtle smokiness, dried tarragon for French-inspired notes, or fennel seeds for warming spice characteristics
Combining dry ingredients directly in a small bowl and working them together with your fingers ensures even distribution without clumping. This tactile approach allows you to feel the mixture’s texture and confirm that brown sugar particles have been thoroughly incorporated and broken down.
The Application and Refrigeration Phase
Proper application of the dry brine requires methodical attention to ensure seasoning reaches both exterior and interior surfaces. Position your prepared turkey on a wire rack set inside a rimmed baking sheet—this setup prevents pooling of salt at the pan’s bottom and allows air circulation around the bird. The rack elevation also facilitates thorough refrigeration and moisture evaporation, which contributes to superior skin texture during roasting.
Generously sprinkle the dry-brine mixture over the entire exterior surface, using your fingers to press and pat the seasoning into place. Work methodically around the bird, paying particular attention to crevices around the thighs, legs, and wings where seasoning tends to migrate. Carefully loosen the skin covering the breast area and work additional seasoning into these gaps. Tuck some brine inside the cavity and around the leg joints.
Position the seasoned turkey in the refrigerator uncovered for a minimum of 12 hours, though 24 to 48 hours produces optimal results. This extended refrigeration period accomplishes multiple objectives: the dry brine penetrates the meat, surface moisture gradually evaporates creating drier skin conditions, and flavors develop and concentrate throughout the protein structure. The uncovered placement prevents condensation from forming on the skin, which would undermine your browning efforts.
Preparing for Roasting Success
On the day of roasting, remove your brined turkey from the refrigerator and allow it to reach room temperature for 2 to 3 hours before cooking. This extended rest brings the meat to a uniform temperature throughout, ensuring even cooking from center to exterior. Cold poultry requires significantly longer roasting times and produces uneven results, with the exterior over-cooking while interior sections lag behind.
While the bird comes to temperature, prepare your roasting pan. Line a large roasting pan with three layers of heavy-duty aluminum foil, creating a protective barrier that facilitates cleanup while preventing the pan bottom from scorching. Position an oven-safe wire rack inside the prepared pan—the rack elevation ensures air circulation beneath the bird and allows pan drippings to concentrate into flavorful liquid for basting and gravy preparation.
Prepare aromatics by gathering citrus strips, crushed garlic cloves, fresh herb sprigs, and quartered onions and apples. These elements will be inserted into the turkey’s cavity, where they perfume the internal meat and contribute subtle flavoring as their essential oils release during roasting.
Temperature Management and Initial Roasting
Position your oven rack in the middle position and preheat to 450°F. This elevated initial temperature accomplishes crucial objectives during the first phase of roasting. The intense heat rapidly dehydrates the skin’s surface through evaporation, promoting moisture loss that precedes browning. Additionally, the high temperature initiates the Maillard reaction—a complex chemical process where amino acids and reducing sugars interact to create hundreds of new flavor compounds and brown pigmentation.
Before placing the turkey in the oven, loosen the skin covering both breasts and carefully work softened butter underneath, spreading it evenly across the breast meat in a thin layer. This technique, known as butter-under-skin application, flavors the meat directly and provides fat that basts the breast area from within. Smear an additional thin layer of softened butter across the exterior surface, which aids browning and imparts rich flavor.
Tie the turkey’s legs together with kitchen twine, creating a compact presentation that promotes even cooking. Place the prepared bird breast-side up on the rack, pour one cup of water into the pan bottom, and transfer to the preheated 450°F oven. Rotate the roasting pan 180 degrees after 15 minutes—this compensates for hot spots in most home ovens, ensuring even browning around the bird’s circumference.
Continue roasting at this elevated temperature for approximately 25 to 30 minutes total, until the skin achieves light golden-brown coloration. Monitor closely during this phase, as skin color transitions quickly from pale to dark brown.
The Glazing Baste Preparation
While the turkey roasts at high temperature, prepare your glazing baste to infuse the bird with additional flavor during the second roasting phase. Combine softened butter, honey, red wine vinegar, Worcestershire sauce, and finely minced aromatic components in a small saucepan. Fresh rosemary sprigs, crushed garlic cloves, and strips of orange zest contribute vibrant flavors that develop further as the glaze simmers.
Warm this mixture over medium heat, stirring occasionally, until the butter melts completely and the combination begins bubbling gently. Allow it to simmer for approximately 5 to 7 minutes, permitting the vinegar’s sharp acidity to mellow slightly while flavors meld together. The honey contributes caramelization potential during basting, deepening the skin’s color and creating a glossy, professional appearance. Once the glaze reaches the desired consistency, reduce heat to low and maintain at a gentle warmth—you’ll be brushing this mixture onto the turkey every 30 minutes throughout the remainder of roasting.
The Extended Roasting Phase
After the initial 25 to 30 minutes at 450°F, reduce the oven temperature to 300°F. This dramatic temperature reduction shifts the roasting approach from rapid exterior browning to gentle, steady interior cooking. The lower temperature prevents the skin from darkening excessively or charring while the meat interior continues cooking through to the center.
Roasting time from this point forward depends on your turkey’s weight. As a general guideline, anticipate 12 to 15 minutes per pound for the complete roasting duration, including the initial high-temperature phase. A 14-pound turkey typically requires approximately 3 hours total roasting time; a 16-pound bird needs roughly 3 hours and 15 minutes. Remember that dry-brined turkeys frequently cook slightly faster than their wet-brined counterparts, so monitor the internal temperature closely as you approach the estimated completion time rather than relying solely on time-based calculations.
Every 30 minutes throughout this phase, remove the turkey from the oven and brush the glaze mixture over all exterior surfaces. This frequent basting accomplishes multiple purposes: the glaze deposits honey and aromatics directly onto the skin, creating deeper caramelization and glossy appearance; the basting brush distributes pan drippings across the surface, maintaining moisture and encouraging even browning; and the process prevents any single area from over-browning.
Add additional water to the pan bottom as needed, maintaining a thin layer of liquid in the pan. This liquid prevents dripping pan juices from scorching on the hot surface, preserves flavorful fond for gravy preparation, and contributes moisture to the oven environment that moderates the heat intensity.
Achieving the Perfect Internal Temperature
The most critical indicator of doneness is internal temperature rather than appearance or time elapsed. Insert an instant-read thermometer into the thickest portion of the thigh without touching bone—the reading should register at least 165°F according to food safety guidelines established by the USDA. Some cooks prefer thigh meat at 170°F for optimal texture, while others prefer breast meat specifically at approximately 150°F for maximum juiciness, accepting slight carryover cooking during the rest period.
Begin checking temperature approximately 30 minutes before your estimated completion time. If the thigh has reached 165°F but the skin hasn’t achieved the desired deep golden-brown color, remove the lid (if used) and increase oven temperature to 350°F for the final 20 to 30 minutes. This brief high-temperature finish crisps and darkens the skin without risking meat over-cooking.
The Essential Resting Period
Upon reaching proper internal temperature, remove the turkey from the oven and transfer it carefully to a clean cutting board. This resting phase, lasting minimum 30 minutes and optimally up to one hour, represents one of the most crucial yet frequently overlooked steps in poultry preparation.
During roasting, intense heat drives moisture from the meat toward the exterior surface. The resting period allows this moisture to redistribute throughout the meat structure, re-absorbing back into muscle fibers rather than running off onto the carving board. Proteins also relax gradually during rest, allowing fibers to retain moisture more effectively. Carving into the turkey immediately after roasting releases accumulated juices, resulting in dry meat; the resting period prevents this loss.
Loosely tent the resting bird with aluminum foil if desired, though this step remains optional since carryover cooking continues even without tenting. The internal temperature may rise another 3 to 5 degrees Fahrenheit during the rest period, justifying removal of the bird from the oven at approximately 160°F in the thigh to achieve final 165°F readings.
Frequently Asked Questions
- Can I prepare the dry brine more than 48 hours in advance?
- Yes, though 48 hours represents the optimal window. Extended dry-brining periods beyond 48 hours may result in excessively salty meat. Prepare the brine mixture in advance, but apply it to the turkey no more than 48 hours before roasting begins.
- What if my turkey skin isn’t browning adequately?
- Ensure the oven temperature increases to 350°F minimum during the final 30 minutes of cooking. If the skin still lacks color, raise the temperature to 375°F or higher for the final 15 minutes. Monitor closely to prevent charring.
- Can I use this method for smaller turkeys or game birds?
- Absolutely. Adjust salt quantities to approximately one tablespoon per four pounds of bird weight. Reduce roasting times proportionally—a 6-pound bird might require only 1.5 to 2 hours total roasting time.
- Is it necessary to baste every 30 minutes?
- Frequent basting improves skin browning and moisture distribution but isn’t absolutely essential. Less frequent basting at 60-minute intervals still produces respectable results, though optimal outcomes require 30-minute intervals.
- Can I make this glaze vegetarian?
- Yes. Replace butter with vegetable oil or vegan butter, maintain honey, vinegar, and Worcestershire components, and add vegetable-based aromatics like garlic, rosemary, and orange zest for identical flavor development.
Conclusion and Final Considerations
Mastering dry-rubbed turkey roasting transforms holiday cooking from a stressful gamble into a reliable, repeatable process that consistently produces exceptional results. The combination of extended dry-brining, strategic temperature management, aromatic glazing, and proper resting creates layered flavors and ensures meat so succulent that guests request your recipe. The techniques outlined here apply equally to future poultry endeavors, establishing a foundation for confident, skilled cooking that extends far beyond seasonal occasions.
References
- Dry-Rubbed Roasted Turkey with Honey Rosemary Glaze Recipe — Honeysuckle White. https://honeysucklewhite.com/recipes/dry-rubbed-roasted-turkey-with-honey-rosemary-glaze/
- USDA Food Safety and Inspection Service: Safe Minimum Internal Temperature Chart — United States Department of Agriculture. https://www.fsis.usda.gov/food-safety/safe-food-handling-and-preparation/meat/safely-cooking-meat-poultry-seafood-eggs-and-other-protein
- Oven Roasted Dry Brine Turkey (Perfectly Juicy!) — Sunkissed Kitchen. https://sunkissedkitchen.com/dry-brine-turkey-recipe/
- Dry Rubbed Roast Turkey — Ali in the Valley. https://aliinthevalley.com/2019/11/19/dry-rubbed-roast-turkey/
- The Maillard Reaction in Cooking — McGill University Office for Science and Society. https://www.mcgill.ca/oss/article/food-and-health/what-are-maillard-reaction-and-caramelization-and-what-role-do-they-play-cooking