Creating bakery-quality pretzel buns in your own kitchen is an achievable goal for both novice and experienced bakers. These distinctive rolls combine the tender crumb of traditional bread with the distinctive flavor and texture that characterizes pretzel products. The process involves yeast fermentation, a specialized alkaline bath treatment, and precise baking techniques that yield impressive results. This comprehensive guide walks you through every stage of production to help you achieve professional-looking buns with exceptional flavor and texture.
Understanding the Science Behind Pretzel Buns
The characteristic pretzel flavor and mahogany-brown exterior come from a crucial step that distinguishes these buns from ordinary dinner rolls: the baking soda bath. When dough is briefly submerged in a baking soda solution, a chemical reaction occurs on the surface that promotes browning and creates a distinctively chewy crust. This alkaline treatment changes the pH of the dough surface, allowing the exterior to brown more deeply while maintaining a soft interior. The bath typically lasts between 30 seconds and one minute per side, depending on your recipe variation and personal preferences.
The dough itself follows traditional yeast bread principles, requiring proper hydration, gluten development, and fermentation time. Understanding how these elements work together ensures consistent success with your baking projects.
Essential Ingredients and Their Roles
| Ingredient | Amount (per 12 buns) | Function |
|---|---|---|
| All-Purpose Flour | 3.5–4 cups | Provides structure and gluten development |
| Warm Water | 1.25–1.5 cups | Hydrates flour and activates yeast |
| Active Dry Yeast | 2.25 teaspoons | Ferments dough and creates rise |
| Salt | 2 teaspoons | Enhances flavor and controls fermentation |
| Butter | 0.25 cup (melted) | Adds richness and browning capability |
| Sugar | 1 teaspoon | Feeds yeast during activation |
| Baking Soda (for bath) | 0.5 cup | Creates alkaline environment for browning |
| Water (for bath) | 6 cups | Medium for baking soda solution |
| Coarse Sea Salt | As needed for topping | Provides signature pretzel texture and flavor |
Quality ingredients make a noticeable difference in your final product. Using fresh yeast that has been stored properly ensures reliable fermentation. Similarly, measuring flour correctly by spooning into a measuring cup and leveling the top, rather than scooping directly from the bag, prevents excess flour in your dough.
Preparing Your Workspace and Equipment
Successful bread baking requires proper setup before you begin mixing ingredients. Gather your equipment in one location:
- Stand mixer with dough hook attachment (or plan to knead by hand)
- Large mixing bowl
- Two baking sheets lined with parchment paper or silicone mats
- Large pot for the baking soda bath
- Slotted spoon for removing buns from the bath
- Sharp knife or bench scraper for scoring
- Instant-read thermometer for monitoring water temperature
- Wire cooling rack
Having everything prepared prevents unnecessary interruptions during the mixing and shaping process, which is particularly important when working with time-sensitive dough.
The Dough Development Process
Activating the Yeast
Begin by measuring warm water—ideally between 105°F and 110°F. Water that is too cold will not activate the yeast sufficiently, while water that is too hot can kill the yeast cells. Add the active dry yeast and a small amount of sugar to the warm water, then let the mixture sit for approximately 10 minutes. After this time, you should observe a visible layer of foam on the surface, indicating that the yeast is active and ready to ferment.
Combining Dry Ingredients
In the bowl of your stand mixer, combine the flour and salt thoroughly. This dry mixing ensures the salt distributes evenly throughout the flour, preventing concentrated pockets of salt that could negatively affect fermentation in specific areas of your dough.
Mixing and Kneading
Add the activated yeast mixture and melted butter to the flour mixture. Using the dough hook attachment on low speed, mix for several minutes until a rough dough forms. Continue mixing until the dough becomes smooth and elastic—typically 8 to 10 minutes of machine time, though this may vary based on your mixer’s power. The dough should pull away from the sides of the bowl and form a cohesive mass. If you prefer to knead by hand, turn the dough onto a lightly floured surface and knead for approximately 10 to 12 minutes, incorporating flour gradually if the dough seems sticky.
If you live in a high-humidity environment, your flour may require adjustment. Humidity above 65% may necessitate adding an extra 1 to 2 tablespoons of flour to achieve the proper dough consistency. Conversely, very dry conditions might require slightly more water. Avoid adding excessive flour, as this produces dense, dry buns rather than the desired soft texture.
Primary Fermentation and Bulk Rise
Transfer your kneaded dough to a lightly greased bowl and turn it to coat all surfaces with oil. This prevents the dough from drying out during fermentation. Cover the bowl tightly with plastic wrap or a damp towel and place it in a warm location—ideally between 75°F and 80°F. The dough should double in volume over approximately 60 minutes, though timing can vary depending on room temperature and yeast activity.
To determine if fermentation has progressed adequately, perform the poke test: gently press your finger about half an inch into the dough. If the indentation slowly springs back but leaves a slight impression, fermentation is complete. If the dough springs back immediately, it needs more time. If the impression remains without any spring-back, fermentation may have proceeded too far.
Shaping the Individual Buns
Once fermentation is complete, transfer the dough to a lightly floured work surface and gently punch down to release excess gas. Divide the dough into 10 to 12 equal portions using a bench scraper or knife. Each portion should weigh approximately 75 to 80 grams for consistent-sized buns.
Shape each portion into a smooth, tight ball by pulling the edges toward the center and pinching them together at the bottom to create a seam. Then, using cupped hands, roll the ball on the work surface, applying gentle downward pressure to create tension in the outer layer of dough. This technique helps the buns maintain their round shape during baking and creates a more professional appearance.
Arrange the shaped buns on your prepared baking sheets, spacing them approximately 2 inches apart to allow for expansion. They should not touch each other at this stage. Let the shaped buns rest uncovered at room temperature for 15 to 20 minutes while you prepare the baking soda bath.
Preparing and Using the Baking Soda Bath
Creating the Alkaline Solution
Pour 6 cups of water into a large pot and bring it to a rolling boil. Add the baking soda gradually—approximately 0.5 cup—directly to the boiling water. This combination creates a vigorous reaction with considerable foam, so use a pot that accommodates this expansion without overflow. Stir the mixture carefully and allow it to cool slightly before proceeding.
It is crucial to use baking soda rather than baking powder, as these are chemically different compounds that produce distinctly different results. Baking soda is sodium bicarbonate, while baking powder contains additional acidic components. Always verify the freshness of your baking soda—if opened more than 6 months prior, test potency by adding a small amount to vinegar; active baking soda will bubble vigorously in response.
The Dipping Process
Working in batches to avoid overcrowding, carefully lower 2 to 3 buns into the simmering baking soda bath using a slotted spoon. Maintain the water at a gentle simmer rather than a rolling boil to prevent excessive agitation. Allow the buns to remain submerged for 30 seconds, then flip them over and cook for an additional 30 seconds on the second side. Using the slotted spoon, remove the buns and return them to the prepared baking sheet lined with fresh parchment paper.
Work efficiently after removing buns from the bath, as allowing them to sit too long before the next steps diminishes the characteristic shine and sheen on the finished product. Immediately proceed to the salting and scoring steps described below.
Finishing Touches: Salting and Scoring
Applying Coarse Salt
While the buns are still warm and slightly wet from the baking soda bath, generously sprinkle them with coarse sea salt. The moisture on the surface of the buns helps the salt adhere properly. If you delay salting until the buns have cooled, the salt will not stick effectively, resulting in an inconsistent topping. Traditional pretzel salt, with its larger crystals and irregular shape, is ideal for this application, though any coarse salt produces acceptable results.
Creating the Signature Score Mark
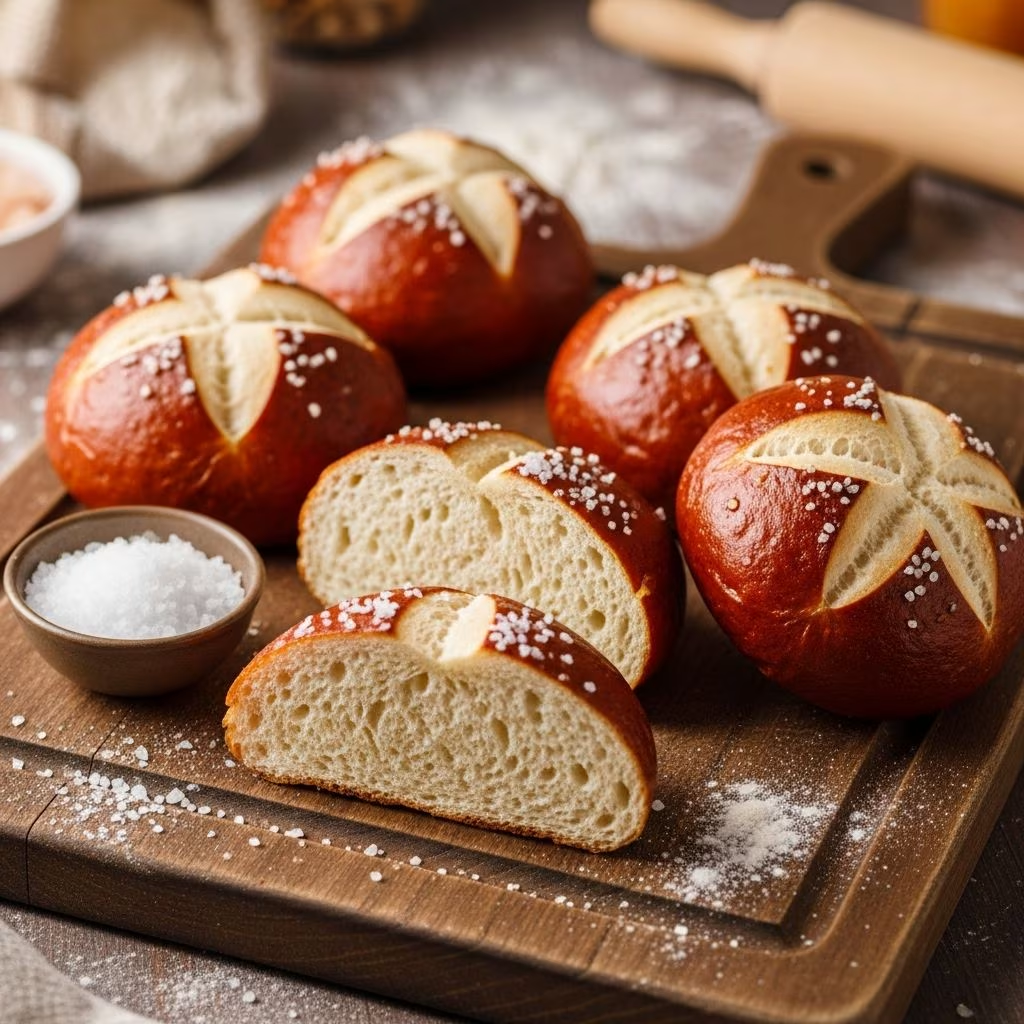
Using a sharp knife or a specialized scoring tool, cut a shallow cross (approximately 0.25 to 0.5 inches deep) into the top of each bun. This scoring serves both aesthetic and functional purposes: it enhances the visual appeal and helps facilitate proper expansion of the bun during baking. The score allows the bun to expand in a controlled manner rather than developing irregular cracks across the surface.
Baking for Perfect Results
Preheat your oven to 400°F to 425°F approximately 30 minutes before baking. Once the oven reaches the target temperature, place the baking sheets on the middle racks. Bake for 15 to 20 minutes, monitoring the buns as they approach the end of the baking time. The finished buns should display a deep golden brown color, with darker browning on the edges and tops. The baking soda bath will have created the characteristic mahogany hue that distinguishes pretzel buns from standard dinner rolls.
If your oven heats unevenly, rotate the baking sheets halfway through the baking time to ensure uniform browning. Remove the buns from the oven when they achieve the desired color but before they begin to darken excessively, as continued baking in the residual heat will darken them further.
Cooling and Storage Considerations
Remove the buns from the baking sheet immediately upon removal from the oven and transfer them to a wire cooling rack. This prevents the bottom from becoming soggy due to steam condensation on the sheet. Allow the buns to cool completely before storing, typically 30 to 45 minutes, depending on room temperature.
For same-day consumption, these buns are best enjoyed within a few hours of baking, while the crust remains crisp and the interior is still tender. For longer storage, allow the buns to cool completely, then place them in an airtight container or bag at room temperature for up to two days. For extended storage beyond two days, freezing is recommended: wrap cooled buns individually in plastic wrap, place them in a freezer bag, and store for up to three months. Thaw at room temperature for several hours before serving.
Troubleshooting Common Issues
| Problem | Likely Cause | Solution |
|---|---|---|
| Dense, heavy texture | Excess flour or insufficient fermentation | Measure flour by spooning and leveling; allow adequate rising time |
| Buns spread sideways instead of rising | Over-fermented dough before baking | Reduce initial fermentation time or use cooler environment |
| Pale color instead of deep brown | Insufficient baking time or low oven temperature | Verify oven temperature with thermometer; extend baking time slightly |
| Salt falls off finished buns | Buns cooled before salting | Salt immediately while buns are still warm from the bath |
| Uneven browning | Uneven oven heat or placement | Rotate baking sheets halfway through; use oven thermometer |
| Dull appearance instead of glossy shine | Delay between bath and baking | Bake immediately after removing from baking soda bath |
Frequently Asked Questions
Can I substitute instant yeast for active-dry yeast?
Yes, you can use instant yeast as a direct substitute at a 1:1 ratio. However, instant yeast ferments somewhat faster, so your dough may complete its rise approximately 15 to 20 minutes sooner. Monitor your dough closely to prevent over-fermentation.
What if I don’t have a stand mixer?
Hand-kneading is entirely feasible, though it requires more physical effort and time. Knead the dough on a floured surface for 10 to 12 minutes until it becomes smooth and elastic. The extended kneading develops gluten and creates the same result as machine mixing.
Can I prepare the dough the night before?
Yes, you can perform a cold overnight fermentation. After mixing and initial kneading, cover the dough and refrigerate overnight. The next morning, allow the dough to come to room temperature for 30 to 45 minutes, then proceed with shaping and the baking soda bath. Cold fermentation actually develops additional flavor complexity.
How do I know if my baking soda is still active?
Place a small amount of baking soda in a bowl with a splash of vinegar. If it fizzes and bubbles actively, it is still effective. Inactive baking soda will not react, and you should replace it with a fresh box before proceeding with your recipe.
Why is humidity important in pretzel bun recipes?
Humidity affects how flour absorbs water. In humid environments, flour already contains some moisture, so you may need to reduce added water slightly or increase flour slightly to achieve the proper dough consistency. High humidity above 65% typically requires adding 1 to 2 extra tablespoons of flour.
Variations and Creative Adaptations
Once you master the basic pretzel bun recipe, you can explore creative variations. Some bakers add seeds like sesame or poppy seeds to the salt topping for additional texture and flavor. Others incorporate grated cheese into the salt mixture for a savory cheese-pretzel combination. Experimenting with different topping ratios and applications allows you to customize the buns to your personal preferences.
Consider the fillings used for sandwich applications as well. The slightly salty, chewy interior of a pretzel bun complements both sweet and savory fillings beautifully, making these buns versatile for various culinary applications beyond simple bread service.
Conclusion
Mastering the art of pretzel bun baking provides a rewarding kitchen skill that produces consistently impressive results. By understanding the role of each ingredient, following proper fermentation procedures, and applying the baking soda bath technique correctly, you can create bakery-quality buns at home. The combination of tender, chewy crumb with a distinctively flavored crust makes homemade pretzel buns a worthwhile addition to your baking repertoire. Start with this foundational recipe, observe how your buns develop at each stage, and gradually build confidence in adjusting techniques to match your local conditions and personal preferences.
References
- Pretzel Buns Recipe — King Arthur Baking Company. 2024. https://www.kingarthurbaking.com/recipes/pretzel-buns-recipe
- Homemade Pretzel Buns (Soft, Chewy, & Bakery-Style) — Handle the Heat. 2024. https://handletheheat.com/pretzel-buns/