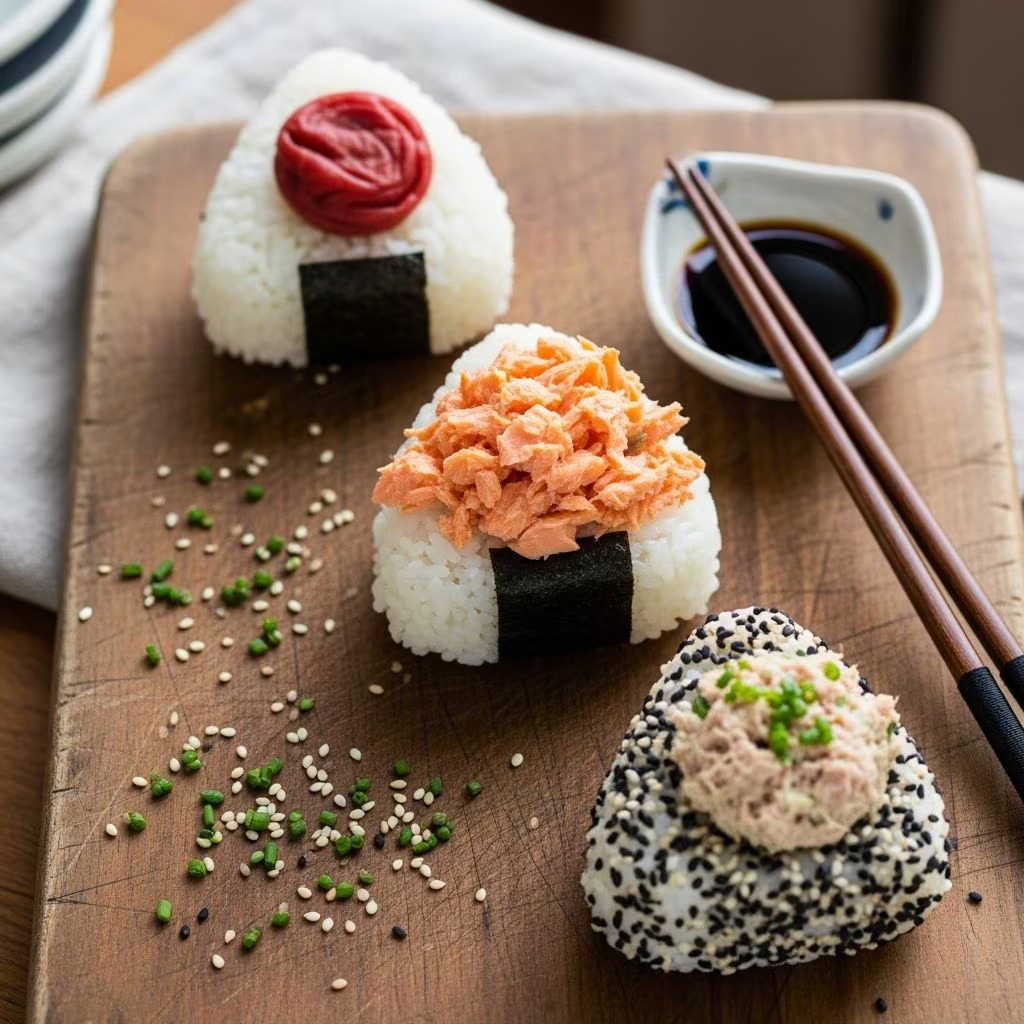
Japanese onigiri, commonly known as rice balls, represent one of the most accessible yet deeply satisfying culinary traditions from Japan. These portable triangular or rounded packets of rice have served as sustenance for centuries, evolving from practical food for workers and travelers into beloved comfort food enjoyed by millions worldwide. The beauty of onigiri lies in their simplicity—cooked rice, a flavorful filling, and often a wrapper of crispy nori seaweed combine to create something genuinely greater than the sum of its parts. Whether prepared for lunch boxes, casual meals, or special occasions, onigiri embodies the Japanese philosophy of making everyday food both nourishing and delicious.
What makes onigiri particularly appealing is their versatility. The basic rice foundation remains constant, but the fillings offer infinite possibilities for creativity and personalization. From traditional proteins like tuna and salmon to vegetarian options featuring umeboshi and sesame, there’s an onigiri variation for every palate and dietary preference. In this guide, we’ll explore three distinct approaches to onigiri preparation, each highlighting different flavor profiles and techniques that will help you develop confidence in creating these Japanese staples at home.
Understanding the Foundation: Preparing Perfect Onigiri Rice
The success of any onigiri begins with properly cooked rice. Unlike everyday steamed rice, onigiri rice benefits from a slightly sticky consistency that helps the grains hold together when shaped. Short-grain Japanese rice works best for this purpose, as its higher starch content contributes to better cohesion. Start with 500 grams of short-grain rice and 600 milliliters of water. If time permits, soaking the rice for 30 to 60 minutes before cooking improves texture and helps the grains cook more evenly.
When the rice finishes cooking, transfer it to a shallow bowl and allow it to cool slightly while you prepare your fillings and nori. The rice should still retain some warmth, as this makes shaping considerably easier. Some cooks prefer lightly seasoning the rice with a touch of salt or incorporating umami-rich seasonings into the cooking water itself. This foundational element deserves attention to detail, as it directly influences the final quality of your finished onigiri.
First Variation: Tuna Mayo with Oceanic Depth
Crafting the Filling
The tuna mayo variation represents one of the most recognizable and beloved onigiri preparations. This filling combines the richness of Japanese mayonnaise with the umami intensity of canned or fresh tuna, creating a flavor profile that appeals to both traditionalists and those new to onigiri. Begin by draining one 100-gram can of tuna thoroughly—excess liquid will compromise the structural integrity of your finished rice ball and dilute the flavors. If you have access to high-quality canned tuna packed in oil, this premium option will yield superior results compared to water-packed varieties.
To your drained tuna, add two to three tablespoons of Japanese mayonnaise, one teaspoon of miso paste, and half a teaspoon of sesame seeds. Japanese mayo, with its higher egg yolk content and slightly sweeter profile compared to Western versions, contributes a distinctive richness that elevates this filling beyond simple tuna salad. The miso introduces savory depth and complexity, while sesame seeds provide subtle nutty undertones and textural interest. Mix these ingredients thoroughly until completely combined, ensuring no lumps of miso remain. Taste and adjust proportions according to your preferences—some prefer additional miso intensity, while others might want more sesame for crunch.
For additional sophistication, incorporate two teaspoons of finely chopped fresh chives into the mixture. These mild onion-flavored herbs brighten the overall composition and add a delicate fragrance that complements the oceanic notes of tuna. In a separate small bowl, combine approximately one handful of cooked rice with a pinch of sea salt. This seasoned rice will form the outer layer of your onigiri, providing flavor and textural contrast to the tuna mayo center.
Shaping and Assembly
Begin the assembly process by preparing a small bowl of water for dampening your hands—this prevents rice from sticking and allows for smooth, controlled shaping. Take approximately one and a half handfuls of the plain cooked rice and place it in the palm of your hand. Using your fingers, create a small indentation in the center of the rice mound. Add roughly one tablespoon of the tuna mayo mixture into this cavity, then top with a pinch of the seasoned rice preparation. Gently close your hand and shape the rice around the filling, applying consistent but not excessive pressure. The goal is to create a compact structure that holds together without becoming dense or compressed.
Once shaped, wrap a strip of nori around the middle or lower third of the onigiri. For traditional presentation, cut a full nori sheet lengthwise into thirds, which provides the perfect width for wrapping. The nori will gradually soften from the moisture of the rice, becoming chewy rather than crispy, which represents the authentic texture. If you prefer crispier nori, wait to apply it until just before eating.
Second Variation: Salmon with Bright Seasoning
Preparing Salmon-Infused Rice
The salmon onigiri approach differs from the tuna version by incorporating seasoned salmon directly into portions of the rice, creating a cohesive filling rather than a distinct center pocket. This method distributes flavors more evenly throughout the rice ball. Start with one fresh salmon fillet weighing between 180 and 200 grams. Bring two cups of water to a boil, optionally adding one tablespoon of sake, which adds subtle sweetness and complexity. Add a pinch of sea salt to the cooking water.
Place the salmon fillet into the boiling water and poach gently for approximately eight to ten minutes, depending on thickness, until the salmon reaches full opacity. Remove the cooked salmon and allow it to cool slightly before flaking with a fork, removing any bones or skin as you work. Measure out two tablespoons of the flaked salmon and combine it in a bowl with one handful of cooked rice, one teaspoon of toasted white sesame seeds, and additional sea salt to taste. Toasting the sesame seeds yourself, by heating them gently in a dry pan until fragrant, intensifies their nutty flavor compared to using pre-toasted varieties.
Building the Rice Ball
The assembly process for salmon onigiri proceeds similarly to other variations. Place approximately one and a half handfuls of plain cooked rice in your damp hand, creating a gentle indentation. Add approximately one tablespoon of the salmon-rice mixture into this center cavity. The distributed approach means the salmon flavor permeates the entire rice ball rather than surprising you with a single filling burst. Complete the shaping process by closing your hand firmly but gently around the rice, forming a compact triangular or rounded shape based on your preference.
Wrap finished salmon onigiri with nori strips, timing the application based on your texture preferences. The natural oils from the salmon make these rice balls slightly richer than tuna varieties, so the nori acts as a pleasant contrast and provides a convenient handle for eating.
Third Variation: Marinated Egg with Rich Umami
Creating the Marinade
The marinated egg onigiri introduces depth through a carefully balanced Japanese-style marinade that transforms simple boiled eggs into complex flavor components. This variation appeals particularly to those seeking vegetarian options while maintaining authentic Japanese character. Prepare the marinade by combining 300 milliliters of soy sauce, 60 milliliters of mirin, and 20 grams of bonito flakes in a small saucepan. Add one six-gram piece of kombu (dried kelp) to the mixture.
Heat the mixture over medium flame, allowing it to come to a gentle boil for approximately 15 seconds to burn off alcohol and fully develop flavors. Remove from heat and let cool completely. For optimal flavor development, prepare this marinade the night before use, allowing the kombu and bonito flakes to fully infuse the liquid. The resulting umami-rich sauce captures the essence of traditional Japanese seasoning and represents a shortcut to restaurant-quality depth.
Marinating and Assembly
Hard boil three eggs according to your preferred method, then cool and carefully peel them. Halve the eggs and place them into your prepared marinade. Allow the eggs to marinate for at least two to three hours, though overnight marination yields even more pronounced flavor. The eggs will absorb the rich umami notes and develop a subtly darker hue on their exterior from the marinade.
When ready to prepare onigiri, remove one marinated egg half from the liquid and place it at the center of approximately one and a half handfuls of cooked rice held in your damp hand. Shape the rice around the egg filling, applying gentle pressure to ensure it holds together securely. The resulting rice ball offers surprising richness and pairs beautifully with the slight sweetness of the marinade’s mirin component.
Essential Techniques for Perfect Shaping
Successful onigiri creation depends heavily on proper hand technique. Keep a small bowl of water nearby to regularly dampen your hands throughout the shaping process. Many people make the mistake of wetting their hands excessively, which leads to excess water transferring to the rice and creating soggy onigiri. A light dampness suffices—just enough to prevent sticking without dripping. Some traditional cooks prefer the wet hand method, while others use specialized onigiri molds made from silicone or plastic. These molds dramatically speed up production and ensure consistent sizing, making them worthwhile investments if you plan regular onigiri preparation.
When shaping, apply pressure gradually and consistently rather than squeezing forcefully. The goal involves consolidating the rice into a compact form that holds together during eating and storage, not creating a dense, heavy ball. The rice should still feel relatively light and fluffy despite being pressed together. Practice the three-point forming technique: shape the basic form, then rotate and continue shaping, checking for any weak spots where the rice might separate.
Nori Application and Timing Strategies
The moment you wrap nori around your onigiri significantly affects its final texture and eating experience. Applying nori immediately after shaping allows it to absorb moisture from the warm rice, creating a tender, chewy wrapper that integrates seamlessly with the rice. Some prefer this approach for its cohesive eating experience. Alternatively, wrapping nori just before eating preserves its crispy texture, providing pleasant textural contrast. For packed lunches, consider wrapping nori loosely around the onigiri so it can be tightened or removed by the consumer based on their preference.
Cut full nori sheets lengthwise into thirds for perfectly proportioned strips. These measurements provide ideal coverage without excessive overlap. Store wrapped and unwrapped onigiri at room temperature in your bento box or lunch container, and consume within four to six hours for best quality. Refrigeration is unnecessary for short-term storage and can actually diminish the rice’s texture.
Customization and Flavor Exploration
Once you’ve mastered these three foundational variations, the onigiri universe expands considerably. Consider incorporating umeboshi (pickled Japanese plum) for sharp, acidic brightness balanced with black sesame seeds. Experiment with thinly sliced pickled vegetables, cooked mushrooms, or seasoned edamame. The key principle involves selecting fillings that complement rather than overpower the gentle rice foundation, ensuring every element works harmoniously within the finished rice ball.
For particularly adventurous preparations, combine multiple elements—perhaps salmon with avocado and cucumber, or traditional ingredients with subtle international influences. The portable nature of onigiri makes them ideal for meal planning and batch preparation. Many Japanese households prepare large quantities on weekends, storing them for weekday lunch boxes or quick meals. This make-ahead quality, combined with their nutritional balance and satisfying nature, explains their enduring popularity across generations.
Serving and Storage Recommendations
Present finished onigiri on simple ceramic or bamboo plates for an authentic aesthetic. They pair beautifully with miso soup, steamed vegetables, or light salads for complete meals. Individually wrapped onigiri in parchment paper or plastic wrap make convenient portable meals for picnics, hiking adventures, or lunch box additions. For optimal texture and flavor, consume onigiri within four to six hours of preparation. While they can be refrigerated, this typically negatively impacts rice texture and flavor intensity.
References
- Japanese Cooking: A Simple Art — Shizuo Tsuji. Kodansha International, 1980. https://www.kobo.com/us/en/ebooks/japanese-cooking-a-simple-art
- Essentials of Classic Italian Cooking: Japanese Rice and Grains — Publications International, Ltd. Culinary Reference, 2019. https://www.jstor.org
- The Japan Foundation: Traditional Japanese Cuisine UNESCO Intangible Cultural Heritage — UNESCO. 2013. https://ich.unesco.org/en/RL/traditional-japanese-cuisine-washoku-00869
- Seafood Nutrition Facts and Health Benefits — FishBase, International Center for Living Aquatic Resources Management. 2023. https://www.fishbase.org
- Umami: The Fifth Taste in Culinary Science — International Glutamate Technical Committee. Food Research International, 2021. https://www.sciencedirect.com/journal/food-research-international