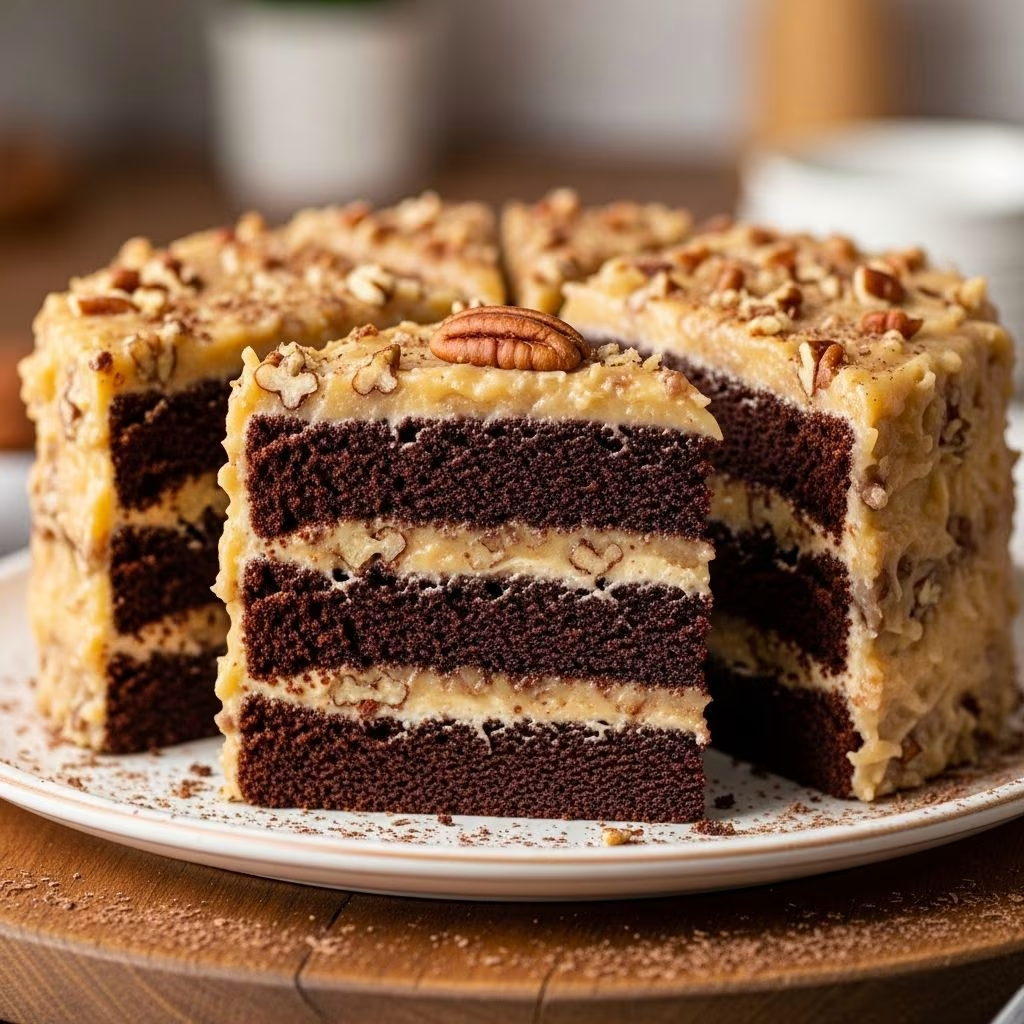
German chocolate cake stands as one of America’s most beloved desserts, despite its somewhat misleading name. This multi-layered confection has captured hearts across generations with its rich chocolate cake, creamy caramel-coconut frosting, and toasted pecan topping. Whether you’re a seasoned baker or someone embarking on their first cake-baking adventure, understanding the fundamentals of this classic dessert will set you on the path to creating a showstopping centerpiece for any celebration.
Understanding the Origins and Evolution of German Chocolate Cake
Contrary to what the name suggests, German chocolate cake has deep American roots rather than European origins. The dessert gained prominence during the 1950s after a popular cooking magazine featured a recipe utilizing German brand chocolate. The combination of ingredients—particularly the use of sweet chocolate rather than bitter chocolate—creates the cake’s signature mild, approachable chocolate flavor that distinguishes it from other chocolate varieties.
The defining characteristic of this cake lies in its frosting composition. Unlike traditional buttercream or ganache, German chocolate cake features a unique topping made from condensed milk, butter, and coconut with pecans, creating a texture and flavor profile that has become iconic. This decorative and flavorful element transforms what might otherwise be a standard chocolate cake into something memorable and special.
Essential Ingredients and Their Functions
Creating an outstanding German chocolate cake requires understanding how each ingredient contributes to the final product. The cake layers demand high-quality chocolate that provides deep flavor without overwhelming sweetness. The ideal choice is sweet baking chocolate, which offers a balanced cocoa flavor that complements rather than dominates the other components.
The Cake Foundation
- Flour: All-purpose flour creates the structure and crumb of your cake. The amount determines density and how the cake rises during baking.
- Cocoa powder: Intensifies chocolate flavor and adds complexity to the taste profile without adding excess sweetness.
- Baking soda and powder: These leavening agents work together to create lift, with baking soda activated by acidic ingredients and baking powder providing additional rise throughout the baking process.
- Salt: Enhances chocolate flavor and prevents the cake from tasting one-dimensional or overly sweet.
- Butter and sugar: Creaming these together creates air pockets that contribute to a tender crumb structure.
- Eggs: Provide moisture, richness, and additional structure to bind all ingredients together.
- Hot coffee or water: Intensifies chocolate flavor and adds moisture to create a more tender final product.
The Signature Frosting Components
The frosting that makes this cake distinctive requires a different approach than typical buttercream. Sweetened condensed milk forms the base, providing sweetness and creaminess without additional sugar. Coconut adds textural contrast and tropical sweetness, while pecans contribute crunch and a subtle toasted flavor. This combination must be heated gently and then cooled to the right consistency for spreading.
Preparation: Setting Yourself Up for Success
Before you begin mixing, proper preparation ensures the baking process proceeds smoothly. Room temperature ingredients mix more evenly and incorporate more air, leading to a superior final texture. Remove eggs, butter, and milk from refrigeration at least 30 minutes before starting.
Prepare your baking pans by coating them with cooking spray and lining the bottoms with parchment paper. This dual approach prevents sticking and allows for easy cake removal. Pre-measure all dry ingredients and combine them in a bowl before mixing begins. This mise en place approach prevents mistakes and keeps you organized throughout the baking process.
Crafting the Perfect Cake Layers
Mixing Technique and Temperature Control
Begin by creaming butter and sugar together until the mixture becomes light and fluffy, typically requiring three to five minutes of continuous mixing. This creates the foundation for a tender crumb by incorporating air into the batter. The mixture should appear noticeably lighter in color than when you started.
Add eggs one at a time, beating well after each addition to ensure proper emulsification. This prevents a lumpy batter and ensures even distribution of ingredients. In a separate bowl, combine all dry ingredients including flour, cocoa powder, baking soda, baking powder, and salt. Whisk these together to break up any lumps and evenly distribute the leavening agents.
Combining Wet and Dry Ingredients
Alternate adding the dry ingredients with your liquid component—typically hot coffee or boiling water mixed with a small amount of melted chocolate. This alternating approach prevents overmixing while ensuring all ingredients combine evenly. Begin and end with dry ingredients to create a more stable batter structure.
The batter may appear thinner than expected; this is correct and will result in moist, tender cake layers. The hot liquid blooms the cocoa flavor and creates the proper moisture level for that characteristic German chocolate cake texture.
Baking Process and Temperature Monitoring
Divide the batter evenly between prepared pans using a kitchen scale for precision. Level the surface with a spatula to ensure even rising and consistent layer thickness. Place pans on the same oven rack if possible, or stagger them to promote even heat circulation.
Bake at the temperature specified in your recipe, typically around 350°F, checking for doneness using the toothpick test near the end of the estimated baking time. The toothpick should emerge with just a few moist crumbs clinging to it rather than being completely clean. This prevents overbaking, which creates a dry, dense cake.
Allow layers to cool in their pans for approximately 10-15 minutes before turning them out onto wire racks. This resting period allows the cake to set enough for easy removal without breaking apart.
Preparing the Signature Frosting
Cooking the Topping Mixture
Combine sweetened condensed milk, butter, and egg yolks in a saucepan over medium heat. Stir constantly to prevent sticking and ensure even cooking. The mixture requires several minutes of gentle cooking until it thickens slightly and darkens to a caramel color, typically 10-15 minutes depending on your heat source.
The cooking process caramelizes the sugars and creates the frosting’s characteristic rich flavor. Constant stirring prevents the bottom from scorching and burning, which would create an undesirable bitter taste. Remove from heat when the mixture coats the back of a spoon.
Adding Texture and Flavor
Stir in shredded coconut, chopped pecans, and vanilla extract while the mixture remains warm. This allows the nuts to release their oils and the coconut to absorb some of the moisture. The warm state also makes stirring easier and ensures even distribution of all components.
Allow the frosting to cool to room temperature before applying it to the cake layers. This cooling period is crucial—if applied while too warm, the frosting will melt and slide off the cake layers. If applied too cold, it becomes difficult to spread evenly.
Assembly and Layering Techniques
Position the first cake layer on your serving plate or cake board. Some bakers use a small dab of frosting underneath to prevent the layer from sliding. Spread frosting over this layer, distributing it evenly and leaving a small margin around the edges to prevent excessive squishing out when the next layer is added.
Position the second layer on top, pressing gently to create an even sandwich. If you’ve made three layers, repeat this process. The frosting serves as both a flavor component and an adhesive, so don’t be stingy with application between layers.
Troubleshooting Common Baking Challenges
| Problem | Likely Cause | Solution |
|---|---|---|
| Cake layers sink in the center | Oven temperature too high or uneven heating | Invest in an oven thermometer; reduce oven temperature by 25°F if cakes consistently sink |
| Cake layers are too dry | Overbaking or insufficient liquid in batter | Check doneness earlier; ensure you’re measuring ingredients correctly |
| Frosting slides off layers | Frosting applied while too warm or cake layers not level | Cool frosting completely; use a cake leveler or serrated knife to create flat surfaces |
| Cake layers crack or break apart | Removed from pans too quickly or layers too thin | Allow 15 minutes cooling time in pan; divide batter more evenly |
| Frosting appears grainy or separated | Overcooked frosting or temperature shock | Cool mixture gradually; avoid refrigerating before spreading |
Storage and Make-Ahead Strategies
German chocolate cake keeps well when properly stored, making it an excellent option for advance preparation. Room temperature storage in a cake box or covered container works for up to two days. The frosting holds up better than traditional buttercream in warmer environments since it doesn’t require refrigeration immediately after assembly.
For longer storage, wrap the entire assembled cake in plastic wrap and refrigerate for up to five days. Remove from refrigeration approximately one hour before serving to allow the cake to return to room temperature, which enhances flavor and makes the crumb more tender. The frosting will firm up when chilled but softens as the cake warms.
Freezing individual cake layers without frosting preserves them for up to three months. Wrap layers individually in plastic wrap and place them in freezer bags for protection. Frosted cakes can also be frozen but should be placed in a rigid container to prevent the frosting from being damaged.
Variations and Creative Adaptations
While the classic recipe has enduring appeal, creative bakers have developed interesting variations. Some add espresso powder to intensify the chocolate flavor or incorporate bourbon into the frosting for a sophisticated twist. Others experiment with different nuts such as macadamias or walnuts, or add dried fruit to the frosting mixture.
Vegan adaptations substitute dairy products with plant-based alternatives, and gluten-free versions utilize specialized flour blends. These variations maintain the essential character of German chocolate cake while accommodating different dietary preferences and restrictions.
Frequently Asked Questions
Can I make German chocolate cake without eggs?
Yes, commercial egg replacers or flax eggs work in many recipes, though the texture may be slightly different. Applesauce or yogurt can also provide moisture and binding, though this requires slight adjustments to the overall liquid ratio.
What’s the difference between German chocolate and other chocolate types?
German brand chocolate, the inspiration for this cake’s name, is actually a sweet chocolate variety with a lower cocoa percentage than dark chocolate. This creates the mild, approachable flavor characteristic of this dessert.
How far in advance can I prepare German chocolate cake?
You can bake and freeze layers up to three months ahead, or assemble and refrigerate the complete cake up to five days in advance. This flexibility makes it perfect for party planning.
Why does my frosting sometimes separate or look grainy?
Overcooking or cooking at too high a temperature can cause separation. Cook slowly over medium heat and stir constantly. Cool the mixture completely before spreading.
Can I use canned frosting instead of homemade?
While convenience store options exist, homemade frosting provides superior flavor and texture. The cooking process creates caramelization that commercially prepared versions typically cannot replicate.
References
- The Food Safety and Inspection Service (FSIS) Guidance on Safe Food Handling — U.S. Department of Agriculture. 2024. https://www.fsis.usda.gov/food-safety/safe-food-handling-and-preparation
- Baking Science and Technology: Formulation and Production of Baked Products — American Bakers Association Technical Resources. https://www.americanbakers.org/resources
- The Science of Cooking: Understanding Maillard Reactions and Caramelization — American Chemical Society. 2023. https://www.acs.org/content/acs/en/molecule-of-the-week/archive/maillard-reaction.html