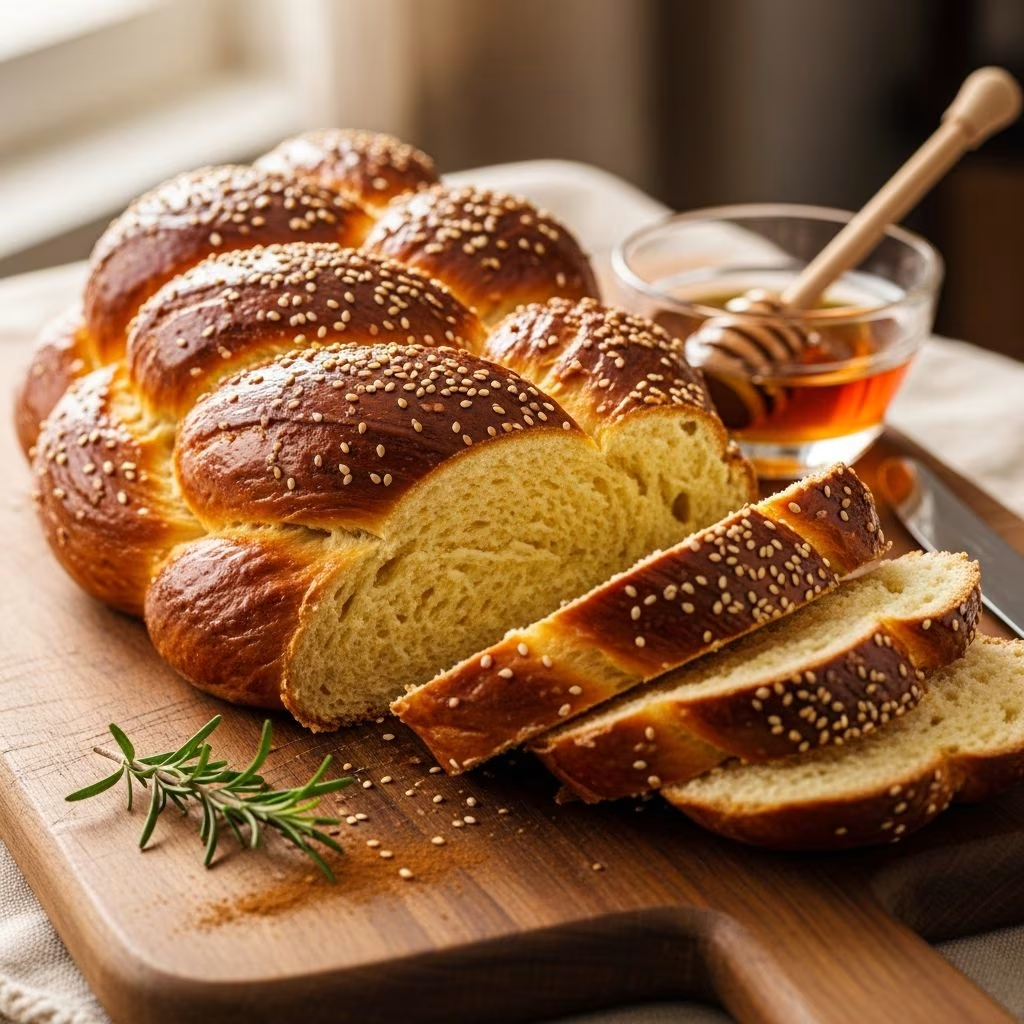
Challah represents one of the most cherished traditions in Jewish cuisine, combining simple ingredients into a bread that carries both cultural significance and culinary excellence. This braided egg bread, typically served during Jewish holidays and Shabbat celebrations, offers home bakers an opportunity to create something truly special in their own kitchens. The appeal of challah extends beyond its ceremonial importance—its rich, slightly sweet flavor profile and tender, pillowy crumb make it a favorite among bread enthusiasts of all backgrounds.
Understanding Challah’s Essential Characteristics
What distinguishes challah from ordinary bread lies in several key elements that work together to create its distinctive character. The inclusion of eggs provides richness and helps develop a fine crumb structure, while sugar or honey contributes subtle sweetness without overwhelming the palate. Oil adds moisture and tenderness, creating bread that stays fresh longer than many other yeast-based loaves. The generous use of eggs—typically five to six per loaf—gives challah its characteristic golden hue and contributes to its luxurious texture.
The braiding technique, while primarily decorative, serves a functional purpose as well. By creating surface area through braiding, bakers achieve more extensive browning during baking, which develops complex flavors through the Maillard reaction. The braided structure also creates visual appeal that makes homemade challah stand out from commercial alternatives.
Gathering Your Ingredients: Quality Matters
Success in bread baking begins with understanding your ingredients and their roles. Here’s what you’ll need for a traditional sweet challah:
- Warm water: Serves as the hydration base and activates the yeast. Temperature should range between 105°F and 115°F—too hot damages yeast, too cold slows activation.
- Active dry yeast: Approximately 4.5 to 7 grams per loaf, depending on your preferred rise time. Active dry yeast works reliably for home bakers.
- Bread flour: Typically 660 to 1000 grams depending on recipe proportions. Bread flour’s higher protein content develops better gluten structure than all-purpose flour.
- Sugar or honey: Between 125 to 165 grams provides subtle sweetness. Some bakers prefer honey for its complex flavor notes, while others use granulated sugar for consistency.
- Eggs: Five to six large eggs contribute to the bread’s golden color, tender crumb, and rich flavor.
- Oil: Approximately 72 to 125 grams of neutral vegetable oil adds moisture and extends shelf life.
- Salt: Between 8 to 28 grams enhances flavor and strengthens gluten development.
- Optional toppings: Sesame seeds, poppy seeds, or everything bagel seasoning add texture and visual interest.
The ratio of these ingredients influences the final bread’s texture and flavor. A higher egg ratio creates a more tender crumb, while increased oil produces bread that stays moist for several days. Bakers often adjust these proportions based on personal preference and climate conditions.
The Dough Development Process
Creating challah dough requires attention to several crucial steps that build upon each other. The process begins with activating the yeast, which indicates whether your yeast is viable and ready to ferment the dough.
Activating the Yeast
Combine warm water with yeast and a small amount of sugar in a separate bowl. Allow this mixture to sit for five to ten minutes until foam begins forming on the surface. This visible activity signals that the yeast is alive and ready to work. If no foam appears, your yeast has expired and should be replaced before proceeding.
Combining Wet Ingredients
To the foamy yeast mixture, add your oil and honey or sugar. Whisk this combination thoroughly to distribute the oil evenly. In a separate bowl, beat your eggs, then add most of them to the wet mixture while reserving a portion for the egg wash that will be applied before baking. Stir this combined wet ingredient mixture to ensure complete incorporation before adding it to the dry ingredients.
Mixing Dry Components
In a large mixing bowl, combine your bread flour with salt. Some bakers prefer mixing these separately and adding them gradually to the wet ingredients to ensure even distribution. Create a well in the center of the flour mixture and pour in your combined wet ingredients. Using a fork or the dough hook attachment on a stand mixer, begin incorporating the flour into the liquid.
Kneading for Development
Continue mixing until all flour is incorporated, then knead the dough for approximately ten minutes. This process develops gluten strands that give bread its structure. The dough should transition from shaggy and sticky to smooth and elastic. If the dough remains too sticky to work with, add small amounts of flour gradually while continuing to knead. Conversely, if the dough feels dry and stiff, lightly wet your hands and continue working the dough, which will incorporate the moisture.
First Rise: Building Flavor and Structure
After kneading, place your dough in an oiled bowl, turning it over to coat all surfaces with oil. This prevents a crust from forming during rising. Cover the bowl with plastic wrap or a damp kitchen towel and set it in a warm location. An ideal rising environment maintains consistent warmth around 75°F to 80°F.
The dough should rise until it roughly doubles in size, typically requiring one to two hours depending on kitchen temperature and yeast activity. Rather than timing rigidly, look for visual cues—the dough should feel airy when poked gently and spring back slowly. Some bakers prefer a longer, cooler rise, which develops more complex flavors through extended fermentation.
Shaping Your Challah: From Dough to Braid
After the first rise, divide your dough into portions depending on whether you’re making one large loaf or multiple smaller ones. Traditional challah often uses a six-strand or four-strand braid, though simpler two or three-strand braids work beautifully for beginners.
To create a three-strand braid, roll your dough portion into a rough rectangle, then divide it into three equal strands by making two lengthwise cuts. Begin braiding from one end, alternating strands over and under each other in a consistent pattern. Pinch the ends firmly together to seal them, then tuck the ends under slightly for a neat appearance.
For a round challah, roll the dough into a long rope, then coil it into a spiral shape, tucking the end underneath. This creates the traditional round loaf often associated with Rosh Hashanah celebrations.
Second Rise and Pre-Baking Preparation
Transfer your shaped dough to a parchment-lined baking sheet or lightly oiled pan. Cover it loosely with oiled plastic wrap and allow it to rise for approximately forty-five minutes to one hour. During this rise, the dough should increase noticeably in volume and feel puffy when gently poked.
Toward the end of this second rise, preheat your oven to 350°F. This temperature allows the interior to cook through while the exterior develops a deep golden-brown color without burning.
The Egg Wash: Creating That Perfect Golden Finish
Just before baking, prepare your egg wash by beating one egg with one tablespoon of water. For a slightly darker appearance, use just the egg yolk without water. Brush this mixture generously over all exposed surfaces of your challah using a pastry brush. This creates the signature glossy, golden exterior.
If you’re using toppings, sprinkle them immediately after applying the egg wash. Sesame seeds, poppy seeds, or everything bagel seasoning adhere well to the wet egg wash and toast beautifully during baking.
Baking: Achieving Perfect Results
Place your prepared challah in the preheated 350°F oven and bake for 25 to 35 minutes. The exact time depends on your oven’s characteristics and the size of your loaf. Rotate the pan front to back halfway through baking for even browning.
Your challah is done when it achieves a deep golden-brown color on both the top and sides. Test for doneness by tapping the bottom of the loaf—it should sound hollow. Alternatively, use an instant-read thermometer inserted into the center; the internal temperature should reach 190°F or higher.
Cooling and Storage
Remove your finished challah from the oven and transfer it to a wire cooling rack. Allow it to cool for at least 15 minutes before slicing, which gives the crumb structure time to set. The bread will continue cooking slightly from residual heat during this cooling period.
Properly stored challah remains fresh for two to three days at room temperature when kept in a bread box or wrapped loosely in plastic wrap. For longer storage, challah freezes exceptionally well for up to three months. Thaw it at room temperature for several hours before serving.
Troubleshooting Common Challenges
| Problem | Likely Cause | Solution |
|---|---|---|
| Dense, heavy crumb | Insufficient rising time or expired yeast | Allow longer fermentation periods; verify yeast viability with the foam test |
| Dry or crumbly texture | Excessive flour or insufficient oil | Reduce flour slightly; increase oil to 100+ grams |
| Flat loaf with minimal rise | Cool rising environment or weak yeast | Use a warmer location for rising; replace expired yeast |
| Pale or uneven browning | Inadequate egg wash application | Apply egg wash more generously; ensure oven preheating |
| Gummy interior despite golden exterior | Underbaking or slicing too soon | Bake until internal temperature reaches 190°F; cool completely before slicing |
Flavor Variations and Creative Additions
While traditional sweet challah stands on its own merits, many bakers enjoy incorporating additional elements. Raisins plumped in warm water add chewy sweetness, while chocolate chips create a delightful surprise. Some bakers include nuts such as almonds or walnuts, though these should be toasted first to maximize their flavor. Cinnamon-sugar mixtures can be swirled into the dough before braiding for warm spice notes.
Honey-sweetened versions offer a more complex flavor profile compared to sugar-based recipes, particularly when using quality honey varieties. Some bakers substitute a portion of the water with orange juice or add orange zest for brightness and aromatic complexity.
Frequently Asked Questions
Can I use instant yeast instead of active dry yeast?
Yes, instant yeast can be substituted at a slightly reduced quantity since it’s more concentrated. Use approximately 6 grams of instant yeast per loaf instead of 7 grams of active dry yeast. The rising times may be slightly faster.
What’s the difference between honey and sugar in challah?
Honey provides a more complex sweetness with subtle floral notes, while sugar offers cleaner sweetness. Both produce excellent results. Some bakers prefer honey during holidays like Rosh Hashanah, which celebrates with symbolic honey consumption.
How far in advance can I prepare challah?
You can prepare dough up to 24 hours ahead by refrigerating it after the first rise. This extended cold fermentation actually develops more complex flavors. Simply shape it, allow it to come to room temperature, then proceed with the second rise before baking.
Why is my challah cracking during baking?
Cracks typically indicate either insufficient steam during the early baking stages or dough that’s too stiff. Try placing a pan of hot water on the oven’s lower rack during the first 10 minutes of baking to create steam. Additionally, ensure your dough has adequate hydration and oil content.
Can I make challah without a stand mixer?
Absolutely. Challah has been made by hand for generations. Mix your ingredients in a large bowl using a fork, then knead on a clean counter for 10 to 15 minutes. Hand-kneading may take slightly longer but develops excellent gluten structure through consistent effort.
References
- Bread Baking Science and Standards — American Society of Bakers. 2023. https://www.americanbakers.org/
- The Flavor Bible: The Essential Reference for More than 300 Ingredients and 8,000 Flavor Combinations — Karen Page and Andrew Dornenburg. 2008. https://www.penguinrandomhouse.com/
- Professional Baking Techniques for Success — The Culinary Institute of America. 2019. https://www.ciachef.edu/
- Yeast Biology and Fermentation Methods — International Society of Brewing Sciences. 2024. https://www.isbs.org/
- Jewish Food Culture and Tradition — Culinary Historians of the East Coast. 2023. https://www.chec-aafcs.org/