Blackberry pie represents one of the most cherished desserts across American kitchens, combining the natural tartness of fresh berries with the comfort of homemade pastry. This timeless classic deserves a place on your dessert table, whether you’re celebrating a special occasion or simply savoring the bounty of summer produce. Creating this delightful treat requires understanding both the fundamentals of pie-making and the specific techniques that transform fresh blackberries into a luscious, perfectly-textured filling.
Understanding the Components of a Successful Blackberry Pie
A truly exceptional blackberry pie consists of three essential elements working in harmony: the bottom crust that provides structural support, the fruit filling that delivers flavor and moisture, and the top crust that seals in the juices while providing textural contrast. Each component plays a crucial role in determining whether your pie will become a showstopper or a disappointment. The foundation begins with understanding how to construct each layer, starting with selecting appropriate ingredients and mastering fundamental techniques.
The Importance of Ingredient Selection
The quality of your final pie depends almost entirely on the ingredients you choose at the outset. For the fruit filling, select blackberries that are plump, fragrant, and deeply colored, indicating peak ripeness and maximum juice content. When purchasing berries, inspect them carefully for mold or soft spots, as damaged berries will compromise the entire batch. You can use either fresh or frozen blackberries, though frozen berries may release additional liquid during baking, requiring adjustment to thickening agents.
For the pastry crust, all-purpose flour provides the ideal balance of structure and tenderness. Cold, unsalted butter is essential because its lower water content compared to salted butter promotes the development of flaky layers. The contrast between cold butter pieces and warm flour creates the characteristic laminated texture that distinguishes an excellent pie crust from a mediocre one. Additionally, ice-cold water ensures that the fat remains distinct rather than blending seamlessly into the flour, which would produce a tough, dense crust.
Crafting the Perfect Pie Crust from Scratch
While pre-made crusts offer convenience, a homemade crust provides superior flavor and texture that elevates your entire pie. The process requires attention to temperature control and minimal handling to prevent overdevelopment of gluten, which creates toughness.
Ingredients for the Crust
- All-purpose flour: 2½ cups
- Cold unsalted butter: 1 cup, cut into small cubes
- Granulated sugar: 1 tablespoon
- Salt: 1 teaspoon
- Ice-cold water: 6 to 8 tablespoons
Step-by-Step Crust Preparation
Begin by combining your dry ingredients—flour, sugar, and salt—in a large mixing bowl or food processor. The sugar contributes subtle sweetness and helps stabilize the dough structure. If using a food processor, pulse the dry ingredients several times to distribute the salt and sugar evenly throughout the flour.
Add your cold butter cubes to the mixture and incorporate them using either a pastry cutter for hand mixing or pulse settings in a food processor. This stage is critical: you want the butter distributed throughout the flour in distinct pea-sized pieces rather than fully incorporated. These isolated butter pockets will create steam during baking, resulting in those desirable flaky layers. Pulse or cut for approximately 10 to 12 times, then assess whether you’ve achieved the correct texture.
Gradually add ice-cold water, one tablespoon at a time, stirring gently or pulsing until the dough just begins to hold together. The dough should appear slightly crumbly rather than smooth and elastic. This ensures you haven’t overworked the gluten. Divide the dough into two equal discs, wrap each in plastic wrap, and refrigerate for at least one hour before rolling out.
Preparing and Flavoring the Blackberry Filling
The filling requires careful attention to achieve the right balance between fruit flavor, sweetness, and texture. Unlike cream pies that maintain completely smooth consistency, blackberry pie filling should contain discernible fruit pieces suspended in a flavorful, slightly thickened sauce.
Essential Filling Ingredients
- Fresh blackberries: 5 to 6 cups
- Granulated sugar: ¾ to 1 cup, adjusted based on berry sweetness
- Cornstarch or instant tapioca: 3 to 3½ tablespoons
- Fresh lemon juice: 1 to 2 tablespoons
- Lemon zest: ½ to 1 teaspoon
- Vanilla extract: ½ teaspoon (optional)
- Salt: small pinch
The Role of Each Ingredient
Granulated sugar provides necessary sweetness while the berries cook down and release their natural juices, creating a syrupy consistency throughout the filling. The amount you use depends on the berries’ natural sweetness; berries at peak season may require less added sugar than early-season fruit.
Cornstarch serves as the primary thickening agent, absorbing excess moisture and preventing your pie from becoming soupy. This ingredient gelatinizes at approximately 140°F to 150°F, transforming the berry liquid into a coating that clings to each piece of fruit. Some bakers prefer instant tapioca, which creates a slightly different texture and won’t create the chalky mouthfeel that occasionally occurs with excessive cornstarch.
Lemon juice and zest brighten the blackberries’ natural flavor while balancing the sweetness with pleasant acidity. This contrast makes each bite more interesting, preventing the pie from tasting one-dimensionally sweet. The acid also helps prevent the mixture from becoming cloying, making the dessert more sophisticated and refined.
Combining Filling Components
Place your rinsed and gently dried blackberries in a large bowl, being careful not to crush them. Sprinkle the sugar, cornstarch, lemon juice, and zest over the berries, then stir gently using a wooden spoon or rubber spatula. Avoid vigorous stirring, which crushes the delicate fruit and creates an undesirable texture. Let this mixture rest for approximately 15 minutes at room temperature, allowing the berries to begin releasing their juices while the cornstarch hydrates and becomes ready to thicken the filling during baking.
Assembly and Baking Techniques
Proper assembly ensures even baking and prevents common problems like filling overflow or uneven browning.
Preparing Your Pie Dish
Remove your chilled pie dough from the refrigerator and allow it to sit at room temperature for 5 to 10 minutes, making it slightly more pliable for rolling. Lightly flour your work surface and roll the first dough disc into an 11-inch circle approximately ⅛-inch thick. Transfer this crust to your 9-inch pie dish, gently pressing it into the bottom and allowing approximately ½-inch overhang beyond the rim.
Filling and Topping
Pour your prepared blackberry mixture into the crust, spreading it evenly from center to edges. Dot several small pieces of cold butter across the filling surface—approximately 1 tablespoon total—as this enhances richness and adds subtle flavor complexity.
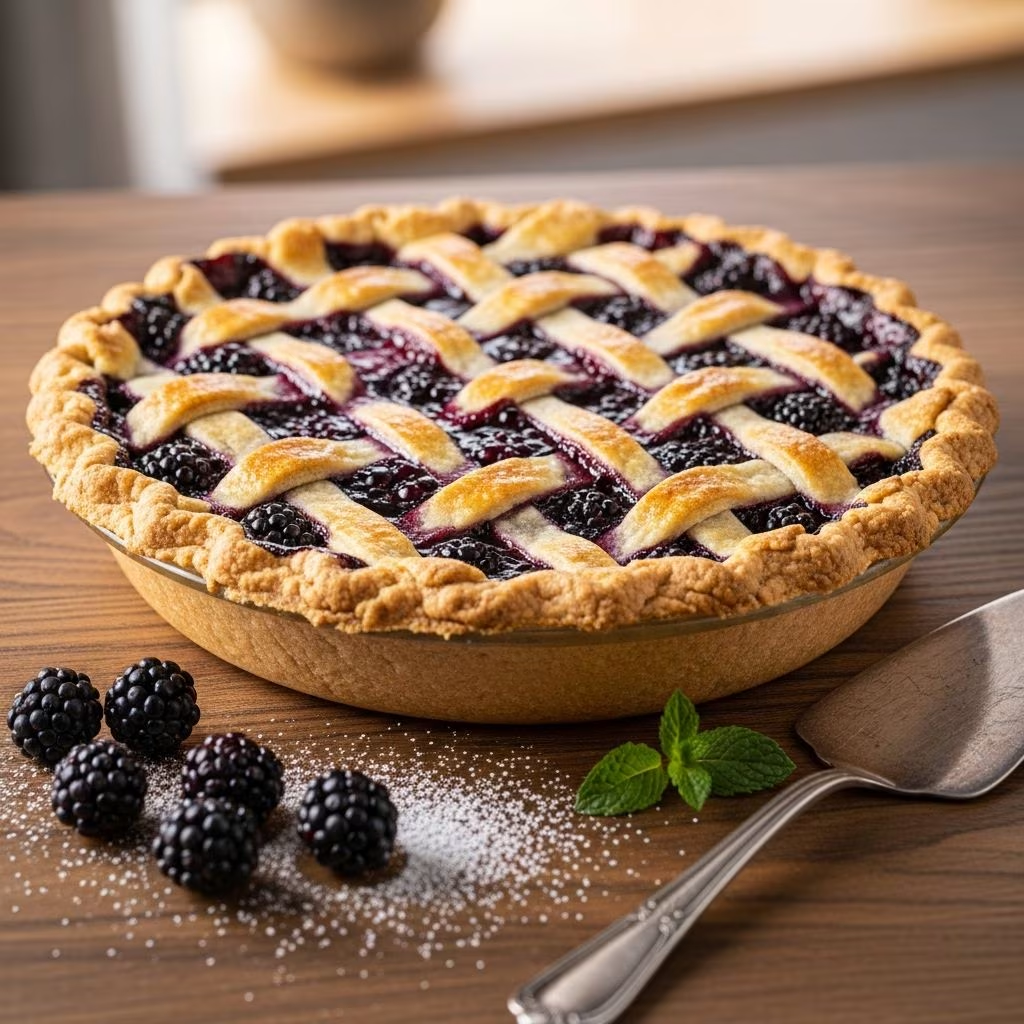
Roll your second dough disc to the same thickness as the first. You now have two options: create a traditional double crust by placing the rolled dough over the filling and crimping the edges, or construct a lattice top by cutting the dough into strips and weaving them over the filling for a more elegant presentation. For the double crust method, seal the edges by pressing the dough with the tines of a fork, creating both a decorative pattern and a proper seal that prevents filling from escaping during baking.
Cut 4 to 5 small slits in the top crust using a sharp knife; these vents allow steam to escape gradually rather than forcing its way through the crust and creating a burst. An egg wash—created by whisking one egg with 2 tablespoons of water—applied with a pastry brush adds color and shine to the finished crust. For enhanced visual appeal, sprinkle coarse sugar crystals over the egg wash before baking.
Baking Instructions
Position your oven rack on the lowest setting and preheat to 425°F. This high initial temperature helps set the crust’s structure before the filling begins releasing significant moisture. Place your assembled pie on a baking sheet lined with parchment or foil to catch any filling drips. Bake at 425°F for the first 15 minutes, then reduce temperature to 375°F and continue baking for 40 to 45 minutes additional minutes.
The pie is done when the crust appears deep golden brown and the filling visibly bubbles around the edges or through the vents. This bubbling indicates the cornstarch has fully gelatinized and the mixture has reached the proper consistency. If the crust begins darkening excessively before the filling appears done, tent it loosely with aluminum foil to prevent burning while allowing the filling to finish cooking.
Cooling and Serving Considerations
Patience represents perhaps the most important ingredient after the pie leaves the oven. Allow your pie to cool at room temperature for at least 2 to 3 hours before slicing, or better yet, refrigerate it overnight. This resting period allows the filling to set properly; cutting into a warm pie releases the filling in a runny stream rather than presenting neat, defined slices.
When you’re ready to serve, run a thin knife around the pie’s interior edge to release any stuck portions, then slice using a sharp knife dipped in hot water and wiped between cuts. Serve each slice with a dollop of fresh whipped cream or vanilla ice cream, which provides luxurious contrast to the tart, juicy filling.
Troubleshooting Common Blackberry Pie Challenges
| Problem | Cause | Solution |
|---|---|---|
| Runny filling | Insufficient thickener or underbaking | Increase cornstarch by ½ tablespoon or bake longer until filling visibly bubbles |
| Tough, dense crust | Overworking dough or warm butter | Handle dough minimally and keep butter cold throughout preparation |
| Crust browning too quickly | Oven temperature too high or crust too exposed | Lower oven temperature 25°F or tent crust edges with foil |
| Filling leaking from edges | Inadequate sealing or overfilled pie | Ensure proper edge crimping and don’t exceed filling capacity |
| Soggy bottom crust | Insufficient oven rack positioning | Use lowest oven rack to expose bottom crust to direct heat |
Frequently Asked Questions About Blackberry Pie
Can I use frozen blackberries instead of fresh?
Yes, frozen blackberries work well for pie-making. Since frozen berries have already been processed by ice crystal formation, they release more liquid during baking. Increase your cornstarch by an additional ½ tablespoon when using frozen berries to account for this extra moisture.
How far in advance can I prepare this pie?
You can assemble the unbaked pie up to 24 hours before baking by covering it loosely with plastic wrap and refrigerating. Baked pie keeps well at room temperature for 2 to 3 days covered loosely with foil, though refrigerating extends shelf life to approximately 5 days. Unbaked pies can be frozen for up to 3 months and baked directly from frozen, adding approximately 10 to 15 minutes to the baking time.
What if I don’t have cornstarch on hand?
All-purpose flour works as a substitute thickener, though it produces a slightly different texture and may create a less glossy filling. Use a 2:1 ratio—for every 1 tablespoon cornstarch, substitute 2 tablespoons flour. Instant tapioca provides another excellent alternative with a texture that many bakers prefer.
Is homemade crust difficult for beginners?
While homemade crust requires attention to detail, it’s achievable for beginners who follow instructions carefully. The most important factors are keeping ingredients cold, handling the dough minimally, and allowing adequate resting time. Most failures result from overworking the dough rather than lack of skill.
Can I make a lattice crust instead of a double crust?
Absolutely. A lattice crust provides beautiful visual appeal and allows some steam to escape, reducing the risk of overflow. Cut your top dough into ½-inch-wide strips, lay half diagonally across the filling in one direction, then weave the remaining strips perpendicular to create the classic lattice pattern. Seal the strips’ ends to the bottom crust edge using egg wash as adhesive.
Variations and Creative Adaptations
Once you’ve mastered the basic blackberry pie, consider these variations to refresh your repertoire. Mix blackberries with other berries such as raspberries or blueberries for complex flavor profiles. Add spice through cinnamon, nutmeg, or cardamom for warmth and depth. Substitute a portion of the sugar with honey or brown sugar for subtle caramel notes that complement the berries’ natural tartness.
For a more elegant presentation, try a crumb topping instead of a second crust by combining flour, brown sugar, cold butter, and chopped nuts, then distributing this mixture over the filling before baking. This creates textural contrast while avoiding the challenge of achieving perfectly crimped edges.
Conclusion
Creating a homemade blackberry pie from scratch represents a rewarding culinary achievement that rewards careful attention and proper technique. By understanding each component—the flaky, buttery crust, the perfectly thickened fruit filling, and the proper baking methods—you’ll produce a pie that tastes far superior to any convenience option. The combination of fresh summer berries with homemade pastry creates a dessert worthy of your finest table settings and most appreciated by those fortunate enough to enjoy it. Whether this becomes your signature dessert or simply a delightful summer treat, mastering blackberry pie ensures you’ll return to this classic recipe for years to come.
References
- Blackberry Pie Recipe — Kristine’s Kitchen. 2024. https://kristineskitchenblog.com/blackberry-pie/
- An Easy Homemade Blackberry Pie Recipe — The Delicious Spoon. 2024. https://thedeliciousspoon.com/blackberry-pie/
- The Only Blackberry Pie Recipe You’ll Ever Need — Son Shine Kitchen. 2024. https://www.sonshinekitchen.com/the-only-blackberry-pie-recipe-youll-ever-need/
- Homemade Blackberry Pie — My Country Table. 2024. https://mycountrytable.com/homemade-blackberry-pie/
- Blackberry Pie Recipe — Bigger Bolder Baking. 2024. https://www.biggerbolderbaking.com/blackberry-pie/
- Homemade Blackberry Pie — Spend With Pennies. 2024. https://www.spendwithpennies.com/homemade-blackberry-pie/