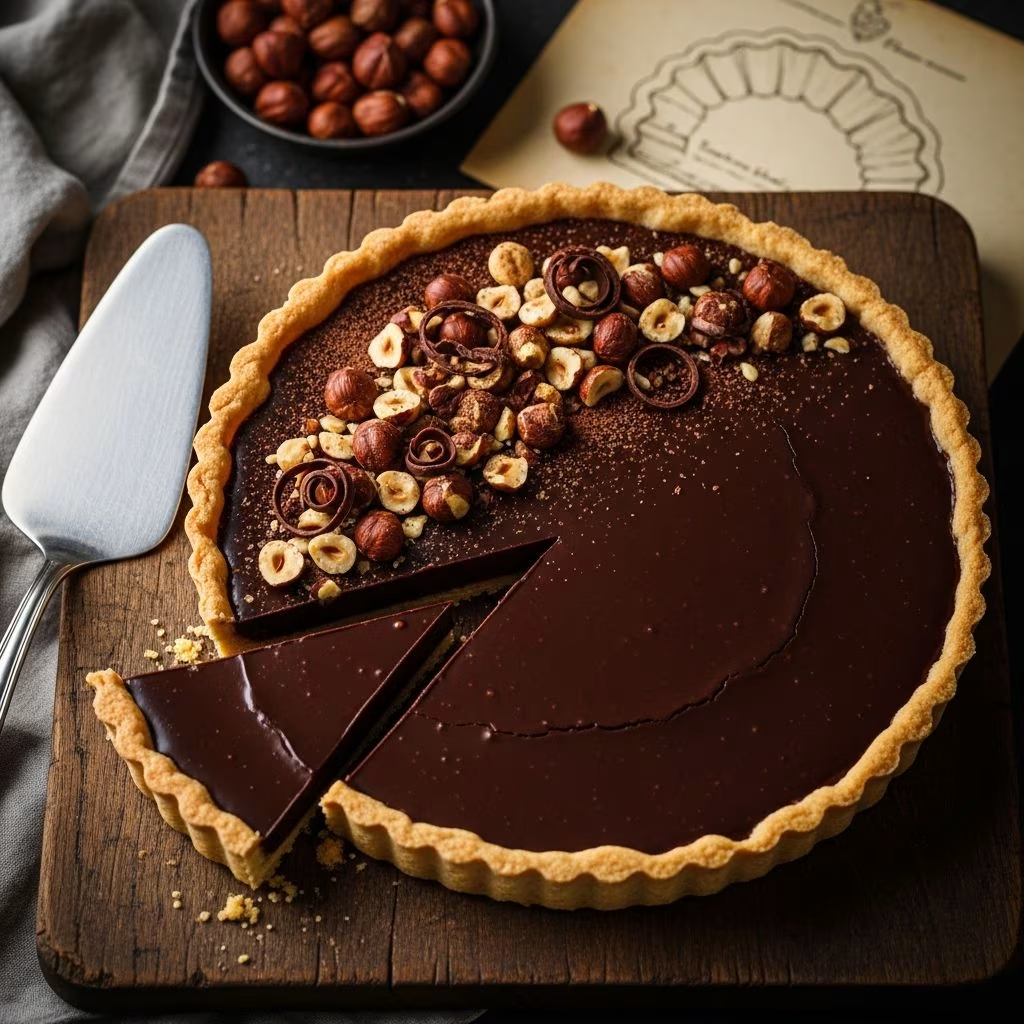
For home bakers seeking to elevate their dessert repertoire, few creations impress quite like a sophisticated hazelnut and chocolate tart. This show-stopping confection combines multiple flavor layers and textures into a single elegant presentation that rivals professional patisseries. What makes this dessert particularly appealing is its deceptive simplicity—while it appears complex, the fundamental techniques are accessible to bakers of varying skill levels.
The charm of this tart lies in its ability to evoke the beloved candy experience of commercial peanut butter cups, but elevated with the refined taste of hazelnuts and quality chocolate. The result is a dessert that feels indulgent yet sophisticated, perfect for special occasions or as an impressive addition to a dinner party spread.
Understanding the Essential Components
Creating a successful hazelnut chocolate tart begins with understanding the role each component plays in the final product. Unlike single-layer cakes or simple cookies, this tart consists of distinct, complementary layers that work together to create a memorable eating experience.
The Foundation: Chocolate Shell
The chocolate shell serves as both a structural component and flavor foundation. This critical layer lines the tart pan, creating a protective barrier that prevents moisture from the filling from compromising the pastry structure. A properly executed chocolate shell must be thick enough to maintain integrity during unmolding yet thin enough to bite through cleanly.
Professional bakers typically employ a combination of bittersweet and semisweet chocolate varieties to achieve optimal flavor balance. Bittersweet chocolate contributes complexity and prevents excessive sweetness, while semisweet chocolate adds approachability and helps achieve the correct texture during tempering. The ratio typically favors bittersweet chocolate slightly, creating depth without sacrificing palatability.
The Filling: Hazelnut Butter Composition
The heart of the tart consists of a homemade hazelnut butter filling that bears similarity to commercial nut butters but with superior flavor and customization potential. Unlike store-bought versions, freshly processed hazelnut butter contains no unnecessary additives and allows bakers to control sweetness levels precisely.
Creating smooth hazelnut butter requires patience and proper processing technique. Raw or lightly roasted hazelnuts contain natural oils that gradually release during mechanical breakdown, transforming the nuts into a creamy consistency. Temperature management during this process affects final texture significantly—slower processing produces superior results compared to rapid high-speed blending.
Textural Accent Elements
Many sophisticated versions of this tart incorporate textural elements that reference its candy inspiration while adding genuine culinary interest. Crushed waffle cone pieces or specialized cookie crumbles distributed throughout the nut butter layer create delightful pockets of crispness that contrast pleasingly with the smooth filling.
Ingredient Selection and Quality Considerations
The success of this tart depends heavily on ingredient quality, as the relatively simple ingredient list means each component significantly influences the final product.
Hazelnut Sourcing and Preparation
The foundation of your hazelnut filling begins with selecting appropriate hazelnuts. Blanched hazelnuts offer several advantages: their pre-removed skins eliminate extra steps, they process more smoothly, and they provide a more refined appearance and taste compared to their skin-on counterparts. However, unblanched hazelnuts remain acceptable if you’re willing to invest time in skin removal post-roasting.
Roasting hazelnuts is non-negotiable for developing the complex, nutty flavors essential to this dessert. Raw hazelnuts produce a comparatively flat, uninteresting filling. Proper roasting temperatures—typically around 350°F—should be maintained carefully, as overroasted nuts develop bitter notes that compromise the entire tart.
Chocolate Quality Standards
The chocolate components require careful selection, as inferior quality chocolate results in a grainy, uninviting mouthfeel. Look for chocolate containing cocoa butter rather than vegetable oils, ensuring smooth melting and superior flavor. The 60% cacao range for bittersweet chocolate typically provides the ideal balance between bitter sophistication and approachable sweetness.
When melting chocolate, technique matters considerably. Double boiler methods prevent scorching while ensuring even temperature distribution. Water contamination poses the greatest risk—even small amounts cause seizing, a catastrophic condition requiring complete chocolate replacement.
Equipment and Preparation Strategy
Before beginning the tart assembly process, gather and prepare appropriate equipment. A removable-bottom tart pan (typically 9-10 inches) facilitates attractive presentation and easier removal. Quality pastry tools—rubber spatulas, offset spatulas, and small serving spoons—significantly improve construction precision.
Parchment paper lining serves a practical purpose: it prevents sticking and allows complete tart removal from the metal pan. This simple step transforms what could be a frustrating extraction into a graceful presentation moment.
Step-by-Step Construction Process
Initial Preparation Phase
Begin by positioning your oven rack and preheating to 350°F. This allows temperature stabilization before hazelnut roasting commences. Spread hazelnuts on a rimmed baking sheet in a single layer, ensuring even heat distribution. Roasting duration typically ranges from 10-12 minutes, with visual cues indicating completion: the hazelnut centers should display a light brown color when a test nut is cracked open.
Once roasted and slightly cooled, the removal of hazelnut skins (if using unblanched varieties) requires a mechanical approach: place warm nuts in a clean kitchen towel and rub vigorously, allowing the friction to loosen and remove the papery outer layer. This step, while seemingly minor, contributes significantly to filling smoothness and refined appearance.
Pan Preparation and Chocolate Shell Creation
Prepare your tart pan by lightly coating the interior surface with vegetable oil using a paper towel. Position parchment paper on the interior bottom if desired, providing additional insurance against sticking. This preparation ensures your finished tart can be confidently removed and presented elegantly.
Combine bittersweet and semisweet chocolate with kosher salt in a heatproof bowl positioned over a saucepan containing barely simmering water. The key word is “barely”—aggressive boiling creates temperature instability and water vapor that compromises chocolate integrity. Stir frequently with a heatproof spatula, observing as the chocolate gradually transitions from solid chips to smooth, glossy liquid.
Once fully melted, pour approximately half the chocolate into your prepared pan. Using a small spoon, carefully spread the chocolate across the bottom and up the sides, working methodically toward the edges. This layer should coat the pan completely without excessive thickness—think of creating a chocolate cup rather than a chocolate brick.
Transfer the chocolate-lined pan to the freezer for 10-30 minutes, allowing the chocolate to set completely. This crucial chilling period prevents the chocolate shell from breaking during filling addition.
Hazelnut Butter Preparation
While the chocolate shell sets, begin creating your hazelnut butter. Place roasted hazelnuts and salt into a food processor, pulsing until a paste consistency emerges—this transformation typically requires about 4 minutes of processing. The mixture will progress from chunky hazelnut pieces through intermediate textures before finally achieving smooth, spreadable consistency.
Add room-temperature butter, vanilla extract (or superior vanilla bean paste), and vegetable oil to the processed hazelnuts. Continue processing until achieving peanut butter-like consistency—smooth and creamy without any grainy texture. Add powdered sugar last, pulsing gently until just combined, then transfer to a medium bowl.
Textural Element Integration
If incorporating crushed cone pieces or cookie crumbles, add them to your hazelnut butter at this stage. Crush your chosen textural element to pea-sized pieces, distributing evenly throughout the filling. Mix thoroughly, using your hands for efficiency if desired, ensuring even distribution.
Assembly and Second Chilling Phase
Remove your chocolate shell from the freezer and carefully pour the hazelnut butter filling into its center. Using an offset spatula or spoon, gently press the filling downward, compacting it into an even layer. Smooth the surface carefully, creating a uniform presentation.
Pour or spread the remaining melted chocolate (reheating briefly if necessary) over the hazelnut layer, extending all the way to the pan edges. Smooth this top layer with your offset spatula or spoon, creating an attractive finish. Generously sprinkle flaky sea salt across the chocolate surface—this final touch adds sophisticated complexity and provides pleasant textural contrast.
Return the assembled tart to the freezer for at least 30 minutes, allowing the top chocolate layer to set completely. The tart may be frozen for up to 4 hours without quality degradation.
Finishing Touches and Serving Optimization
Removing your tart from the pan requires a gentle approach. If you lined the pan with parchment paper, simply push upward from the removable bottom, allow the ring to separate, and carefully peel away the parchment paper. Transfer your finished tart to a serving plate and allow it to rest in the refrigerator for approximately 30 minutes, which softens the frozen filling slightly and makes slicing more manageable.
Before serving, allow the tart to sit at room temperature for 15-20 minutes, bringing it to optimal eating temperature where all flavor components express themselves fully. For the neatest presentation, dip your knife in hot water between cuts, wiping the blade clean after each slice. While this technique requires minimal additional effort, it dramatically improves the visual appeal of each portion.
Creative Variations and Customization
This foundational tart concept accommodates numerous creative modifications while maintaining its essential character. Some bakers experiment with brown butter incorporation in the chocolate layer, adding nutty complexity that complements hazelnuts beautifully. Others combine homemade pastry shells with this filling, creating a multi-component showstopper requiring additional technical skill.
Chocolate enthusiasts might adjust the bittersweet-to-semisweet ratio according to personal preference, creating darker or lighter versions. Sweetness modification through adjusted powdered sugar quantities allows customization for various palates. Some creative approaches include hazelnut oil in place of some vegetable oil, intensifying the nut flavor profile.
Storage and Make-Ahead Strategies
One advantage of this tart is its excellent storage stability. When properly wrapped and refrigerated, it maintains quality for 3-4 days without quality degradation. Freezer storage extends shelf life to several weeks, though optimal flavor presentation occurs within the first two weeks. To thaw, simply move from freezer to refrigerator several hours before serving, allowing gradual temperature adjustment.
Individual components can be prepared in advance on separate days: hazelnut butter keeps refrigerated for up to one week, chocolate shells can be made 2-3 days ahead, and fully assembled tarts freeze beautifully. This flexibility makes this dessert ideal for busy hosts seeking to minimize day-of preparation.
Troubleshooting Common Challenges
Chocolate Shell Cracking: Excessively rapid cooling creates stress fractures. Thaw cracked shells in the refrigerator rather than freezer to allow more gradual solidification.
Grainy Hazelnut Butter: Insufficient processing time or partially processed nuts cause graininess. Continue processing longer, and ensure your nuts are properly roasted and cooled before beginning.
Chocolate Seizing: Water contamination causes this irreversible condition. Prevent by ensuring all equipment is completely dry before chocolate melting begins.
Difficult Unmolding: Inadequate pan preparation complicates removal. Ensure thorough oil coating or reliable parchment paper placement during initial assembly stages.
Nutritional Considerations
While indulgent, this tart provides genuine nutritional value beyond simple empty calories. Hazelnuts contribute healthy monounsaturated fats and valuable minerals including vitamin E and magnesium. Dark chocolate contains beneficial antioxidants and polyphenols when quality chocolate is employed. Moderation in portion sizing allows enjoyment of this sophisticated dessert within balanced eating approaches.
Frequently Asked Questions
Can I make this tart without a food processor?
Yes, though results require more effort. Use a mortar and pestle with multiple batches for the hazelnut processing, or purchase pre-made hazelnut butter and mix it with remaining ingredients. The homemade version provides superior flavor, but shortcuts remain viable.
What happens if my chocolate seizes?
Seized chocolate cannot be recovered for use in this tart. Begin again with fresh chocolate and ensure all tools are completely dry. A single water droplet causes this frustrating condition.
Can I substitute different nuts?
Absolutely. Almond or walnut butters create interesting variations, though hazelnut’s subtle sweetness suits the chocolate-forward profile particularly well. Adjust salt quantities based on your selected nut.
How should I store leftover tart?
Wrap well in plastic wrap and refrigerate for 3-4 days, or freeze for several weeks. Thaw in the refrigerator before serving for optimal texture and flavor development.
Can I use milk chocolate instead of semisweet?
Milk chocolate’s higher sugar content creates excessive sweetness. Stick with the bittersweet and semisweet combination for balanced flavor complexity.
Conclusion
Creating an impressive hazelnut and chocolate tart represents an achievable goal for dedicated home bakers willing to invest modest effort and attention to technique. The multiple layers and sophisticated flavor profile reward careful execution while remaining fundamentally approachable. Whether preparing for special occasions or seeking to expand your baking repertoire, this elegant dessert delivers impressive results worthy of any sophisticated table.
References
- Hazelnut Butter Cup Tart — Bon Appétit Magazine, November 2022. https://www.bonappetit.com/recipe/hazelnut-butter-cup-tart-recipe
- Hazelnut and Brown Butter Milk Chocolate Tart Recipe — Mission Chocolate Recipes. https://missionchocolaterecipes.com/hazelnut-brown-butter-milk-chocolate-tart/
- Hazelnuts: Nutrition and Health Benefits — Oregon State University Extension Service. https://extension.oregonstate.edu/ask-expert/featured/what-are-health-benefits-hazelnuts
- The Science of Chocolate Tempering — Institute of Culinary Education. https://www.iceculinary.com/