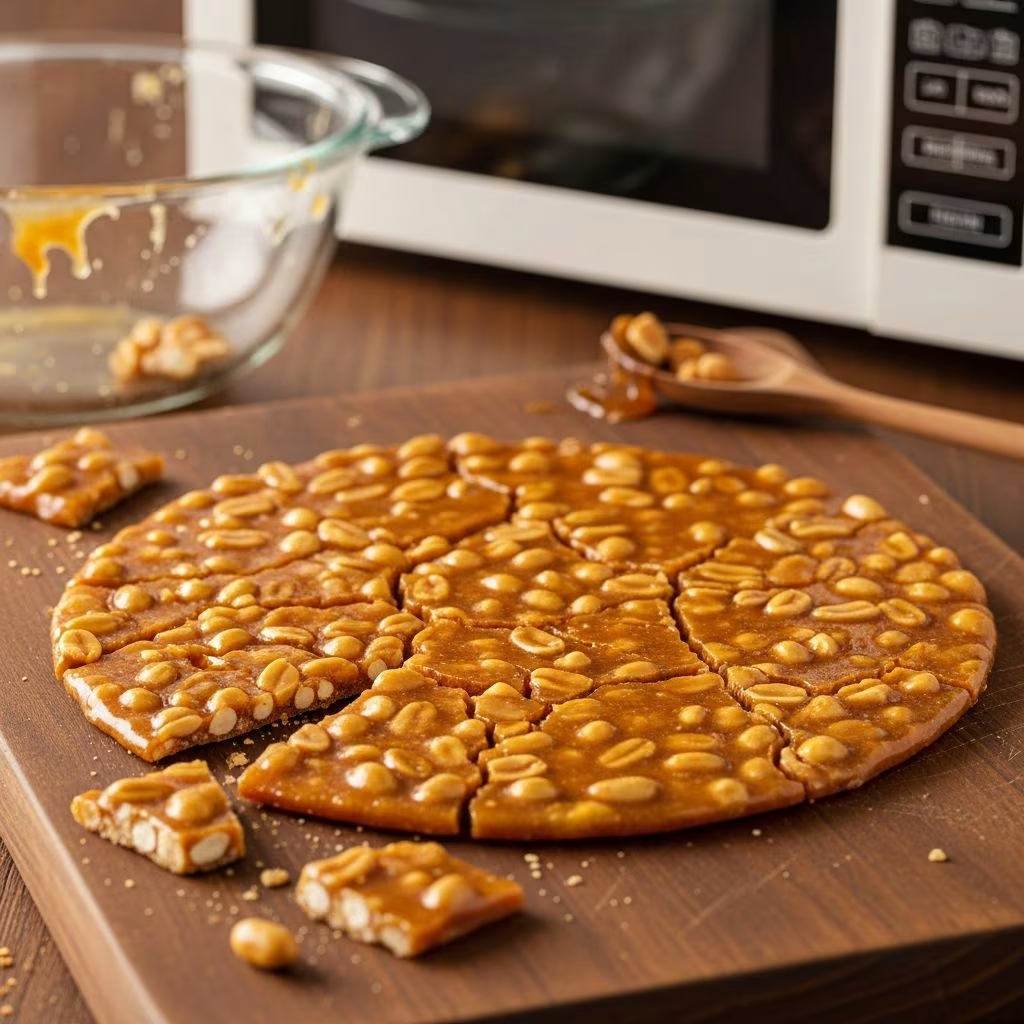
Peanut brittle stands as a timeless confection, blending the rich crunch of roasted nuts with a shattering caramel glaze. This microwave version transforms the traditional stovetop process into a swift, accessible endeavor suitable for any kitchen. Without specialized equipment, you can produce batches of this addictive treat in mere minutes, making it ideal for spontaneous cravings or festive preparations.
The Allure of Homemade Peanut Brittle
Classic peanut brittle evokes memories of county fairs and holiday tins, yet its stovetop preparation often intimidates with demands for precise temperature control. The microwave method circumvents these hurdles, yielding consistent results through short, high-power bursts that mimic professional candy-making. This approach not only saves time but also minimizes cleanup, as the process unfolds in a single bowl.
At its core, peanut brittle relies on sugar’s transformation into a hard-crack stage, where it reaches approximately 300°F (149°C), creating the signature snap. Peanuts add savory contrast, while subtle additions like vanilla and baking soda introduce flavor depth and airy texture. The result? A confection that balances sweetness, saltiness, and crunch, far surpassing store-bought alternatives laden with preservatives.
Essential Ingredients for Success
Gathering pantry staples ensures you’re ready for this quick recipe. Here’s what you’ll need for about 1.5 pounds of brittle:
- 1 cup granulated sugar: Forms the caramel base, providing sweetness and structure.
- 1/2 cup light corn syrup: Prevents crystallization for a smooth, glossy finish.
- 1/8 teaspoon salt: Enhances peanut flavor and balances sweetness (optional but recommended).
- 1 1/2 cups roasted, salted peanuts: Dry-roasted varieties work best for even toasting.
- 1 tablespoon butter: Adds richness and aids in pouring.
- 1 teaspoon vanilla extract: Infuses aromatic notes.
- 1 teaspoon baking soda: Creates foam for lightness—measure precisely.
These components, common in most households, highlight the recipe’s accessibility. Variations might include cashews or almonds, but peanuts deliver the nostalgic essence.
Step-by-Step Microwave Preparation
Prep time clocks in at 5 minutes, with cooking under 10, plus cooling. Mise en place is crucial—measure everything beforehand, as timing is tight.
Prepare the surface: Line a large baking sheet with parchment, foil, or a silicone mat. Lightly grease with oil or non-stick spray to prevent sticking. Set aside.
Combine base: In a deep, microwave-safe glass bowl (at least 2-quart capacity to accommodate foaming), mix sugar, corn syrup, and salt. Stir to combine.
First cook: Microwave on high for 4-5 minutes. The mixture will bubble vigorously and turn clear to pale amber. No stirring needed yet.
Add peanuts: Carefully remove (use oven mitts—it’s scorching). Stir in peanuts until coated. Return to microwave for 3-5 minutes on high, stirring halfway. Watch for light golden brown; times vary by wattage (e.g., 3 minutes in a 1000W unit).
Incorporate butter and vanilla: Stir in butter and vanilla. Microwave 1-2 more minutes until peanuts toast and mixture deepens to caramel hue. Smell for nutty aroma; avoid burning.
Final foam: Remove and quickly beat in baking soda. It foams dramatically—stir swiftly for even bubbles, creating the honeycomb texture.
Spread and cool: Pour onto prepared sheet. Use a greased spatula to spread to 1/4-inch thickness. Cool 30-60 minutes until hard. Break into shards.
Store in airtight containers at room temperature for up to 2 weeks. Humidity softens it, so avoid steamy environments.
Pro Tips for Perfect Texture
- Bowl choice: Glass withstands heat better than plastic; depth prevents overflow.
- Microwave power: Adjust times for your model—start conservative to avoid scorching.
- Peanut selection: Salted, roasted peanuts amplify flavor; unsalted works but add extra salt.
- No thermometer? Color and smell guide doneness: golden, nutty-scented.
- Troubleshooting stickiness: Undercooked? Re-microwave briefly. Overcooked? Bitter taste signals burn—discard and restart.
For altitude adjustments (above 3000 ft), reduce baking soda slightly to control foam.
Nutrition and Serving Facts
A 1-ounce serving (about 6-8 pieces) offers roughly 215 calories, balancing indulgence with portion control. Key stats per serving:
| Nutrient | Amount | % Daily Value |
|---|---|---|
| Calories | 215 kcal | 11% |
| Total Fat | 11g | 14% |
| Saturated Fat | 2.5g | 13% |
| Carbohydrates | 28g | 10% |
| Sugars | 24g | – |
| Protein | 5g | 10% |
| Sodium | 200mg | 9% |
Values approximate; peanuts provide healthy fats and protein amid sugar. Serve atop ice cream, chop into cookies, or gift in cellophane bags.
Creative Twists and Variations
Elevate the classic:
- Nut medley: Swap half peanuts for pecans or almonds.
- Spicy kick: Add 1/4 tsp cayenne post-foaming.
- Chocolate dip: Melt dark chocolate, dip cooled pieces halfway.
- Seed boost: Mix in pumpkin seeds for autumn vibes.
- Vegan adapt: Use plant-based butter and certified syrup.
These tweaks maintain the 15-minute timeline while personalizing flavor.
Frequently Asked Questions
Why does the baking soda make it foam?
Baking soda reacts with the hot, acidic syrup, releasing carbon dioxide bubbles that lighten the brittle’s dense structure for superior crunch.
My brittle is chewy—what went wrong?
Insufficient cooking time prevented hard-crack stage. Next batch, extend peanut stage by 1 minute and ensure deep caramel color.
Can I halve the recipe?
Yes, but keep microwave times similar—scaling down affects heating less than expected. Use a smaller bowl.
Is it gluten-free?
Absolutely; all ingredients are naturally gluten-free. Confirm peanuts are processed in dedicated facilities if celiac.
How long does it last?
Airtight storage yields 2 weeks shelf life. Freezing extends to 3 months—thaw at room temp.
Why Microwave Brittle Outshines Traditional Methods
Stovetop brittle demands constant stirring and thermometer vigilance, risking separation or scorching. Microwave versions, as detailed across tested recipes, offer hands-off reliability with comparable quality. The foaming step remains pivotal, ensuring porosity that shatters satisfyingly.
Economically, it costs under $5 per batch, yielding 20+ servings—budget-friendly for gifting. Its versatility suits holidays, parties, or midnight snacks, proving that premium candy needn’t be complex.
Experiment confidently; this method forgives minor variances, delivering pro-level results at home.
References
- Recipe For Microwave Peanut Brittle — Culinary Hill. 2023-12-01. https://www.culinaryhill.com/microwave-peanut-brittle/
- The BEST Peanut Brittle Made in the MICROWAVE! — YouTube (Thyme to Cook with Kristi). 2023-11-15. https://www.youtube.com/watch?v=t5HkAxiF8M0
- Easy Microwave Peanut Brittle — Southern Bite. 2024-01-10. https://southernbite.com/easy-microwave-peanut-brittle/
- Microwave Peanut Brittle — Easy As Cookies. 2023-10-20. https://easyascookies.com/microwave-peanut-brittle/
- Easy Microwave Peanut Brittle — A Food Lover’s Kitchen. 2024-02-05. https://afoodloverskitchen.com/easy-microwave-peanut-brittle/
- Microwave Peanut Brittle — Melissa’s Southern Style Kitchen. 2023-09-12. https://www.melissassouthernstylekitchen.com/microwave-peanut-brittle/