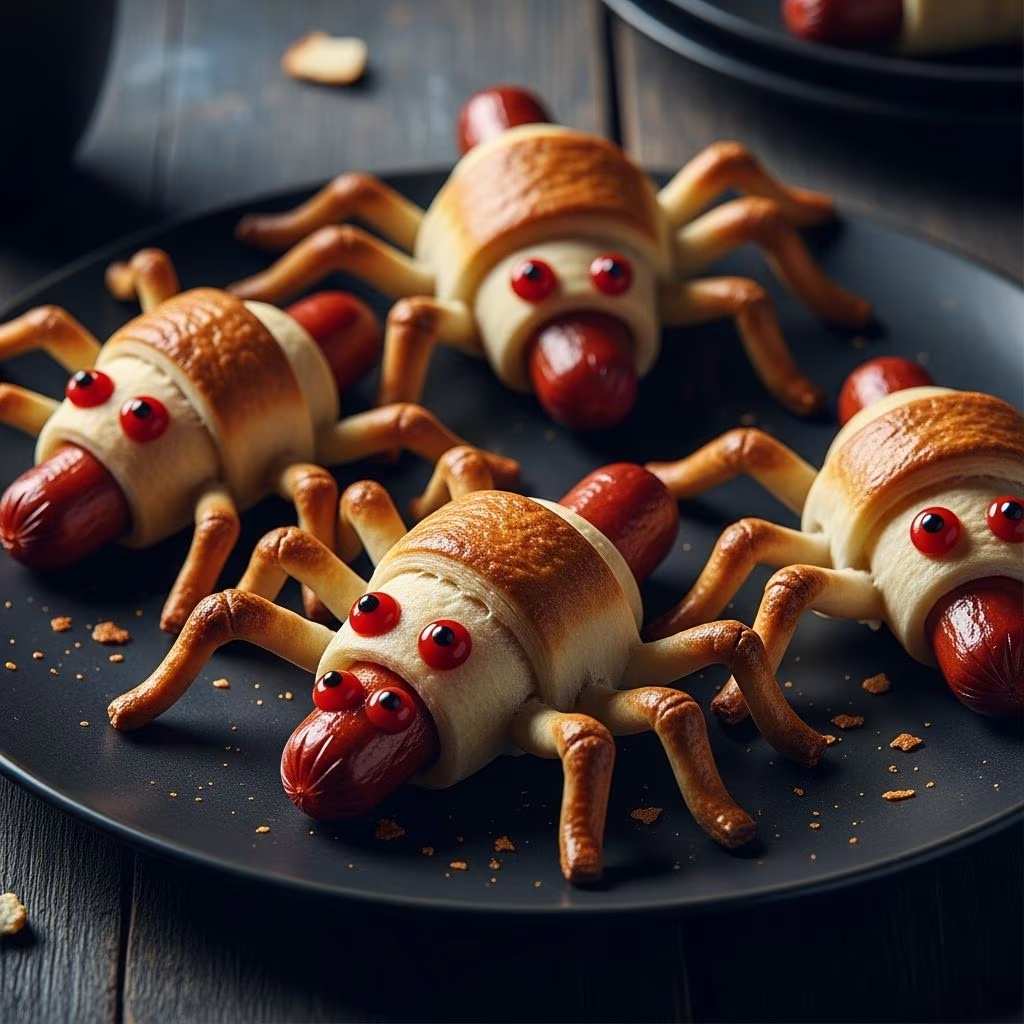
When Halloween season arrives, creative food presentations can elevate any gathering from ordinary to memorable. One particularly charming option involves transforming humble hot dogs into whimsical arachnid characters. This culinary craft requires minimal ingredients and straightforward techniques, making it accessible for cooks of all skill levels. The result is a visually engaging treat that appeals to both children and adults who appreciate playful food presentations.
Why These Spider Hot Dogs Deserve a Spot on Your Halloween Menu
Seasonal celebrations benefit greatly from thematic food elements that spark conversation and encourage participation. These spider-themed hot dogs offer several advantages for party planning. They serve as both a satisfying snack and an entertaining centerpiece that guests remember long after the event concludes. The combination of familiar ingredients—hot dogs and refrigerated dough—means preparation doesn’t require exotic components or specialized culinary skills.
From a practical standpoint, these creations can be assembled ahead of time and refrigerated before baking, allowing hosts to manage preparation across multiple hours. The baking process produces a golden exterior that contrasts appealingly with the warm filling, creating visual interest on serving platters. Unlike some elaborate Halloween recipes requiring extensive skill or specialized equipment, this approach remains straightforward enough for families seeking interactive cooking activities.
Gathering Your Ingredients and Kitchen Equipment
The beauty of this recipe lies in its minimalist ingredient list. You’ll need standard pantry and refrigeration staples that many households already stock:
- Hot dogs (typically eight to twelve, depending on your serving needs)
- Refrigerated crescent roll dough (one or two tubes as needed)
- Toppings for spider eyes (options include ketchup, capers, black olives, poppy seeds, or candy decorations)
- Basic baking sheet and parchment paper (optional but recommended)
- Cutting board and sharp knife for precise cuts
- Chopstick, toothpick, or similar tool for applying eye details
The ingredient flexibility deserves emphasis. While specific brands appear in various versions, substitutions work well. Any quality hot dog brand functions identically in the recipe, and alternative eye materials produce equally charming results. This adaptability makes the recipe suitable for households with dietary preferences or ingredient restrictions.
Transforming Hot Dogs into Eight-Legged Creatures
The fundamental technique involves creating a visual representation of spider legs while maintaining the structural integrity of the hot dog. This begins with careful cutting that produces eight protruding segments—four on each end of the hot dog. The process requires attention but not precision craftsmanship.
Start by positioning your hot dog on the cutting board. Using your sharp knife, make a two-inch slice through the center of one end, cutting parallel to the cutting board’s surface. This creates your first leg. Immediately adjacent to this cut, make two additional parallel cuts of equal length and depth. You now have four roughly equal segments at that end. Flip the hot dog around and repeat this process on the opposite end, creating four more legs.
The critical detail involves leaving the center approximately one and one-half inches of the hot dog intact. This maintains structural stability and provides the area where you’ll wrap your crescent roll dough. The leg segments, when baked, will curl slightly, enhancing their spider-like appearance. Some versions recommend cutting the hot dog in half first, creating multiple spiders from single hot dogs, while others keep them whole. Either approach works successfully.
Preparing Your Crescent Roll Wrapping
Refrigerated crescent dough serves as the body component of your spider creation. If your dough comes in tube form with perforated triangular sections, you’ll need to consolidate these pieces into longer strips. Press the perforations together firmly to keep rectangular sections intact rather than separating them into individual triangles. This creates the linear wrapping material needed for the next step.
From these rectangles, cut lengthwise strips approximately one inch wide and two to three inches long. These dimensions create manageable wrapping pieces that encircle the hot dog’s center without excessive excess dough. The strips should wrap around the hot dog’s middle, where the legs protrude from both ends.
Temperature considerations matter during this phase. Many recipes recommend working with slightly cold dough—removed from refrigeration just before use. Cold dough remains more pliable and less sticky, making it easier to handle and shape around the hot dog without tearing or stretching excessively.
The Assembly and Baking Process
Once your hot dogs feature eight sturdy legs and your dough strips are prepared, assembly begins. Place a prepared hot dog on your work surface with legs protruding prominently. Wrap a crescent dough strip around the hot dog’s center, positioning it perpendicular to the protruding legs. Pinch the dough seam firmly to seal it completely. This sealed edge should sit downward on your baking sheet to prevent it from opening during baking.
Arrange your assembled spiders on an ungreased baking sheet or one lined with parchment paper. Spacing them approximately two inches apart ensures even heat circulation and prevents them from touching during expansion. This is an ideal moment to add your eye decorations if using ingredients like capers or olives that won’t bake well. Press two pieces gently onto the dough body where you envision the spider’s face.
Preheat your oven to either 375 degrees Fahrenheit or 400 degrees Fahrenheit, depending on which variation you follow. Baking time typically ranges from ten to fifteen minutes, with the dough transitioning from pale to golden brown. Watch carefully during the final few minutes, as baking times vary based on oven characteristics and hot dog size. The dough should achieve a light golden-brown exterior, and the hot dog legs should appear slightly curled and sizzling when ready.
Finishing Touches and Eye Decoration Techniques
After removing your creations from the oven, several eye application methods become available. If you didn’t pre-bake your eyes, now is the moment to add them. A simple approach involves dipping a chopstick or similar tool into ketchup and dotting two small spots onto the cooled dough body. This creates a charming, minimalist face with instant recognition.
For more elaborate presentations, consider these alternatives:
- Capers produce an authentic spider-eye appearance with their dark color and rounded shape
- Sliced black olives offer a similar aesthetic with convenient flat backing for adhesion
- Poppy seeds create tiny, detailed eyes for miniature spider creations
- Candy eyes (typically available during Halloween season) provide colorful personality
- Edible markers allow precise placement and creative expression
The eye placement significantly influences your spider’s personality and apparent direction. Positioning eyes on the upper front of the body creates a forward-facing, alert appearance, while slightly offset placement suggests a more mischievous character. These subtle variations allow creative expression within the recipe’s straightforward framework.
Scaling Your Recipe for Various Gathering Sizes
| Number of Guests | Hot Dogs Needed | Crescent Rolls Required | Approximate Prep Time | Baking Time |
|---|---|---|---|---|
| Small gathering (8-10) | 8 | 1 tube | 20 minutes | 12-15 minutes |
| Medium party (15-20) | 16 | 2 tubes | 35 minutes | 12-15 minutes per batch |
| Large celebration (25+) | 24-32 | 3-4 tubes | 60 minutes | 12-15 minutes per batch |
The recipe adapts seamlessly to different party sizes. Simply multiply ingredient quantities proportionally. However, oven capacity may require baking in multiple batches for larger gatherings. Prepared spiders can remain refrigerated for several hours before baking, allowing you to organize your cooking schedule around oven availability.
Storage and Make-Ahead Strategies
Planning ahead transforms this recipe from a day-of undertaking to a manageable project distributed across multiple preparation sessions. Assembled spiders maintain quality in refrigeration for up to eight hours before baking. This allows morning assembly for evening entertaining or advance weekend preparation for following-week events.
After baking, cooled spiders can be reheated gently in a 250-degree oven for approximately five minutes without significant quality loss. They’re best served warm but remain palatable at room temperature for several hours. Avoid refrigerating baked spiders if possible, as the crescent roll coating becomes less appealing when chilled and reheated.
Uncooked dough components should remain separate from assembled spiders if storing for extended periods. Moisture from the hot dog gradually affects dough texture over many hours. If you must prepare spiders more than four hours ahead, wrap them loosely and leave them at room temperature rather than refrigerating.
Complementary Serving Suggestions
While these spiders shine independently, thoughtful accompaniments enhance the festive experience. Traditional condiments like ketchup and mustard pair naturally with the hot dog component. Spicy mustard adds sophistication for adult guests, while milder versions suit younger palates.
Themed sides expand the Halloween presentation. Arrange spiders on platters surrounded by Halloween-colored vegetables, create a “web” presentation using parchment paper folded into geometric patterns, or serve them in small paper boats decorated with spooky imagery. Beverage pairings might include themed punch, apple cider, or age-appropriate Halloween cocktails alongside the food.
Consider serving your spiders as the centerpiece of a comprehensive Halloween spread featuring other themed items like mummy-wrapped sandwiches, witches’ hat appetizers, or graveyard desserts. This integrated approach creates a memorable feast where multiple elements reinforce the seasonal theme.
Troubleshooting Common Preparation Challenges
Most aspects of this recipe proceed smoothly, but occasional issues may arise. If crescent dough tears during wrapping, brief refrigeration restores workability. Dough becoming too warm and sticky responds well to ten minutes in the refrigerator before continuing.
Hot dogs splitting during cutting typically result from insufficient sharpness in your knife. A properly honed blade cuts cleanly through the casing without tearing. Ensure your knife has adequate edge before beginning the leg-cutting phase.
Uneven browning suggests your oven may have temperature variation across its interior. Rotating your baking sheet halfway through the cooking time often resolves this issue. Additionally, ensure your sheet isn’t positioned too close to heating elements, which can create overly browned spots.
If your spiders emerge looking flattened rather than three-dimensional, your oven temperature may be too low. Ensure accurate preheating—allow at least fifteen minutes for your oven to reach the target temperature. Lower-than-intended temperatures result in extended baking times and less attractive browning.
Why This Recipe Becomes a Seasonal Tradition
Beyond the straightforward mechanics of preparation, this recipe succeeds because it bridges childhood whimsy with adult appreciation for practical entertaining solutions. The visual transformation from ordinary ingredients to recognizable creatures delights observers before consumption even occurs. Watching guests discover the hot dog interior beneath the golden crust provides consistent entertainment value.
The recipe’s cultural significance lies in its accessibility. Unlike elaborate carved centerpieces or labor-intensive pastries, anyone can execute this project successfully. This democratization of themed entertaining empowers hosts to create memorable experiences without requiring professional culinary training or extreme time commitments.
For families seeking interactive traditions, involving children in assembly creates bonding opportunities and builds holiday memories. The forgiving nature of the recipe—minor imperfections don’t diminish the final product’s appeal—makes it suitable for enthusiastic but inexperienced junior cooks. A child’s first successfully baked spider hot dog becomes a source of pride and encourages future creative culinary experiments.
References
- Spooky Spider Hot Dogs — Fab Everyday. https://fabeveryday.com/2018/09/fun-halloween-recipe-for-kids-spooky.html
- Spider Hotdogs — Rhodes Bake-N-Serv. https://rhodesbakenserv.com/spider-hotdogs/
- Halloween Hot Dog Spiders — The Jam Jar Kitchen. https://jamjarkitchen.com/2021/08/09/halloween-hot-dog-spiders/
- Hot Dog Spiders — Applegate Recipes. https://applegate.com/recipes/hot-dog-spiders