The Dubai chocolate cake has become a viral sensation in recent years, captivating dessert enthusiasts with its striking combination of rich chocolate, crunchy textures, and aromatic pistachio elements. While traditional versions of this Middle Eastern-inspired treat may seem intimidating with their lengthy ingredient lists and complex techniques, a simplified approach using readily available components makes this sophisticated dessert accessible to home bakers of all skill levels. This guide walks you through creating a memorable chocolate cake that delivers restaurant-quality results without requiring specialized culinary training or hard-to-find ingredients.
Understanding the Dubai Chocolate Cake Phenomenon
The Dubai chocolate cake represents a modern fusion of traditional Middle Eastern flavors with contemporary baking trends. This dessert gained worldwide recognition through social media platforms, where its visually striking appearance and unique flavor profile captured the attention of food lovers everywhere. The appeal lies not only in its aesthetic presentation but also in the harmonious blend of complementary ingredients that create a multi-sensory eating experience.
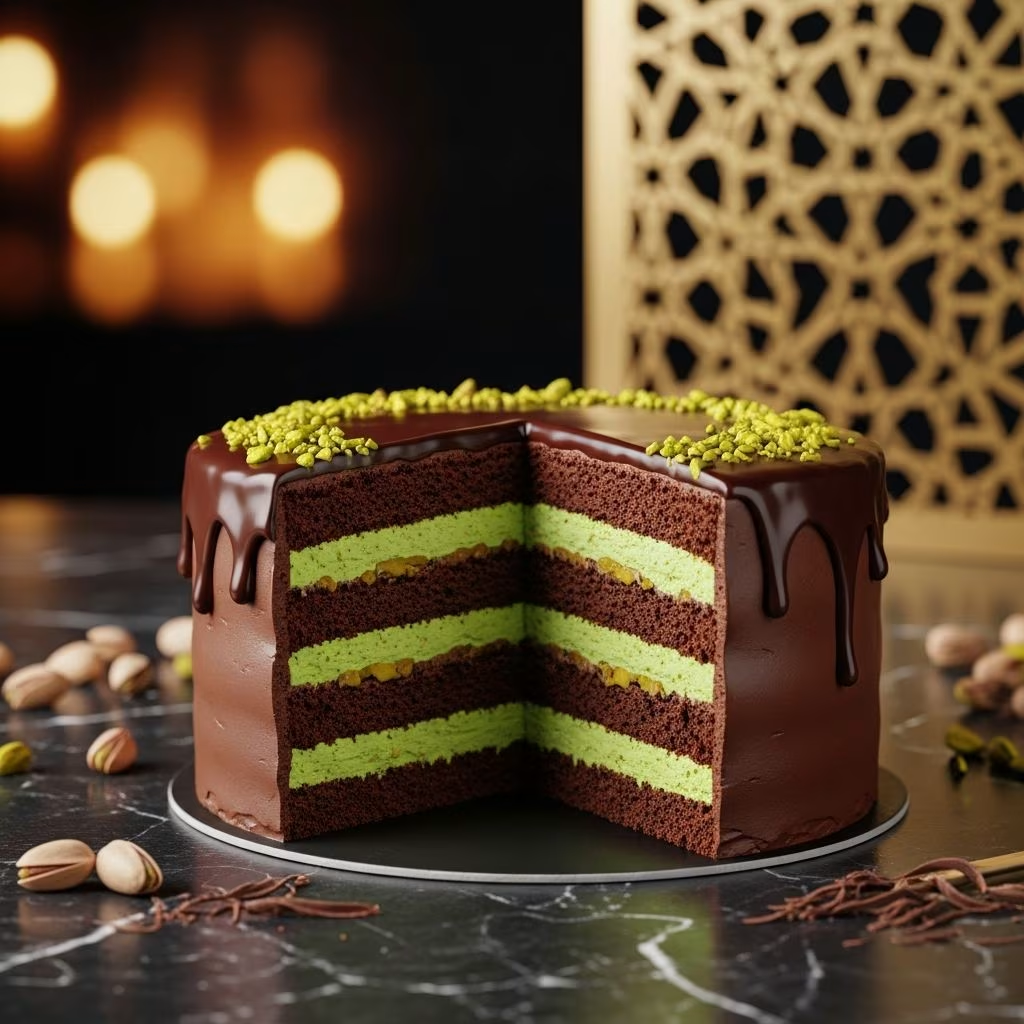
What distinguishes this cake from conventional chocolate creations is the incorporation of pistachio elements that add both textural contrast and sophisticated nutty notes. The combination of tender cake layers, luscious frosting, and crunchy pistachio components creates an engaging texture profile that keeps each bite interesting. For those seeking to recreate this trending dessert at home, understanding the fundamental components and their purposes simplifies the baking process considerably.
Essential Ingredients for Your Chocolate Foundation
The base of your Dubai chocolate cake begins with quality chocolate elements that form the structural and flavor backbone of this dessert. Rather than requiring exotic or expensive items, this streamlined version utilizes common baking staples found in most kitchens.
- Cocoa powder: Provides the rich chocolate flavor and deep color throughout the cake layers
- All-purpose flour: Creates the tender crumb structure that supports the filling and frosting
- Sugars: Both granulated and brown sugar contribute sweetness and moisture to the cake
- Leavening agents: Baking powder and baking soda ensure proper rise and light texture
- Eggs: Bind ingredients together and add richness to the final product
- Oil: Neutral oils like canola maintain moisture and tender crumb
- Milk and coffee: Enhance chocolate flavor while adding moisture
These ingredients work synergistically to create a moist, flavorful chocolate cake that serves as the perfect canvas for the pistachio elements that follow. The addition of espresso or strong coffee doesn’t make the cake taste like coffee; instead, it deepens and intensifies the chocolate notes, creating a more complex flavor profile.
Crafting the Pistachio-Rich Filling
The filling distinguishes this Dubai cake from standard chocolate layer cakes and represents the most distinctive element of this dessert. Creating this component involves toasting phyllo dough threads and combining them with pistachio cream for a filling that delivers both textural interest and sophisticated flavor.
Phyllo dough strands, known as kataifi, provide a satisfying crunch that contrasts beautifully with the soft cake layers and creamy frosting. Toasting these delicate strands brings out their subtle nuttiness and creates a golden color that visually enhances the final presentation. The process requires gentle heat and constant attention to prevent burning, but the results justify this careful handling.
Pistachio cream forms the aromatic base of your filling. You can either prepare this component from scratch using roasted pistachios blended until smooth, or source pre-made versions from specialty retailers. The homemade approach offers superior flavor and allows customization of texture and sweetness to match your preferences. When making pistachio cream at home, a food processor works most effectively, as it can handle the gradual transformation from coarse nuts to silky paste.
Blending Tahini for Depth and Complexity
Tahini, a paste made from ground sesame seeds, plays a crucial role in elevating the pistachio filling beyond simple nut butter. This ingredient adds a subtle earthiness and slight bitterness that prevents the filling from becoming overly sweet or one-dimensional. The sesame paste creates a deeper, more nuanced flavor experience that distinguishes homemade versions from simpler alternatives.
Combining tahini with pistachio cream and toasted phyllo creates a thick paste that spreads easily between cake layers. This filling bridges the gap between the tender cake and the frosting, creating a cohesive structure while introducing the textural crunch that makes this cake memorable.
Mastering the Chocolate Cloud Frosting
The frosting serves multiple purposes: providing creaminess and sweetness, creating visual appeal, and serving as the final layer that ties all components together. This airy frosting achieves its light, fluffy texture through whipping butter until it becomes pale and voluminous, then gradually incorporating confectioners’ sugar, cocoa powder, and milk.
The technique of alternating dry and wet ingredients while beating prevents lumps and ensures even incorporation. This method also incorporates air into the frosting, creating the characteristic lightness that makes it spreadable and enjoyable. The consistency should be thick enough to hold its shape on the cake yet soft enough to spread smoothly without cracking the delicate cake layers.
Step-by-Step Baking Instructions
Preparation Phase
Begin your baking journey by preheating your oven to 350°F (175°C). Proper temperature ensures even baking and prevents dry edges or undercooked centers. While the oven reaches temperature, prepare your cake pans by greasing them thoroughly and lining the bottoms with parchment paper. This dual approach prevents sticking from both the pan surface and the bottom of the cake, ensuring easy removal.
Creating the Cake Batter
In a large mixing bowl, whisk together your dry ingredients: flour, cocoa powder, both sugars, baking powder, baking soda, and salt. This combining step ensures even distribution of leavening agents throughout the batter, which prevents dense spots or uneven rising. In a separate step or directly into the dry mixture, add room-temperature eggs, neutral oil, milk, and vanilla extract. Whisking until smooth guarantees complete incorporation without overmixing, which would toughen the cake structure.
The final addition of hot espresso or strong coffee should be stirred in just until combined. The heat from this liquid slightly cooks the outer portions of the batter, which actually contributes to moisture retention during baking. Avoid overmixing at this stage, as excessive stirring can develop gluten and result in a tougher cake.
Baking Process
Divide your batter evenly between the prepared pans, filling each approximately halfway to allow for rise during baking. Bake for 30 to 35 minutes, testing for doneness by inserting a toothpick into the center of each cake. When the toothpick emerges clean or with just a few moist crumbs, the cakes have reached optimal baking. Allow the cakes to cool in their pans for approximately 10 minutes, during which they continue to firm up enough for safe removal. Transfer the cakes to wire racks where air circulates freely around them, promoting even cooling and preventing condensation from creating a soggy surface.
Assembling Your Masterpiece
Once all components have cooled completely, assembly transforms individual elements into a unified dessert. Place your first cooled cake layer on a serving plate or cake board, creating a stable base. Spread a portion of your chocolate frosting over this base layer, creating an even layer approximately 1/2 inch thick. This frosting layer acts as both an adhesive and a moisture barrier.
Distribute your pistachio-phyllo filling evenly across the frosted surface, working gently to avoid displacing too much frosting. The filling should be thick enough to support the top cake layer without squishing out excessively. Place the second cake layer on top, aligning it carefully with the bottom layer.
Before applying the final frosting, many bakers recommend creating a thin crumb coat and refrigerating it for 30 minutes. This intermediate step seals loose crumbs into the frosting, preventing them from marring your final presentation layer. After this resting period, apply your final frosting generously, creating smooth surfaces or decorative swirls according to your preference.
Finishing Touches and Garnishing
The final appearance of your Dubai chocolate cake reflects both the quality of your construction and your creative choices for garnish. Crushed pistachios sprinkled across the frosting surface provide visual confirmation of the pistachio elements within while adding textural interest to each serving. For occasions requiring extra elegance, edible gold leaf adds a luxurious touch that elevates the dessert’s presentation.
Consider the color contrast when selecting garnishes. The deep chocolate of your frosting provides an ideal background for the vibrant green of pistachio pieces or the warm shimmer of gold leaf. These garnishing choices transform a homemade cake into an impressive centerpiece suitable for special occasions or celebrations.
Storage and Serving Recommendations
Properly stored, your Dubai chocolate cake maintains its quality for several days. Keep the assembled cake in an airtight container in the refrigerator, where cool temperatures help the frosting set firmly while maintaining the cake’s moisture. When removing the cake from refrigeration for serving, allow it to sit at room temperature for 15 to 20 minutes, which allows the frosting to soften slightly and the cake to warm through, enhancing flavor perception.
Cut slices using a sharp knife dipped in hot water and wiped dry between cuts. This technique prevents frosting from tearing or smudging on the cake’s surface, ensuring clean, attractive slices that showcase the distinct layers within.
Troubleshooting Common Baking Challenges
Dense or Dry Cake Layers
A dense cake typically results from overmixing the batter, which develops excess gluten. Mix just until ingredients combine, stopping before the batter becomes smooth and elastic. Dry cakes often indicate overbaking; check for doneness at the lower end of the recommended time range and remove the cake when a toothpick emerges with moist crumbs rather than completely dry.
Frosting Consistency Issues
Frosting that’s too stiff benefits from small additions of milk whisked in gradually. Frosting that’s too soft requires additional confectioners’ sugar added slowly while beating. Room temperature ingredients mix more smoothly than cold or warm components, so ensure your butter is properly softened before beginning.
Filling Separation or Leaking
If filling oozes from between cake layers, it contains too much moisture or is insufficiently thick. Ensure your phyllo has cooled completely before mixing with pistachio cream, and avoid using overly wet pistachio preparations.
Variations and Customizations
While the traditional Dubai chocolate cake formula works beautifully as presented, numerous variations allow personalization based on preferences or dietary considerations. Substitute milk chocolate cocoa powder for unsweetened versions to reduce bitterness for less adventurous palates. Replace portions of all-purpose flour with almond flour for additional nuttiness and moisture. Introduce cardamom or cinnamon to the cake batter for warm spice notes that complement chocolate and pistachio beautifully.
For those avoiding dairy, coconut milk substitutes effectively for regular milk in both cake and frosting, creating a tropical dimension to this Middle Eastern-inspired dessert. Nut-free preparations can substitute sunflower seed butter for tahini and toasted pumpkin seeds for pistachios, maintaining textural contrast and visual appeal.
Making This Cake Ahead of Time
The Dubai chocolate cake actually improves when prepared a day in advance, allowing flavors to meld and settle. Bake the cake layers and prepare the frosting and filling components the evening before final assembly. Store these components separately in the refrigerator: cake layers in airtight containers, frosting covered tightly, and filling in a sealed container. Assemble the complete cake on your serving day for optimal freshness and texture.
Frequently Asked Questions
Can I use cake mix instead of baking from scratch?
Yes, simplified versions using pistachio or chocolate cake mix reduce preparation time significantly while maintaining the distinctive Dubai flavor profile. Follow package directions for the base cake, then proceed with creating the pistachio filling and frosting using the methods outlined above.
How far ahead can I prepare this cake?
Prepared cakes keep refrigerated for up to four days, maintaining quality throughout this period. Individual components like frosting and filling can be prepared three to four days in advance and stored separately.
Can I freeze this cake?
Yes, unfrosted cake layers freeze successfully for up to three months. Allow frosted cakes to freeze completely uncovered, then wrap carefully before storing, for up to two months. Thaw in the refrigerator before serving.
What alternatives work if I cannot find kataifi?
Crushed phyllo dough sheets, shredded phyllo, or even finely chopped candied pistachios provide textural alternatives, though the exact crunch may differ slightly.
References
- Dubai Chocolate Cake Recipe — Homemade Cooking Classes. 2024. https://www.homemadecooking.com/class/dubai-chocolate-cake