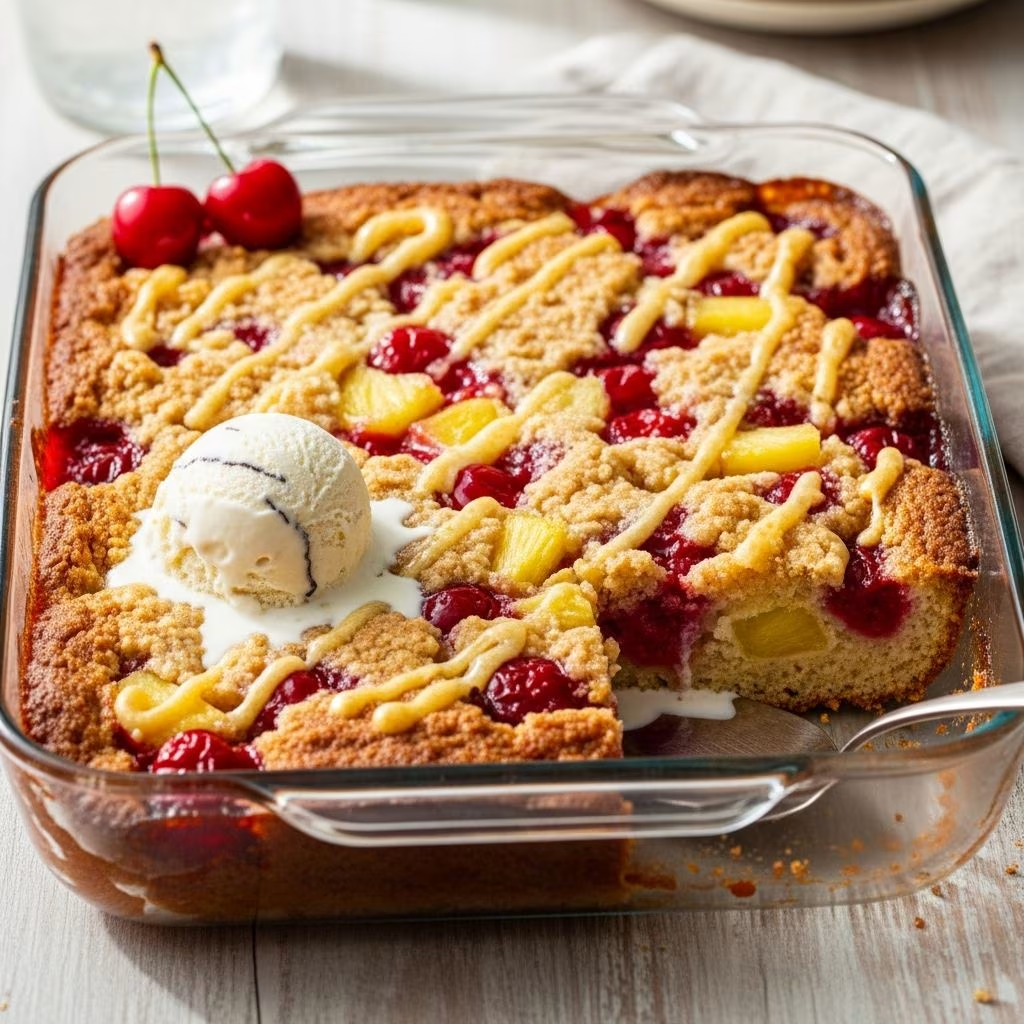
When it comes to effortless desserts that deliver impressive results, few recipes rival the appeal of a cherry pineapple dump cake. This delightful treat combines the natural sweetness of tropical fruits with a tender cake layer, all assembled in under five minutes. Whether you’re hosting guests unexpectedly or need a simple dessert for a family gathering, this recipe proves that sophisticated flavors don’t require complicated techniques.
Understanding the Dump Cake Concept
A dump cake represents one of the most forgiving approaches to dessert-making in home kitchens. Rather than requiring precise mixing, creaming butter and sugar, or folding delicate ingredients, this method involves simply layering components directly into a baking dish. The magic happens during baking as the butter and fruit juices meld with the dry cake mix, creating a moist, flavorful cake that develops a golden, slightly crispy exterior while maintaining a tender crumb throughout.
The beauty of this approach lies in its accessibility. Novice bakers find success immediately, while experienced cooks appreciate the time savings that allow them to focus on other elements of a meal. The recipe’s forgiving nature means minor variations rarely result in failure, making it ideal for experimenting with different fruit combinations or toppings.
Gathering Your Essential Ingredients
This recipe requires remarkably few components, yet each plays a vital role in the final product:
- Crushed pineapple in juice – A 20-ounce can provides the tropical base and essential moisture. Importantly, you’ll retain all the juice rather than draining it, as this liquid creates the signature moist texture.
- Cherry pie filling – A 21-ounce can of commercial cherry pie filling offers both fruit and a lightly thickened syrup that prevents the finished cake from becoming too wet.
- Yellow cake mix – One standard box of dry cake mix, left unpreparated, serves as the topping. This creates a more structured crust than homemade cake batter would provide.
- Unsalted butter – One stick, cut into small cubes, distributes throughout the dry mix. Real butter produces superior results compared to margarine, which can create a greasy texture and unpleasant flavor.
- Optional garnishes – Chopped pecans or shredded coconut add textural contrast and additional flavor complexity.
Preparing Your Workspace and Equipment
Successful dump cake preparation begins with proper equipment setup. You’ll need a 9-by-13-inch baking dish, which represents the standard size for this recipe. Glass or metal pans work equally well, though glass allows you to monitor browning from below if needed. Lightly grease the interior with butter or nonstick cooking spray to prevent sticking.
Arrange your ingredients in the order you’ll use them before beginning. This mise en place approach prevents scrambling mid-preparation and ensures even ingredient distribution. Have your oven preheated to 350 degrees Fahrenheit, allowing the heating element to reach the correct temperature by the time you slide your cake into bake.
Mastering the Layering Technique
The foundation of a successful dump cake depends on proper layering technique:
Begin by pouring the entire contents of the crushed pineapple can—fruit and juice included—directly into your prepared baking dish. Use a spatula to spread this evenly across the bottom, extending it to all edges of the pan. This ensures that every forkful includes the tropical fruit flavor.
Next, distribute the cherry pie filling over the pineapple layer. Work deliberately to spread this filling across the pineapple but resist the urge to mix the two fruits together thoroughly. Some recipes suggest pressing the filling down slightly into the pineapple, which creates a more integrated crumb in the finished cake where the layers meet.
The final critical step involves spreading the dry cake mix evenly over the fruit layers. Rather than simply sprinkling it haphazardly, use the back of a spoon or a small spatula to distribute the mix uniformly, pressing down gently. This accomplishes two important goals: it ensures the cake mix reaches all edges of the pan, and the gentle pressure creates a more cohesive final product.
The Butter Distribution Method
Cutting your butter into small cubes and distributing them across the dry cake mix creates the golden, crispy top layer that distinguishes excellent dump cakes from mediocre ones. Work methodically, spacing the butter pieces relatively evenly across the entire surface. As the cake bakes, the butter melts downward into the dry mix, creating a cohesive crust while simultaneously enriching it with fat.
For those preferring maximum precision, slice your butter stick into 24 pieces—two per every inch along the length and width of the pan. This mathematical approach ensures balanced distribution.
Optional Topping Enhancements
While the basic recipe excels on its own, strategic additions elevate the final product:
- Pecans – Chopped pecan pieces scattered across the buttered cake mix add a subtle nuttiness and pleasant crunch that contrasts beautifully with the tender crumb beneath.
- Shredded coconut – Unsweetened or lightly sweetened coconut flakes complement the tropical profile established by pineapple, adding textural interest.
- Combined toppings – Using both pecans and coconut creates a more complex flavor profile and interesting texture combination.
Baking for Perfect Results
Once your cake enters the preheated 350-degree oven, baking typically requires 35 to 45 minutes, though some sources recommend up to 50 to 60 minutes depending on your specific oven’s characteristics. The cake reaches doneness when two conditions are met simultaneously: the top develops a golden-brown color and the filling begins bubbling around the edges.
If the top browns too quickly while the interior remains insufficiently cooked, cover the cake loosely with aluminum foil. This moderates heat exposure while allowing the interior to continue baking through.
Cooling and Serving Strategies
Resist the temptation to serve immediately from the oven. Allowing the cake to cool for at least 20 to 30 minutes accomplishes several things: it allows the filling to set slightly, making serving neater; it permits the internal temperature to drop to a more pleasant eating temperature; and it allows structural integrity to develop, preventing soggy, overly soft slices.
You may serve the cake warm or at room temperature, depending on your preference. Many people find warm cake particularly enjoyable, especially when accompanied by vanilla ice cream or a dollop of whipped cream. These additions complement the tropical fruit flavors while providing temperature and textural contrast.
Storage and Longevity
Store leftover cake covered at room temperature for up to two days. For extended storage, transfer covered cake to the refrigerator where it maintains quality for up to four days. Properly wrapped cake can also be frozen for up to three months, making it an excellent make-ahead dessert for future gatherings.
Troubleshooting Common Issues
Understanding what can go wrong helps you troubleshoot effectively. If your cake emerges overly dry, you likely over-baked it—reduce baking time by 5 to 10 minutes in future attempts. If the filling never bubbles and the cake remains too moist, your oven may run cool; use an oven thermometer to verify temperature accuracy.
Should the top burn before the center cooks through, your oven may run hot. Position your rack lower in the oven or reduce temperature by 25 degrees. Conversely, if the top refuses to brown despite adequate baking time, move the rack higher and increase oven temperature slightly for future batches.
Variations Worth Exploring
Once you master the basic recipe, consider variations that maintain the dump cake methodology. Different fruit combinations work beautifully—substitute blueberry pie filling, use mandarin oranges instead of pineapple, or combine cherry filling with peaches. Alternative cake mixes expand possibilities; white or vanilla mixes offer subtle flavor shifts compared to yellow cake mix.
Why This Recipe Endures
The cherry pineapple dump cake persists in home recipe collections because it delivers on every front: minimal preparation time, accessible ingredients, forgiving technique, and genuinely delicious results. It satisfies comfort food cravings while introducing tropical fruit flavors that feel special without the work required for more complex desserts.
References
- Cherry Pineapple Cabana Cake (Dump Cake) — Lucky Leaf. Accessed 2026. https://www.luckyleaf.com/recipe/cherry-pineapple-cabana-cake-dump-cake/
- Cherry Pineapple Dump Cake: Just 5 Ingredients — Gonna Want Seconds. Accessed 2026. https://www.gonnawantseconds.com/cherry-pineapple-dump-cake/
- Cherry Pineapple Dump Cake (5 Ingredients) — Joyful Healthy Eats. Accessed 2026. https://www.joyfulhealthyeats.com/cherry-pineapple-dump-cake/