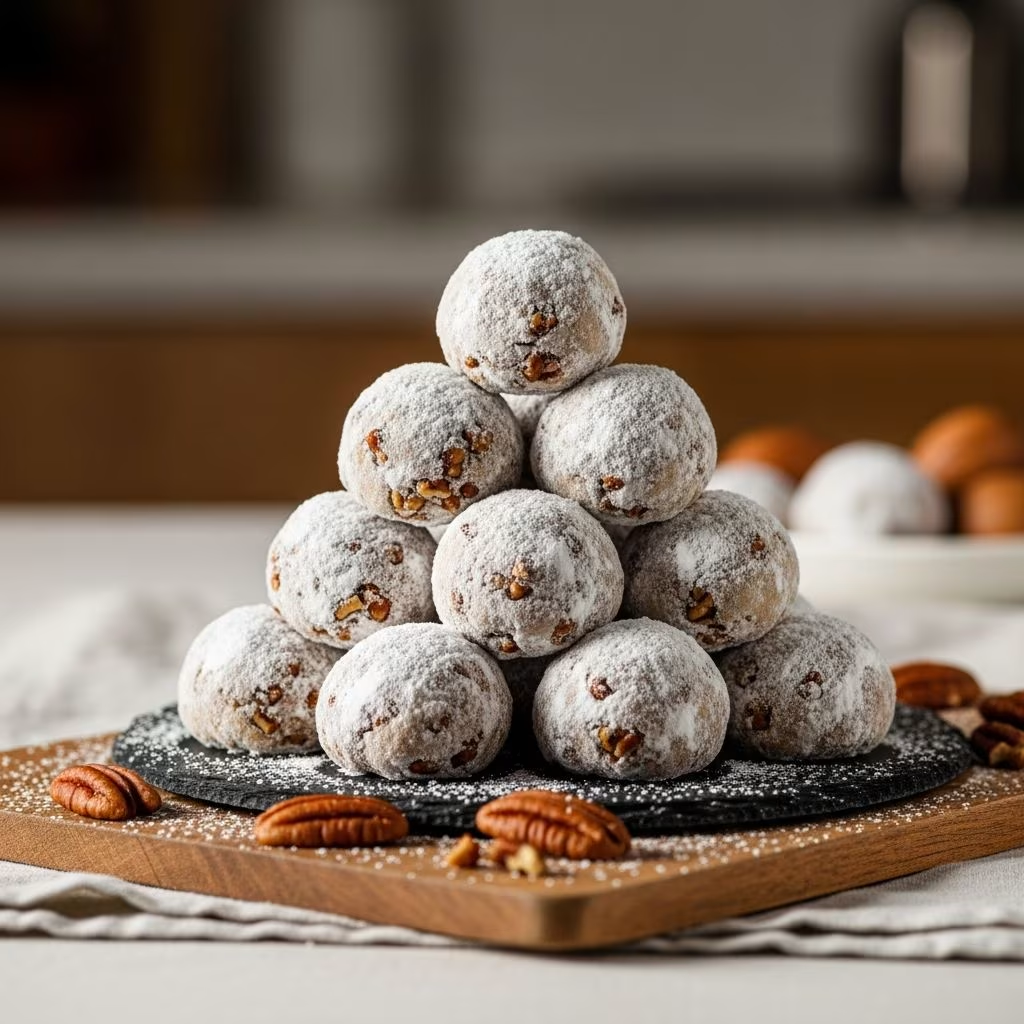
Snowball cookies represent a timeless tradition in American home baking, particularly during the holiday season and special occasions. These delicate treats combine simplicity with elegance, requiring only a handful of basic ingredients to create something truly memorable. The appeal of snowball cookies lies in their tender, crumbly texture that dissolves on your tongue, paired with the rich nuttiness of pecans and the subtle sweetness of powdered sugar coating. Whether you’re a seasoned baker or new to the kitchen, understanding the fundamentals of creating perfect snowball cookies will elevate your baking repertoire.
Understanding the Snowball Cookie Tradition
The snowball cookie has deep roots in traditional American baking culture, often passed down through generations of families. Known by various names including butter balls, Russian tea cakes, and wedding cookies, these treats share a common foundation of butter, flour, nuts, and powdered sugar. The signature element that distinguishes snowball cookies is their generous coating of powdered sugar, which creates an appearance reminiscent of freshly fallen snow—hence the evocative name. This style of cookie transcends regional boundaries and appears in countless family recipe collections across North America.
What makes snowball cookies particularly special is their versatility. While the classic version features pecans, variations exist using walnuts, almonds, or even ground hazelnuts. Some families add vanilla extract for additional depth, while others incorporate citrus zest or a hint of almond extract. This flexibility allows bakers to personalize the recipe while maintaining the essential character that defines a snowball cookie.
Essential Ingredients for Success
Creating exceptional snowball cookies begins with understanding each ingredient’s role in the final product. The ingredient list is intentionally brief, allowing the quality of each component to shine through.
Butter: The Foundation of Flavor
Butter serves as the primary ingredient, constituting the largest portion of the dough. Using room-temperature butter is crucial—cold butter will not incorporate properly, resulting in a dense, difficult-to-work-with dough. Room-temperature butter blends smoothly with the other ingredients, creating a cohesive mixture that binds the flour and pecans together. Many experienced bakers recommend removing butter from the refrigerator thirty to forty minutes before beginning the recipe. For those in warmer climates, less time may be necessary. The quality of butter matters significantly; unsalted butter allows you to control the overall salt content while also providing a cleaner, more authentic butter flavor.
Flour: Structure and Texture
All-purpose flour provides the structural framework for snowball cookies. The flour absorbs the butter and creates the crumbly texture characteristic of this cookie style. Unlike many other cookies that develop gluten strands through vigorous mixing, snowball cookies benefit from relatively gentle handling. This prevents overdevelopment of gluten, which would create a tough, chewy texture rather than the desired tender, crumbly consistency.
Pecans: Nutty Complexity
Finely diced or ground pecans constitute a substantial portion of the cookie dough, providing both flavor and texture. The size of the pecan pieces affects the final cookie; finely chopped pecans integrate seamlessly into the dough, while larger pieces create a more pronounced texture. Toasting pecans before chopping them intensifies their flavor, adding depth to the cookies. Many bakers prefer to pulse pecans in a food processor to achieve uniform, fine pieces that distribute evenly throughout the dough.
Granulated Sugar: Subtle Sweetness
A modest amount of granulated sugar provides sweetness without overwhelming the delicate butter and pecan flavors. The relatively small quantity of sugar distinguishes snowball cookies from many other desserts, creating a cookie that is rich rather than candy-like. This restrained sweetness profile makes snowball cookies particularly elegant and suitable for serving alongside coffee or tea.
Powdered Sugar: The Finishing Touch
Powdered sugar serves dual purposes: it creates the distinctive snowy exterior and adds a subtle sweetness when eating the cookie. The powdered form dissolves quickly on the tongue, adding a smooth textural element that contrasts with the crumbly interior. Using freshly powdered sugar or sifting packaged powdered sugar ensures an even, attractive coating without lumps.
Ingredient Comparison Table
| Ingredient | Amount | Purpose | Selection Tips |
|---|---|---|---|
| Butter | 1 cup (2 sticks) | Main binder and flavor | Use unsalted, room temperature |
| All-purpose flour | 2 cups | Structure and texture | Spoon and level, do not pack |
| Pecans | 2 cups finely chopped | Nutty flavor and texture | Toast for deeper flavor |
| Granulated sugar | 1/4 cup | Base sweetness | Standard white sugar |
| Powdered sugar | 2 cups (for coating) | Final coating and finish | Sift before using |
Step-by-Step Preparation and Mixing Techniques
Mixing the Dough
The mixing process for snowball cookie dough differs from traditional cookie doughs because the mixture remains relatively crumbly rather than forming a cohesive ball. Begin by combining room-temperature butter, flour, finely chopped pecans, and granulated sugar in a stand mixer fitted with a paddle attachment. Set the mixer to low speed to blend the ingredients gradually. This gentle approach prevents overdeveloping the gluten and keeps the texture light and crumbly. As the mixer operates, monitor the dough’s consistency, scraping down the bowl sides periodically with a rubber spatula to ensure even distribution of ingredients.
The dough should appear somewhat sandy rather than smooth like traditional cookie dough. This characteristic texture indicates proper mixing. If you observe dry patches of flour, continue mixing briefly. Conversely, if the mixture becomes too compact, you’ve mixed too long. The goal is achieving a consistency where the dough holds together when pressed but remains visibly crumbly. Some bakers prefer mixing by hand using two forks or their fingers to maintain better control over the final texture.
Shaping the Cookies
Once the dough reaches the proper consistency, use a cookie scoop to portion uniform-sized pieces. A standard cookie scoop produces cookies approximately one inch in diameter, though some bakers prefer slightly smaller or larger versions depending on their preference. After scooping dough onto the work surface, gently roll each piece between your palms to form a sphere. The warmth of your hands helps bind the crumbly dough without overworking it. Roll slowly and deliberately; rushing this step may cause uneven cookies. If the dough doesn’t hold together initially, this is normal—the binding occurs through gentle pressure rather than mixing.
Arrange the formed balls on parchment-lined baking sheets, leaving approximately one inch between cookies. Snowball cookies expand only minimally during baking, so spacing concerns are minimal. However, adequate spacing ensures even heat distribution and prevents any potential touching.
Baking Guidelines and Temperature Control
Preheat your oven to 325 degrees Fahrenheit approximately fifteen minutes before baking. This lower temperature, compared to many other cookie recipes, is intentional. The moderate heat allows the cookies to bake through completely while developing a light golden color without browning too intensely. The lower temperature also contributes to the tender, delicate texture that distinguishes snowball cookies from other butter cookies.
Place prepared baking sheets in the preheated oven and bake for eighteen to twenty minutes, depending on your oven’s characteristics and the size of your cookies. The cookies are done when the bottoms show light golden-brown coloring and the edges appear slightly darker than the centers. The tops may appear pale or only lightly colored, which is perfectly acceptable. Avoid overbaking, as this dries out the cookies and creates a tough texture rather than the desired delicate crumb.
Remove cookies from the oven and allow them to cool on the baking sheet for five minutes. This resting period lets the cookies firm up slightly while remaining warm enough to be easily handled. After five minutes, transfer cookies to a cooling rack or place them directly on a clean surface. Allow them to cool completely before rolling in powdered sugar, typically requiring thirty minutes to one hour depending on kitchen temperature.
Coating and Storage Methods
The Powdered Sugar Coating
Once cookies have cooled completely, the powdered sugar coating can be applied. Pour approximately two cups of sifted powdered sugar into a shallow bowl. Working with a few cookies at a time, gently roll each cooled cookie in the powdered sugar, ensuring complete coverage. The sugar adheres best to slightly cool cookies, so avoid coating them while they’re still warm. For a heavier coating, roll each cookie twice—first creating an initial layer, then allowing it to set briefly before rolling a second time. This double-coating technique creates a more pronounced snowy appearance.
Storage and Longevity
Store cooled and coated snowball cookies in an airtight container at room temperature. Properly stored cookies maintain freshness for up to five days, though many consider them at peak quality within the first two to three days. Layer cookies between parchment paper sheets within the storage container to prevent them from sticking together. Avoid refrigerating snowball cookies, as cold temperatures accelerate drying. For longer storage extending up to one month, freeze uncoated cookies in freezer-safe containers. When ready to serve, thaw at room temperature and apply the powdered sugar coating.
Frequently Asked Questions About Snowball Cookies
Can I substitute nuts other than pecans?
Absolutely. Walnuts, almonds, pistachios, or hazelnuts all work well, though each produces slightly different flavor profiles. Walnuts create a more robust, earthy taste, while almonds provide a delicate, slightly sweet note. Toasted almonds offer the most pronounced flavor. You may also use a combination of different nuts if desired. Maintain the same total quantity (two cups) when substituting to preserve the proper dough consistency.
What if my dough seems too crumbly to shape?
Crumbly dough is normal and desired. If your dough truly won’t hold together at all, verify that your butter was room temperature when mixing. Cold butter doesn’t incorporate properly, leading to an overly dry mixture. If your kitchen is very warm, refrigerating the dough for fifteen to twenty minutes before shaping can help. Alternatively, slightly dampen your hands before shaping—this provides just enough moisture to help the dough cohere.
How can I achieve a more pronounced pecan flavor?
Toast your pecans before chopping them. Spread raw pecans on a baking sheet and roast at 325 degrees Fahrenheit for eight to ten minutes until fragrant. Cool completely before chopping finely and incorporating into the dough. You might also increase the pecan quantity slightly to 2.25 cups, though reducing flour proportionally maintains the correct dough consistency. Adding one-half teaspoon of vanilla extract or almond extract enhances the overall nutty character.
Can I make the dough ahead of time?
Yes, you can prepare the dough up to three days in advance. Store it in an airtight container in the refrigerator. When ready to bake, allow the dough to sit at room temperature for ten to fifteen minutes before shaping, as cold dough proves more difficult to work with. You can also freeze dough for up to three months, thawing it overnight in the refrigerator before use.
Why did my cookies spread excessively during baking?
Excessive spreading typically results from oven temperature that’s too high or dough that was too warm when baked. Verify your oven temperature with an independent thermometer, as many ovens run hot or cool compared to their settings. Ensure butter was at room temperature, not warm. If your kitchen is very hot, briefly refrigerate shaped cookies before baking to help them maintain their form.
Troubleshooting Common Cookie Problems
Understanding potential issues helps ensure consistent success. Cookies that appear greasy indicate either too much butter or an oven temperature that’s too low, causing extended baking time. Taste-test one cooled cookie to determine which factor applies. Overly dense or hard cookies result from overmixing the dough, using cold butter, or packing flour when measuring. Dense cookies may also indicate oven temperature that’s too low, requiring extended baking. Cookies that fail to hold their round shape during baking typically result from dough that was too warm or from shaping that was too gentle. Firm, room-temperature dough holds shape best.
Serving Suggestions and Presentation Ideas
Snowball cookies pair beautifully with hot beverages including coffee, hot chocolate, or tea. Their delicate sweetness complements rather than overwhelms. Arrange cookies on tiered serving plates for an elegant presentation, perhaps interspersing them with fresh berries or mint leaves for visual interest. Snowball cookies make excellent homemade gifts when packaged in decorative boxes lined with parchment paper. Include a card mentioning storage instructions. For holiday gatherings, arrange cookies on a platter alongside other treats for a varied dessert selection.
References
- Butter Selection and Baking Science — King Arthur Baking Company. 2024. https://www.kingarthurbaking.com/learn/articles/baking-with-butter
- Oven Temperature and Baking Precision — America’s Test Kitchen. 2023. https://www.americastestkitchen.com/articles/how-to-check-oven-temperature