Creating authentic naan bread traditionally requires yeast, careful timing, and specialized equipment—or so most home cooks believe. However, a simplified approach has emerged that eliminates these barriers entirely. By combining just two pantry staples with basic cooking techniques, anyone can produce soft, pillowy flatbread that rivals restaurant-quality naan. This method removes the intimidation factor from homemade bread baking while delivering impressive results in a fraction of the usual time.
Understanding the Two-Ingredient Foundation
The cornerstone of this simplified naan preparation relies on the chemical properties of self-rising flour combined with the moisture and protein content of Greek yogurt. Self-rising flour already contains leavening agents—baking powder and salt—which means the dough rises without requiring yeast fermentation. When mixed with Greek yogurt, a chemical reaction occurs that creates air pockets within the dough structure. These pockets expand during cooking, resulting in the characteristic fluffy texture associated with traditional naan.
Greek yogurt serves a dual purpose in this formula. Its acidity interacts with the leavening agents to enhance rise, while its moisture content contributes to the dough’s tender crumb. The protein in yogurt also strengthens gluten development, creating a dough that’s easier to handle and more forgiving than conventional flatbread doughs. This combination explains why this method has gained popularity among home cooks seeking reliability without complexity.
Essential Ingredients and Their Roles
While the recipe earns its name from two primary components, understanding each ingredient’s function improves your results:
- Self-Rising Flour: This pre-formulated blend eliminates the need for separate baking powder and salt measurements. One cup (approximately 120 grams) provides the structure and body for the flatbread. If self-rising flour isn’t available, combine one cup of all-purpose flour with one and a half teaspoons of baking powder and one-quarter teaspoon of salt to create an equivalent substitute.
- Greek Yogurt: Use plain varieties without added flavors or sweeteners. Both nonfat and full-fat yogurks work effectively, though the consistency may vary slightly. Half a cup (approximately 115 grams) hydrates the flour while contributing to the dough’s binding properties.
- Salt: An additional one-quarter teaspoon enhances flavor and strengthens gluten strands. This step is optional but recommended for optimal taste.
- Butter: While not essential for cooking, brushing finished naan with melted butter immediately after cooking adds richness and helps optional toppings adhere.
- Aromatics and Garnishes: Fresh cilantro, garlic, or herbs elevate the finished bread to restaurant standards without requiring additional cooking steps.
The Dough-Making Process
Creating the dough requires minimal equipment and just a few minutes of hands-on work. Begin by combining self-rising flour and salt in a mixing bowl. Add Greek yogurt and stir until the ingredients integrate into a cohesive mass. The dough will appear slightly rough initially, but continued mixing brings it together smoothly.
Different flour brands and yogurt styles behave variably due to moisture content and protein levels. If your dough seems excessively wet and sticky, incorporate additional flour one teaspoon at a time until reaching the proper consistency. Conversely, if the mixture appears crumbly and refuses to bind, add yogurt incrementally. The target texture should feel soft, pliable, and only slightly sticky to the touch.
Once combined, transfer the dough to a lightly floured work surface and knead gently for approximately one minute. This brief kneading session develops gluten strands without overdeveloping them, which could result in tough bread. The goal is achieving a smooth, manageable ball rather than the extensive kneading required for traditional yeast-based doughs.
Shaping and Preparation Techniques
Divide the dough into four equal portions and roll each into a ball. Working with one ball at a time, dust your work surface and rolling pin with flour to prevent sticking. Flatten and roll each dough ball to approximately one-quarter inch thickness, aiming for an oval or round shape resembling authentic naan.
Maintaining uniform thickness throughout each piece ensures even cooking and prevents some areas from burning while others remain undercooked. If the dough springs back aggressively during rolling, allow it to rest for a minute or two before continuing. This resting period relaxes the gluten, making the dough more cooperative.
For variation, you can adjust thickness based on preference—thinner naan becomes crispier, while thicker versions remain softer and doughier. Experimentation helps identify your ideal texture.
Cooking Methods and Timing
Place a non-stick skillet or nonstick pan over medium heat without adding oil or butter initially. This dry-cooking approach allows the dough’s surface to develop color while its interior steams from trapped moisture. Once the pan reaches temperature, add a rolled dough piece and cook for three minutes. Watch for bubbles forming on the surface—these indicate proper leavening and structural development.
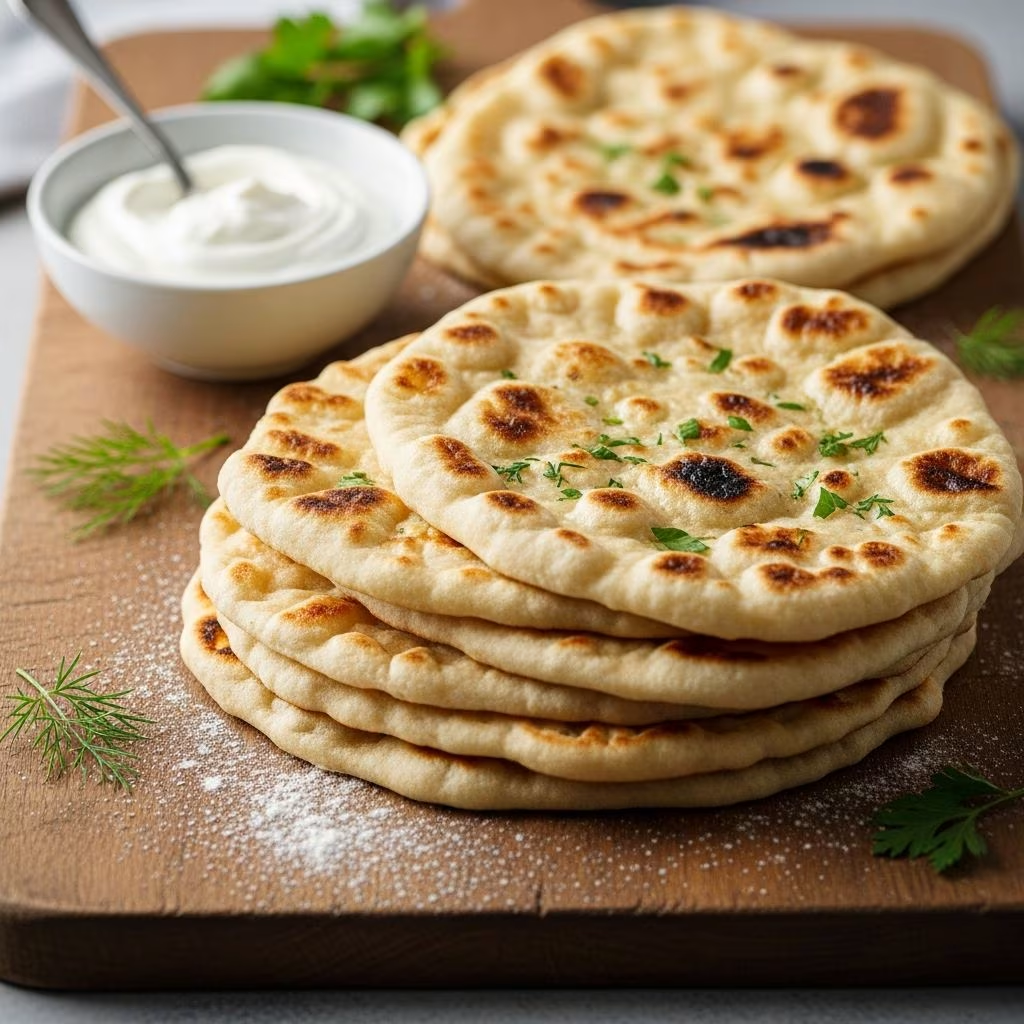
Flip the naan carefully and cook the reverse side for an additional two to three minutes until golden-brown spots appear. These spotted areas indicate the Maillard reaction is occurring, which creates complex flavors and appealing appearance. The entire cooking process for both sides takes approximately five to six minutes total.
Immediately upon removing each naan from the pan, brush both surfaces with melted butter. This timing is crucial because the bread’s heat helps the butter absorb into the porous crumb, enhancing flavor and texture. Add cilantro or other desired garnishes while the butter remains warm enough to help toppings adhere.
The complete preparation from raw ingredients to finished naan requires less than fifteen minutes, making this method significantly faster than traditional approaches that demand yeast fermentation time.
Customization Options for Dietary Needs
The fundamental recipe easily adapts to various dietary restrictions and preferences. For dairy-free versions, substitute coconut yogurt for Greek yogurt while using coconut oil instead of butter for brushing. Dairy-free alternatives produce comparable results due to similar moisture and binding properties.
Gluten-sensitive individuals can substitute gluten-free self-rising flour for the standard version. Gluten-free variants require slightly more careful handling during rolling and cooking, but the basic method remains unchanged. Some cooks find that gluten-free doughs benefit from an extra thirty seconds of resting time between preparation steps.
Flavor modifications work seamlessly within this framework. Minced garlic mixed into the dough creates garlic naan, while herbs like oregano, cumin, or nigella seeds can be kneaded into the dough or sprinkled on the surface before cooking. Spiced versions incorporating garam masala or chili powder bridge the gap between flatbread and seasoned preparations.
Storage and Make-Ahead Strategies
Freshly cooked naan tastes best when served immediately while still warm. However, prepared naan keeps in an airtight container at room temperature for up to two days. Reheat briefly in a dry skillet over low heat to restore softness and warmth without additional cooking.
Unbaked dough can be prepared several hours in advance and kept covered in the refrigerator. Cold dough actually rolls more easily due to improved gluten relaxation. Remove refrigerated dough from cold storage about thirty minutes before cooking to allow it to return to room temperature, which ensures even cooking.
Freezing cooked naan extends shelf life significantly. Stack cooled naan between parchment paper sheets and freeze in an airtight container for up to three months. Thaw frozen naan at room temperature or reheat directly from frozen in a warm skillet, though thawing first generally produces superior texture.
Serving Suggestions and Pairing Ideas
Naan’s versatility makes it suitable for numerous applications beyond its traditional role as a curry accompaniment. Serve warm naan alongside Indian curries, dal, or tikka preparations where its soft texture excels at scooping sauces. The bread’s neutral flavor profile complements spiced dishes without competing for attention.
Transformed into vehicles for other cuisines, naan functions beautifully as a pizza base, creating crispy-edged, tender-centered flatbread pizzas. Layer with your preferred toppings and bake briefly for quick personal pizzas. Alternatively, split naan horizontally and fill with sandwich ingredients for an interesting bread alternative to traditional sandwich bases.
Breakfast applications showcase naan’s adaptability—warm naan spread with honey and nuts, topped with fresh fruit, or paired with scrambled eggs and cheese creates satisfying morning meals. Brushing naan with garlic-infused oil before serving elevates the bread beyond its straightforward preparation.
Common Troubleshooting Guidance
Dough won’t combine: Dough that remains crumbly typically needs additional yogurt. Add one teaspoon at a time while mixing until the dough forms a cohesive ball. Variations in flour moisture content necessitate these adjustments.
Dough feels excessively sticky: Sticky dough requires additional flour incorporation. Rather than adding flour directly to the dough, dust your work surface and hands generously while handling the dough, which prevents sticking without making the final product dry.
Naan burns before cooking through: Your skillet temperature likely exceeds the optimal level. Reduce heat to medium and increase cooking time slightly. The goal is gentle browning rather than rapid charring.
Naan emerges dense and compact: Insufficient cooking time prevents proper bubbling and leavening. Ensure you cook the first side for the full three minutes before flipping, and don’t rush the second side. Rushed cooking prevents adequate moisture conversion to steam, which creates the characteristic lightness.
Nutritional Considerations
This naan preparation is notably lower in calories than many traditional flatbreads due to the absence of oil in the dough and minimal butter brushing. One prepared naan contains approximately 150-180 calories, depending on precise portion size and optional butter application. The Greek yogurt base adds protein without adding significant fat, making this option suitable for various dietary philosophies.
The recipe naturally contains carbohydrates from flour, with minimal added sugars. Using full-fat Greek yogurt instead of nonfat increases caloric content marginally while providing additional satiety through fat content. Choosing the yogurt type that aligns with your dietary goals allows personalization without compromising the method’s effectiveness.
Why This Method Deserves Your Attention
The appeal of this no-yeast naan method extends beyond mere convenience. The approach eliminates fermentation time while producing results comparable to traditional preparations that require hours of planning. Home cooks without previous bread-making experience find success immediately due to the forgiving nature of the technique and minimal equipment requirements.
Speed translates to opportunity—fresh naan can become a regular dinner component rather than an occasional special effort. The adaptability to dietary preferences ensures that various household members can enjoy the same bread despite different nutritional needs. From a practical standpoint, the combination of speed, reliability, and flexibility makes this recipe invaluable for busy home cooks seeking quality without complexity.
Frequently Asked Questions
- Can I use regular flour instead of self-rising flour?
- Yes. For each cup of all-purpose flour, add one and a half teaspoons of baking powder and one-quarter teaspoon of salt to create self-rising flour. Mix these together before combining with yogurt for consistent results.
- Does the type of Greek yogurt matter?
- All Greek yogurt varieties—nonfat, reduced-fat, and full-fat—work successfully. Nonfat versions produce slightly lighter bread, while full-fat options create marginally richer texture. Choose based on preference and dietary goals; the method accommodates all variations.
- Why does my dough seem stickier than expected?
- Variations in flour protein content and yogurt moisture cause consistency differences between batches. Address overly wet dough by using additional flour on your work surface and hands rather than incorporating flour directly into the dough, which prevents excessive dryness in the final product.
- Can naan dough be prepared in advance?
- Yes. Cover prepared dough and refrigerate for several hours or overnight. Remove from refrigeration thirty minutes before cooking to allow the dough to warm slightly for more consistent cooking results.
- What should I do if my naan burns?
- Reduce your skillet temperature to medium and increase cooking time slightly. Burns indicate heat that’s too intense; gentler heat allows proper browning without charring. Cooking time becomes slightly longer but the quality improves significantly.
- Is this recipe suitable for freezing?
- Definitely. Stack cooled naan between parchment paper and freeze in airtight containers for up to three months. Reheat from frozen in a warm skillet for quick recovery of texture and warmth.
References
- 2 Ingredient Naan (Greek Yogurt Naan) — Easy Macro Meals. 2024. https://easymacromeals.com/2-ingredient-naan-greek-yogurt-naan/