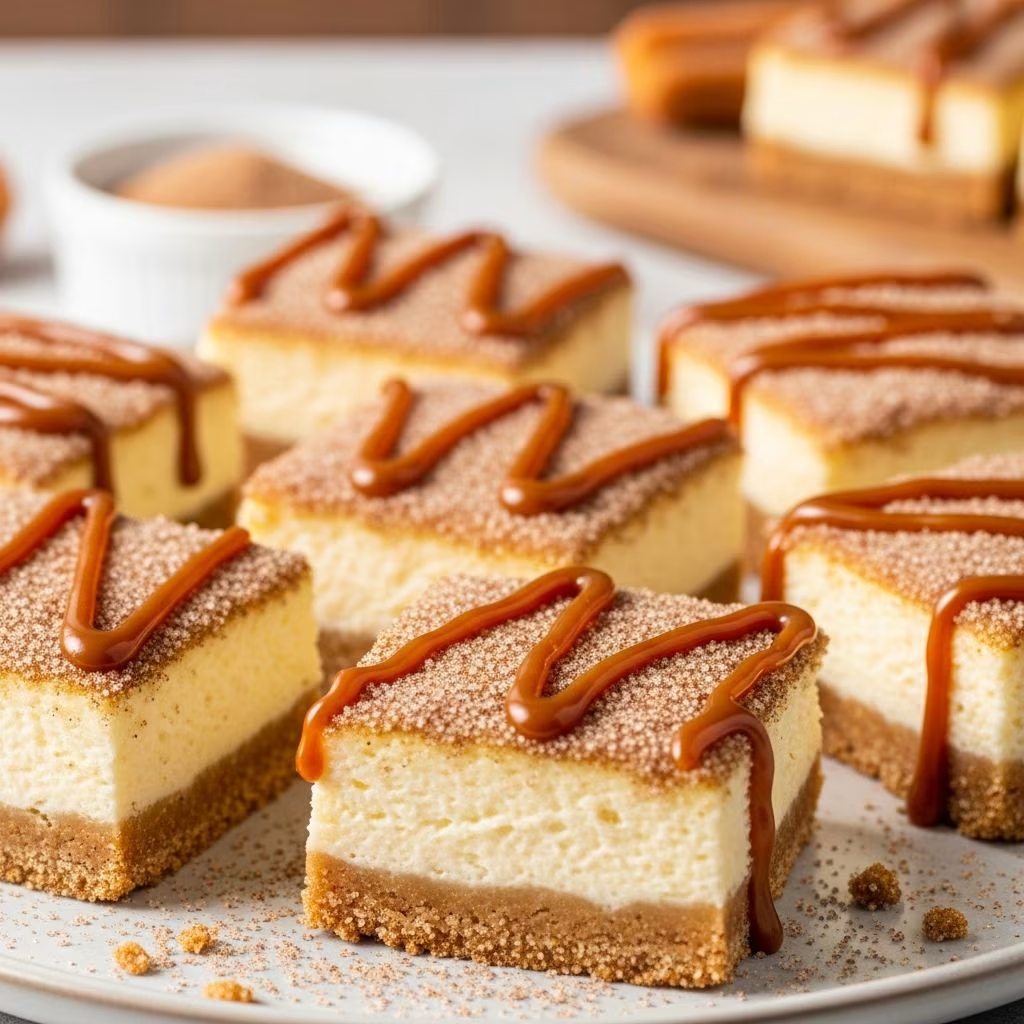
The marriage of two beloved dessert traditions creates something truly special. Churro cheesecake bars represent a modern culinary approach where the crispy, cinnamon-dusted exterior of a traditional churro meets the smooth, velvety richness of cheesecake. This innovative dessert combines accessible ingredients with straightforward preparation methods, making it an excellent choice for both beginner bakers and experienced dessert enthusiasts.
Understanding the Dessert Concept
This particular treat builds its appeal by merging distinct textural and flavor profiles into a single baked good. The foundation relies on refrigerated crescent roll dough, which provides a buttery, flaky base that mimics the structure of a churro’s exterior. The middle layer showcases a traditional cheesecake filling infused with the warmth of cinnamon and vanilla. The top crust seals everything together while crisping during baking, creating multiple textural layers that keep each bite interesting.
The beauty of this dessert lies in its simplicity and versatility. Unlike traditional cheesecake, which demands careful temperature control and often includes finicky water baths, churro cheesecake bars eliminate these complications while delivering comparable satisfaction. The combination works because neither component overshadows the other—the cinnamon sugar complements rather than competes with the cream cheese, and the crescent dough provides structural integrity without becoming dense.
Essential Ingredients and Their Roles
Base Layer Components
- Crescent roll dough: Two 8-ounce cans or sheets serve as the structural foundation. Using sheet-style dough, if available, reduces seam-pressing work and creates a more uniform base.
- Cinnamon-sugar mixture: Typically combining one-half to one cup of granulated sugar with two to three tablespoons of ground cinnamon, this mixture appears both beneath and atop the filling to establish the churro flavor profile.
- Non-stick cooking spray: Essential for preventing sticking without imparting unwanted flavors.
Filling Components
- Cream cheese: Two 8-ounce packages, fully softened to room temperature, ensure a smooth, lump-free filling. Full-fat cream cheese produces superior results compared to reduced-fat alternatives.
- Granulated sugar: Usually one-half to three-quarters cup, sweetens the filling while contributing to its creamy texture when beaten properly.
- Egg: One large egg (or two eggs in some variations) provides binding and structure during baking.
- Vanilla extract: One to one-and-a-half teaspoons add depth and complement the cinnamon notes.
Optional Enhancements
Some recipes incorporate sour cream (typically one-quarter cup) into the cheesecake filling, which adds tanginess and improves overall moisture content. Melted butter drizzled over the top layer before baking enhances the crescent dough’s golden-brown appearance and adds richness to the final texture.
Preparation Techniques and Best Practices
Readying Your Equipment and Workspace
Success begins with proper preparation. Preheat your oven to 350°F approximately fifteen minutes before assembly to ensure even heat distribution throughout baking. Use a 9-by-13-inch rectangular baking pan, which accommodates the dough sheets perfectly and produces bars of consistent size. Spray the entire interior with non-stick cooking spray, paying special attention to corners where sticking commonly occurs.
Developing the Cream Cheese Filling
Remove cream cheese from refrigeration at least one hour before use, allowing it to reach a genuinely soft, spreadable consistency. Using an electric mixer set to medium speed, beat the softened cream cheese for two to three minutes until it transforms into a smooth, fluffy mass without any lumps. Add sugar gradually while continuing to beat, maintaining consistent speed to prevent overworking.
Incorporate eggs one at a time, beating briefly after each addition to fully integrate without creating excess air bubbles that can cause cracking. Finally, add vanilla extract and mix until the entire filling achieves a uniform, creamy consistency. Overbeating at this stage can introduce unwanted air, so stop mixing as soon as the filling appears completely smooth and homogeneous.
Assembling the Base Layers
Distribute approximately one-half of your cinnamon-sugar mixture evenly across the bottom of your prepared pan. This layer establishes flavor in the crust while preventing the pan from directly contacting the dough. Unroll the first crescent roll sheet or can onto a lightly floured surface. If using triangular-cut dough, firmly press all perforations and seams together to create one unified rectangle. Gently transfer this sheet into the pan, pressing it to cover the bottom completely and reach the edges.
Spread the prepared cream cheese filling evenly across the dough base using a spatula or the back of a spoon. Take care not to puncture the crust beneath. Unroll the second crescent sheet, again pressing seams together if necessary, and carefully place it atop the filling. Press gently to ensure good contact with the underlying layer.
Final Preparation Before Baking
Sprinkle the remaining cinnamon-sugar mixture across the top dough layer in an even distribution. For recipes incorporating melted butter, drizzle it across the surface and spread gently with the back of a spoon, allowing the butter to seep into the dough and contribute to the final crispy texture.
Baking Guidelines and Temperature Management
Bake at 350°F for approximately twenty-six to thirty minutes, observing the top layer until it achieves a light golden-brown color and appears puffed and set. The exact timing depends on individual oven characteristics and the size of your bars. A toothpick inserted into the filling should come out clean or with just a few moist crumbs, confirming that the cheesecake layer has cooked through without drying out.
Remove the pan from the oven and place it on a wire cooling rack. Allow the bars to cool at room temperature for a minimum of fifteen minutes before refrigeration. This resting period prevents condensation from making the top layer soggy while the filling firms up slightly.
Storage and Serving Recommendations
Refrigeration and Chilling
Transfer the cooled pan to the refrigerator and chill for at least four hours or preferably overnight. This extended chilling time allows the flavors to meld, the cream cheese to fully set, and the bars to become firm enough for clean cutting. Properly chilled bars maintain their structure when sliced, preventing the filling from running and the layers from separating.
Cutting and Portioning
Remove the pan from refrigeration and let it sit at room temperature for five to ten minutes to slightly soften, making cutting easier. Using a sharp knife and occasionally wiping the blade with a damp cloth prevents frosting buildup and ensures clean cuts. Cut the entire pan into equal squares—a 4-by-4 grid produces sixteen servings, though you may prefer larger or smaller portions depending on your needs.
Storage Duration and Methods
Store cut bars in an airtight container with parchment paper between layers to prevent sticking. Properly stored bars maintain excellent quality for five to seven days in the refrigerator. These bars can also be frozen for up to three months; simply wrap individual bars tightly in plastic wrap before placing them in freezer-safe containers. Thaw at room temperature for approximately thirty minutes before serving.
Flavor Enhancement and Serving Options
Classic Accompaniments
While these bars stand perfectly well alone, several toppings elevate the eating experience. A dollop of freshly whipped cream provides cooling contrast to the rich filling and crispy top layer. Chocolate drizzle—whether dark, milk, or white chocolate—adds an additional flavor dimension. Caramel sauce complements the cinnamon notes beautifully, while a sprinkle of extra cinnamon sugar on the serving plate reminds diners of the churro inspiration.
Creative Variations
Consider incorporating dulce de leche into the filling or drizzling it across the top after baking for added caramel complexity. A thin layer of chocolate spread between the filling and top dough creates unexpected richness. Crushed churro pieces scattered atop the uncooled bars add textural authenticity and visual appeal.
Troubleshooting Common Issues
| Problem | Likely Cause | Solution |
|---|---|---|
| Soggy bottom crust | Insufficient cinnamon-sugar layer or oven rack position too low | Ensure adequate base mixture coverage and position rack in middle of oven |
| Cracked filling | Overbeating cream cheese or too-high oven temperature | Mix filling gently and verify oven temperature accuracy |
| Uneven browning | Uneven dough thickness or hot spots in oven | Press dough uniformly and rotate pan halfway through baking |
| Bars stick together | Insufficient separation or excess moisture between layers | Use parchment paper between layers when storing |
Frequently Asked Questions
Can I prepare these bars in advance?
Yes, these bars benefit from advance preparation. Assemble completely through the pre-baking stage, cover tightly with plastic wrap, and refrigerate for up to twenty-four hours before baking. Add approximately five minutes to baking time if baking from a cold state.
What if I cannot find crescent roll sheets?
Standard triangular-cut crescent rolls work perfectly—simply press the perforations together more thoroughly. This requires slightly more effort but produces identical results.
Can I make these bars gluten-free?
Most commercial gluten-free crescent dough alternatives work well as substitutes. Prepare and assemble exactly as directed, though gluten-free dough may brown slightly faster, requiring closer monitoring during baking.
How many servings does one pan produce?
A standard 9-by-13-inch pan cut into sixteen equal bars serves sixteen people with modest portions. For smaller, more indulgent servings, cut into nine larger pieces.
What is the caloric content per serving?
A typical bar contains approximately 280–300 calories, though this varies based on exact ingredient measurements and whether optional toppings are included.
Conclusion: Creating Your Perfect Batch
Churro cheesecake bars represent an achievable yet impressive dessert that combines familiar flavors in a novel format. The recipe’s flexibility accommodates various preferences and dietary considerations while maintaining excellent results. Whether you are preparing them for a family gathering, office potluck, or personal enjoyment, these bars deliver reliable satisfaction with straightforward preparation techniques.
The success of this dessert depends on attention to detail in ingredient preparation and assembly rather than advanced baking skills. By following the guidelines provided and taking time to properly soften cream cheese and press dough seams, even novice bakers can produce professional-quality results. The combination of flavors and textures ensures that each bar remains interesting from first bite to last, making this recipe worthy of regular rotation in any home baker’s repertoire.
References
- Cream Cheese: Properties and Applications in Baking — The Kitchn. 2024. https://www.thekitchn.com/
- Crescent Dough Baking Guidelines — Pillsbury Official Recipes. 2024. https://www.pillsbury.com/recipes
- Cheesecake Filling Techniques and Best Practices — Serious Eats. 2023. https://www.seriouseats.com/
- Dessert Bar Storage and Food Safety — U.S. Food and Drug Administration. 2023. https://www.fda.gov/
- Oven Temperature Calibration for Baking Success — America’s Test Kitchen. 2024. https://www.americastestkitchen.com/