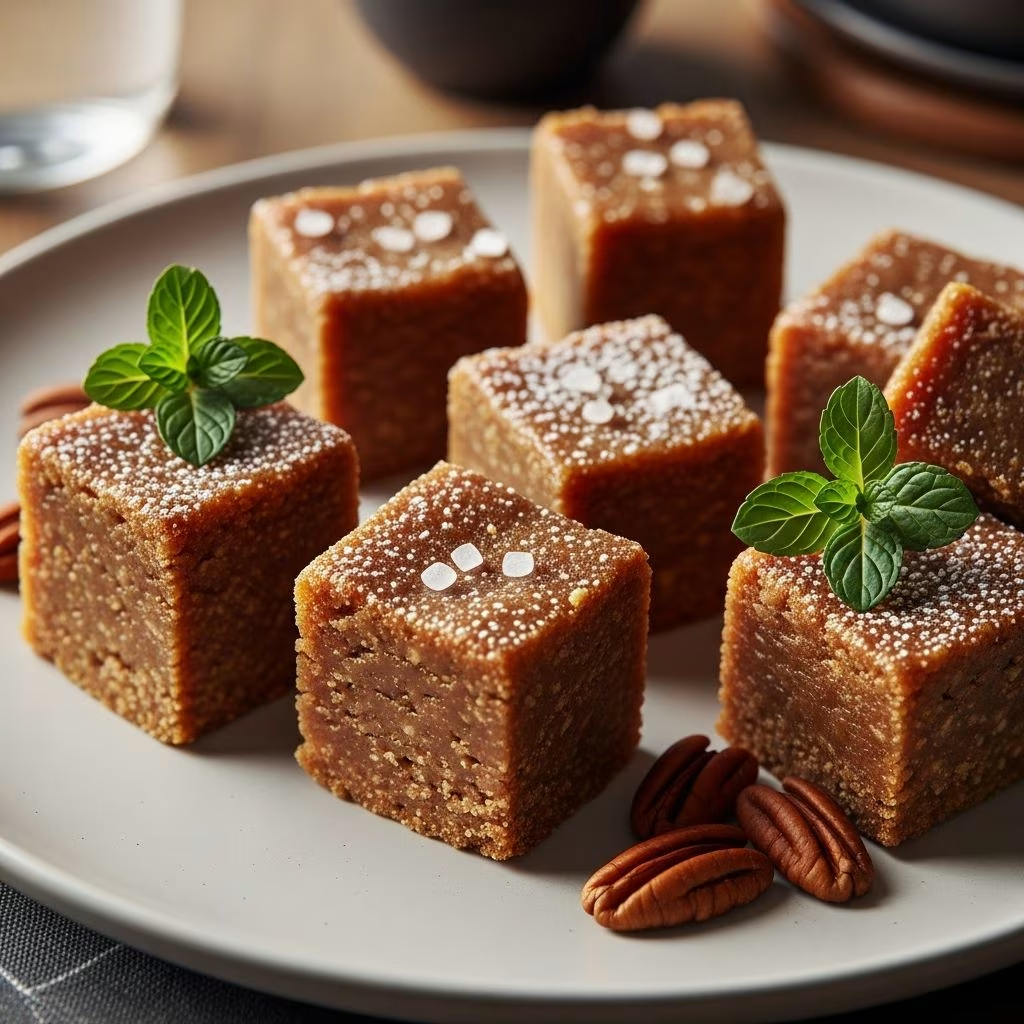
Brown sugar fudge, traditionally known as penuche in New England regions, represents one of the most accessible yet satisfying candy-making projects for home cooks. This classic confection combines simple pantry staples into a rich, velvety treat that rivals commercial candies in both flavor and texture. The beauty of brown sugar fudge lies in its straightforward approach—requiring minimal ingredients and basic kitchen equipment—while delivering sophisticated caramel-like complexity that keeps people reaching for more.
The charm of homemade brown sugar fudge extends beyond taste. Creating this candy from scratch provides a rewarding hands-on experience, transforms your kitchen into a fragrant workshop, and produces impressive gifts for holiday seasons or special occasions. Whether you’re a seasoned candy maker or attempting your first batch, understanding the fundamentals of brown sugar fudge creation ensures consistent, delicious results every single time.
Understanding the Foundation: Essential Ingredients
Successfully making brown sugar fudge begins with recognizing the critical role each ingredient plays in the final product. Unlike some candy recipes that demand exotic or hard-to-find components, brown sugar fudge celebrates simplicity and accessibility.
Brown Sugar: The Star Ingredient
Brown sugar forms the foundation of this confection, providing both sweetness and the distinctive molasses-derived flavor that distinguishes it from conventional fudge. Light brown sugar delivers a milder molasses note, while dark brown sugar contributes deeper, more complex caramel undertones. Most recipes call for 2 to 4 cups of packed brown sugar, depending on batch size and desired intensity. Packing the sugar properly ensures accurate measurement and consistent results.
Dairy Components: Cream and Evaporated Milk
The choice between heavy cream and evaporated milk significantly influences texture and flavor profile. Heavy cream produces fudge with luxurious, smooth mouthfeel, while evaporated milk creates a slightly firmer texture with concentrated sweetness. Some recipes combine both for optimal results. Quantities typically range from ½ cup to 1½ cups, with the exact amount varying based on your preferred consistency and the other ingredients in your recipe.
Fat Element: Butter’s Important Role
Butter contributes essential richness and helps achieve the desired creamy texture. Recipes typically call for ½ cup to ¾ cup of unsalted butter, allowing you to control saltiness. Some versions use salted butter for convenience. The butter’s fat content emulsifies with other ingredients during the beating process, creating the signature smooth consistency that melts on your tongue.
Supporting Ingredients
Beyond the primary components, several supporting ingredients refine the fudge’s character. Vanilla extract adds warmth and complexity, typically requiring ½ to 1 teaspoon. Salt—usually ¼ to ½ teaspoon—enhances sweetness perception and balances flavors. Powdered sugar, added during the beating phase, adjusts consistency and contributes to the fudge’s final texture. Optional additions like toasted walnuts or pecans provide pleasant crunch and nutty depth.
The Temperature Threshold: Achieving Perfect Texture
Temperature control represents the single most critical factor in brown sugar fudge success. The mixture must reach the soft-ball stage, which occurs between 234°F and 240°F on a candy thermometer. This specific temperature range determines whether your fudge achieves creamy smoothness or becomes grainy and disappointing.
Different recipes emphasize slightly different target temperatures within this range. Some aim for 236°F, while others prefer 238°F or 240°F. These subtle variations reflect personal preference and slight differences in ingredient ratios. A reliable candy thermometer becomes non-negotiable equipment; without it, achieving consistent results becomes nearly impossible.
The soft-ball test offers an alternative to thermometer reliance. By dropping a small spoonful of the hot mixture into cold water, a properly cooked batch will form a soft ball that holds its shape briefly before collapsing. This traditional method requires practice and develops a tactile intuition that experienced candy makers cultivate over time.
Step-by-Step Preparation: From Stove to Finished Candy
Initial Combination and Heating
Begin by combining your brown sugar, dairy component, and butter in a heavy-bottomed medium saucepan. Heavy-bottomed pans distribute heat evenly, preventing hot spots that could cause scorching or uneven cooking. Place the pan over medium to medium-high heat. As the mixture warms, stir occasionally with a wooden spoon until the butter melts completely and the sugar dissolves throughout, creating a homogeneous liquid.
The Boiling Phase
Once the mixture reaches a gentle boil, a critical decision point arrives: whether to continue stirring or stop. Many recipes specifically instruct stopping all stirring after boiling begins, as continued stirring can cause crystallization, resulting in grainy rather than smooth fudge. However, some recipes recommend occasional gentle stirring to ensure even cooking. Research the specific recipe’s preference and commit to that approach.
Insert your candy thermometer at this stage, ensuring the tip remains covered by the mixture but doesn’t touch the pan’s bottom. Maintain medium heat and allow the temperature to climb steadily toward your target range. This phase typically requires 10 to 20 minutes, depending on heat level and batch size.
Temperature Achievement and Heat Cessation
Watch carefully as the thermometer approaches your target temperature. Remove the pan from heat the moment it reaches the desired temperature—typically 236°F to 240°F. Leaving it on heat even briefly after reaching temperature causes overcooking, potentially pushing the mixture into the firm-ball stage (240°F to 248°F), resulting in hard, unpleasant fudge.
The Beating Process
Pour the hot mixture into a heat-proof bowl immediately upon removal from heat. Add your vanilla extract and any salt required by your recipe, stirring gently to combine. Using an electric mixer on low speed, begin adding powdered sugar gradually while the mixer runs. This is where the fudge’s magic happens—as air incorporates and sugar distributes throughout, the smooth mixture transforms into thickened fudge.
The beating process typically requires 3 to 5 minutes, though timing varies based on mixer speed and recipe specifics. You’ll notice the mixture gradually losing its glossy sheen and becoming thicker, lighter in color, and more opaque. Stop beating when the fudge reaches a spreadable consistency but still flows easily into the prepared pan.
Pan Transfer and Cooling
Line an 8-inch square baking dish (or similar size appropriate to your recipe) with parchment paper, allowing overhang on sides for easy removal later. Pour the fudge mixture into the prepared pan and smooth the surface using the back of a wooden spoon or spatula, ensuring even distribution and minimal air bubbles.
Patience becomes essential during cooling. Allow the fudge to set at room temperature for approximately 1 hour, or refrigerate for 30 minutes if time is limited. Complete cooling solidifies the mixture and ensures clean cuts without crumbling or sticking.
Cutting and Storage
Once fully set, use the parchment paper overhang to remove the entire fudge block from the pan. Place on a cutting board and slice into ½-inch to 1-inch squares using a sharp knife, wiping the blade between cuts for clean edges. Store finished fudge in an airtight container at room temperature for up to two weeks, or in the refrigerator for extended shelf life.
Common Challenges and Solutions
Even experienced candy makers encounter occasional issues. Understanding common problems and their solutions builds confidence and improves success rates.
Grainy Texture: Graininess typically results from premature crystallization caused by continued stirring after boiling or by undercooking. Ensure you reach proper temperature before removing from heat, and follow your recipe’s stirring instructions precisely.
Too Soft or Runny: Insufficient cooking prevents proper setting. If your mixture didn’t reach the soft-ball stage, it won’t solidify correctly. Always verify thermometer accuracy and allow the mixture to reach the target temperature.
Too Hard or Brittle: Overcooking pushes the mixture into the firm-ball stage or beyond. Remove from heat promptly when temperature reaches the target, and invest in an accurate thermometer if results consistently run too hard.
Separation or Oily Appearance: Over-beating can cause fat separation. Mix only until the fudge reaches spreadable consistency, stopping before it becomes too thick or dull-looking.
Creative Variations and Flavor Enhancements
While traditional brown sugar fudge requires nothing beyond basic ingredients, creative variations elevate the classic candy into exciting new territory.
Chocolate Infusion: Adding cinnamon (½ to 1 teaspoon) during cooking introduces warm spice notes. For chocolate versions, substitute a portion of brown sugar with cocoa powder or fold chocolate pieces into the mixture during beating.
Nutty Additions: Toasted walnuts, pecans, or even macadamia nuts contribute delightful texture and flavor complexity. Add chopped nuts after beating, stirring gently until evenly distributed.
Sea Salt Finishing: A light sprinkle of fleur de sel or sea salt on the fudge surface creates sophisticated sweet-salty contrast that modern palates appreciate.
Equipment Essentials
While brown sugar fudge doesn’t demand specialized equipment, several items significantly ease the process:
- Heavy-bottomed medium saucepan for even heat distribution
- Accurate candy thermometer for precise temperature monitoring
- Electric mixer for consistent beating and proper aeration
- Heat-proof mixing bowl for transferring hot mixture
- Wooden spoon for stirring the initial mixture
- Parchment paper for lining pans and easy removal
- Sharp knife for clean cutting
- Airtight container for proper storage
Frequently Asked Questions
Can I make brown sugar fudge without a candy thermometer?
Yes, using the soft-ball test provides an effective alternative. Drop a small spoonful into cold water; properly cooked fudge forms a soft ball that holds shape briefly before collapsing. This traditional method requires practice but works reliably once mastered.
How long does homemade brown sugar fudge last?
Properly stored fudge lasts up to two weeks at room temperature in an airtight container, or three to four weeks refrigerated. Freezing extends shelf life to several months.
Why did my fudge turn out grainy?
Graininess typically results from continued stirring after boiling begins or from undercooking. Following recipe instructions precisely regarding stirring and ensuring the mixture reaches the proper soft-ball stage prevents this issue.
Can I use salted butter instead of unsalted?
Yes, though reduce added salt by approximately ⅛ teaspoon to maintain proper flavor balance. Salted butter adds convenience while keeping overall saltiness under control.
What’s the difference between brown sugar fudge and regular fudge?
Brown sugar fudge features molasses-derived flavor and caramel undertones, creating more complex taste than chocolate fudge. The cooking process and ingredient ratios remain similar, but the flavor profile differs significantly.
Conclusion: Mastering a Timeless Treat
Brown sugar fudge represents accessible luxury—a homemade candy that impresses friends and family while remaining achievable for home cooks at any skill level. By understanding ingredient roles, respecting temperature precision, and following systematic procedures, anyone can create restaurant-quality fudge in their own kitchen. Whether you’re preparing holiday gifts, satisfying personal cravings, or exploring candy-making possibilities, brown sugar fudge offers rewarding results that justify the minimal time investment. Start with a basic recipe, master the fundamentals, and gradually explore creative variations as your confidence builds. Soon you’ll discover why this classic confection has remained beloved across generations and continues capturing hearts through its simple elegance and sophisticated flavor.
References
- Brown Sugar Fudge (Penuche) — Completely Delicious. 2024. https://www.completelydelicious.com/brown-sugar-fudge/
- Old-Fashioned Brown Sugar Fudge (Penuche) — The Delicious Spoon. 2024. https://thedeliciousspoon.com/old-fashioned-brown-sugar-fudge/
- Brown Sugar Fudge Recipe — Bake. Eat. Repeat. 2024. https://bake-eat-repeat.com/brown-sugar-fudge-recipe/
- Old-Fashioned Brown Sugar Fudge Recipe — Son Shine Kitchen. 2024. https://www.sonshinekitchen.com/brown-sugar-fudge-only-5-ingredients/
- Brown Sugar Fudge (Penuche) — Stephie Cooks. 2024. https://www.stephiecooks.com/brown-sugar-fudge/