Creating a chocolate cheesecake that rivals professional bakery results requires understanding the balance between technique, ingredient quality, and precise execution. This comprehensive guide walks you through every step of developing a luxuriously creamy chocolate cheesecake with a satisfying crust and elegant ganache topping. Whether you’re a seasoned baker or attempting this dessert for the first time, these detailed instructions and professional insights will help you achieve consistently impressive results.
Understanding the Foundational Components
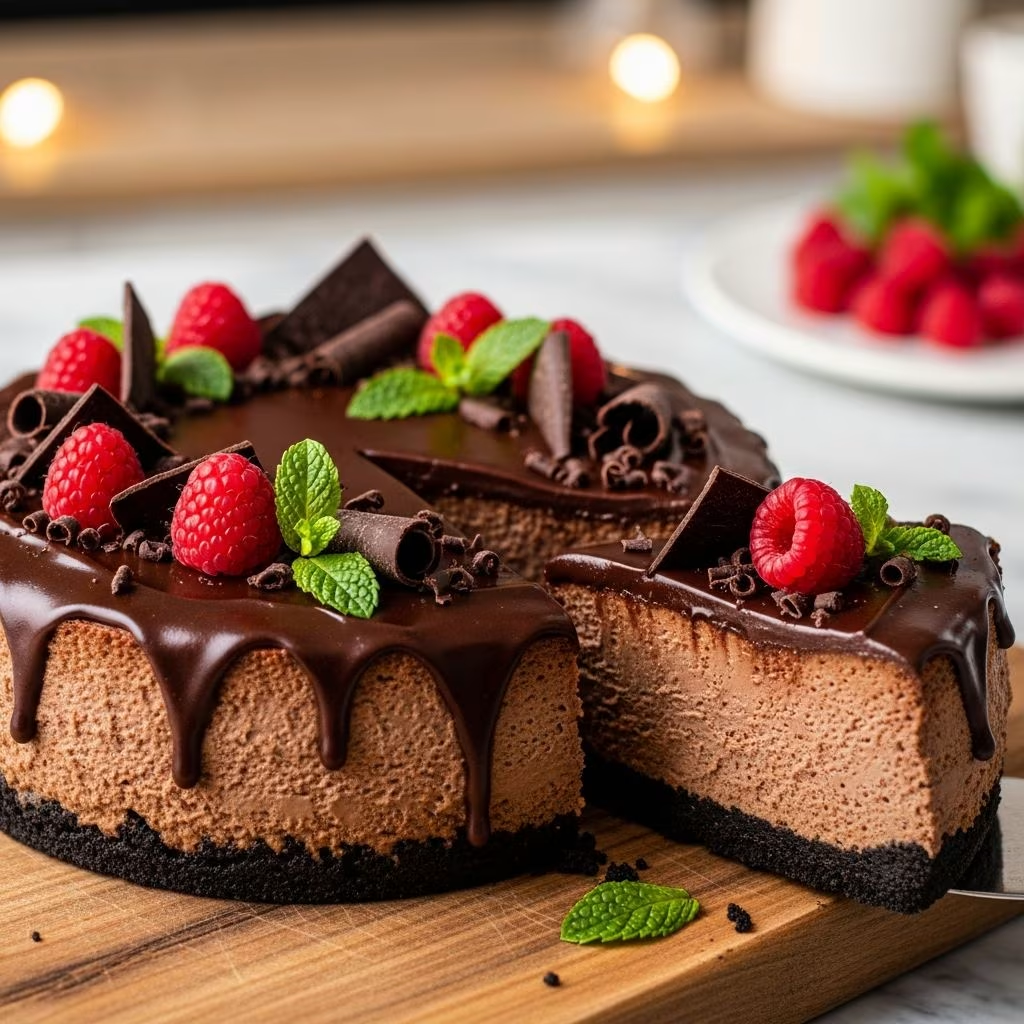
A superior chocolate cheesecake consists of three essential layers, each contributing distinct textural and flavor elements. The foundation begins with a sturdy cookie crust that provides structural support and textural contrast. The middle layer features the star of the dessert: a silky, dense chocolate-infused cream cheese filling that embodies richness without heaviness. The final element, typically a glossy chocolate ganache, adds visual appeal and intensifies the chocolate experience.
The interplay between these components determines whether your cheesecake achieves that coveted restaurant-quality outcome. Understanding how each layer functions allows you to troubleshoot issues and customize the recipe to your preferences.
Selecting Premium Ingredients for Optimal Results
The quality of your finished cheesecake depends significantly on ingredient selection. Unlike recipes where substitutions might go unnoticed, chocolate cheesecake demands premium components that shine through in every bite.
Cream Cheese: The Foundation of Flavor
Full-fat cream cheese serves as the structural and flavor foundation for your filling. Room-temperature cream cheese integrates smoothly with other ingredients, preventing lumps and ensuring a consistent texture throughout the batter. Cold cream cheese requires excessive mixing, which can incorporate unwanted air bubbles and lead to cracks during baking. Remove your cream cheese from refrigeration at least one hour before mixing.
Chocolate Selection Matters
Professional bakers distinguish between chocolate types based on cocoa solids content and intended use. For the filling, chopped bittersweet or dark chocolate (containing 60-70% cocoa solids) delivers robust chocolate flavor without excessive bitterness. Avoid chocolate chips, which contain stabilizers that prevent smooth melting and compromise texture. Instead, purchase chocolate bars or blocks and chop them into uniform pieces for consistent melting.
The ganache topping typically employs semi-sweet chocolate (50-60% cocoa solids) balanced with heavy cream and butter, creating a pourable consistency that sets to a glossy finish.
Other Critical Ingredients
Unsweetened cocoa powder intensifies chocolate flavor without adding bulk. Dutch-processed cocoa provides deeper color and smoother taste compared to natural cocoa powder. Heavy cream at room temperature incorporates more readily than cold cream, contributing to a lighter, more luxurious texture. Large eggs at room temperature emulsify properly with the cream cheese mixture, providing essential binding without introducing excess air.
Constructing the Cookie Crust Base
The crust represents your dessert’s foundation, requiring proper construction to prevent soggy bottoms and provide structural integrity. Cookie-based crusts work best for chocolate cheesecake, offering complementary flavors and sturdy support.
Crust Assembly Process
- Pulse chocolate sandwich cookies (such as Oreos) in a food processor, including the filling, until achieving fine crumbs
- Combine cookie crumbs with melted butter in a 1:1 ratio by weight
- Press the mixture firmly into the bottom of a 9-inch springform pan, creating an even layer
- Use the bottom of a measuring cup to compress the mixture thoroughly
- Pre-bake the crust for 8-10 minutes at 325°F to set the structure
- Allow the crust to cool slightly before adding the filling
Pre-baking the crust prevents the bottom from remaining soggy after the water bath process. A well-compacted crust maintains its structure throughout baking and slicing.
Crafting the Silky Chocolate Filling
The filling transforms basic ingredients into a velvety layer that defines your cheesecake experience. Proper technique during each mixing stage ensures a smooth, lump-free result.
Sequential Mixing Method
Begin by processing the room-temperature cream cheese alone until completely smooth, approximately 2 minutes. This preliminary step eliminates lumps before incorporating other components. Add granulated sugar and cocoa powder next, beating until well combined and color becomes uniform throughout the mixture.
Introduce heavy cream gradually, incorporating it fully before adding any other wet ingredients. This order prevents cream from whipping into stiff peaks, which would introduce excess air. The mixture should appear light and smooth at this stage.
Fold in the melted and slightly cooled chocolate slowly while stirring continuously. Adding chocolate too quickly creates streaks and lumps. Stir until the filling achieves a uniform rich brown color with no visible chocolate streaks. Finally, gently incorporate lightly beaten eggs just until combined. Overmixing at this stage introduces air bubbles that cause cracks during baking.
Achieving the Perfect Chocolate Incorporation
Melting chocolate properly prevents the grainy texture that results from overheating. Create a double boiler by placing a heatproof bowl over a pot of barely simmering water, ensuring the bowl doesn’t touch the water. Stir the chocolate frequently as it melts, removing it from heat while small unmelted pieces remain. These residual pieces melt from residual heat, preventing temperature spikes that compromise chocolate structure.
Allow melted chocolate to cool for 3-5 minutes before adding to the cream cheese mixture. Hot chocolate can scramble eggs and create lumps when mixed with cool ingredients.
Water Bath Baking: The Professional Technique
The water bath method differentiates excellent cheesecakes from mediocre attempts. Surrounding the cheesecake with hot water creates a moist baking environment that promotes gentle, even heat distribution.
Setting Up Your Water Bath
Place your filled springform pan inside a larger roasting pan. Fill the roasting pan with hot water until it reaches approximately halfway up the sides of the cheesecake pan. This setup requires either wrapping the springform pan’s exterior with aluminum foil (to prevent water seepage) or placing the filled roasting pan on the lower oven rack with a second roasting pan containing water on the upper rack.
Optimal Baking Temperature and Time
Bake at 300°F for approximately 55-65 minutes. The cheesecake is properly done when the edges are set but the center still exhibits a slight wobble approximately 2 inches from the center. This residual jiggle appears counterintuitive but indicates perfect doneness. The center continues cooking from residual heat after oven removal, setting to the ideal consistency.
Overbaking dries out the filling and creates cracks. Use this jiggle test rather than relying on time alone, as oven variations affect baking duration.
Cooling and Setting: A Critical Phase
Proper cooling prevents the dramatic cracking that occurs when cheesecakes experience temperature shock. After removing from the oven, allow the cheesecake to rest in the turned-off oven with the door slightly ajar for one hour. This gradual temperature transition prevents the sudden contraction that causes deep cracks.
After one hour, remove the cheesecake completely and allow it to cool to room temperature on the counter, approximately 30-45 minutes. Once cooled, refrigerate for at least 8 hours, ideally overnight, before adding ganache or serving. This extended refrigeration time allows the filling to set completely and develops flavor.
Creating the Chocolate Ganache Topping
Ganache adds professional polish and intensifies the chocolate experience. This glossy topping requires precise technique for optimal results.
Ganache Preparation Steps
- Chop semi-sweet chocolate finely into uniform pieces for consistent melting
- Heat heavy cream in a small saucepan until it reaches a gentle simmer
- Pour approximately half the hot cream over the chocolate pieces and wait one minute
- Using a whisk, begin incorporating the chocolate into the cream with gentle circular motions
- Gradually add remaining cream while continuing to whisk until achieving a smooth, glossy consistency
- Add butter cubes and stir until completely incorporated
- Allow ganache to cool for 5-10 minutes to achieve the ideal pouring consistency
The cream-to-chocolate ratio determines ganache consistency. More cream produces a pourable glaze, while equal ratios create a thicker frosting-like topping. This recipe uses a 1.25-to-1 cream-to-chocolate ratio for optimal spreadability.
Applying Ganache with Precision
Pour cooled ganache onto the center of the chilled cheesecake. Using an offset spatula, spread the ganache in concentric circles from the center outward, allowing excess to drip down the sides for visual appeal. Refrigerate for 1-2 hours until the ganache sets completely before slicing.
Slicing and Serving Techniques
Achieving clean, attractive slices requires proper tools and technique. Use a thin-bladed sharp knife and wipe the blade clean with a hot, damp towel between each cut. The heat slightly softens the chocolate, preventing excessive tearing. Allow sliced cheesecake to rest at room temperature for 10-15 minutes before serving, which enhances flavor and texture.
Common Challenges and Solutions
| Challenge | Cause | Solution |
|---|---|---|
| Deep cracks across surface | Rapid temperature change or overbaking | Use water bath and follow the jiggle test. Allow gradual cooling in the oven. |
| Grainy or lumpy texture | Cold ingredients or overmixing | Bring all ingredients to room temperature. Mix only until combined. |
| Soggy or undercooked bottom | Insufficient crust pre-baking or moisture seepage | Pre-bake crust thoroughly and wrap springform pan with foil. |
| Ganache won’t set | Insufficient chocolate or excessive cream | Adjust cream-to-chocolate ratio to 1:1 for thicker consistency. |
Frequently Asked Questions
Can I prepare this cheesecake in advance?
Yes, chocolate cheesecake actually improves when made 1-2 days ahead. The flavors develop and meld more completely. Cover the finished cheesecake with plastic wrap and refrigerate up to four days. You may also freeze the cheesecake for up to three months; thaw slowly in the refrigerator before serving.
What if I don’t have a springform pan?
A regular 9-inch round cake pan works, though removing the cheesecake requires inverting it onto a plate or sliding a thin knife around the edges and transferring it carefully. Springform pans are preferable because they eliminate this step and reduce damage risk.
Can I substitute ingredients?
Avoid substituting cream cheese, as other cheeses produce entirely different results. You may replace some heavy cream with sour cream (though this creates tanginess) or use different chocolate types within similar cocoa solid percentages. However, each substitution affects final flavor and texture.
How should I store leftover cheesecake?
Store covered in the refrigerator up to four days. Cheesecake freezes excellently for up to three months when wrapped tightly. Thaw overnight in the refrigerator before serving, as this gradual process maintains texture better than room temperature thawing.
Variations and Customizations
Once you master the basic recipe, explore variations. Add espresso powder to the filling for mocha-chocolate flavor. Incorporate peanut butter or salted caramel swirls before baking. Top with fresh berries, chocolate shavings, or toasted nuts. Layer the filling with brownie pieces or cookie crumbles for texture variation. The foundational technique remains constant while flavor possibilities expand infinitely.
Conclusion: Achieving Bakery Excellence
Creating exceptional chocolate cheesecake at home requires patience, attention to detail, and understanding the science behind each technique. By following these professional methods—selecting quality ingredients, employing proper mixing sequences, utilizing the water bath, and respecting cooling timelines—you’ll consistently produce cheesecakes that rival professional bakeries. The investment in technique yields desserts worthy of celebration, guaranteed to impress guests and satisfy your chocolate cravings.
References
- The Science of Cooking: Understanding Maillard Reaction and Protein Denaturation — McGee, H. (2004). On Food and Cooking: The Science and Lore of the Kitchen. Scribner. https://www.scribner.com/
- Professional Baking Standards and Food Safety Guidelines — U.S. Food and Drug Administration. Accessed April 2026. https://www.fda.gov/food
- Temperature Control in Baking and Its Effect on Product Quality — Cauvain, S.P. & Young, L.S. (2006). The ICC Handbook of Cereals, Flour, Dough and Product Testing. DEStech Publications.