Few breakfast dishes capture attention quite like a baked apple pancake emerging from the oven with dramatic puffing and golden-brown edges. This elegant yet approachable recipe combines the simplicity of basic ingredients with the visual spectacle of a dessert-like presentation. Whether you’re looking to impress weekend guests or create a memorable family breakfast, the baked apple pancake delivers both substance and style to your morning table.
Understanding the Baked Apple Pancake
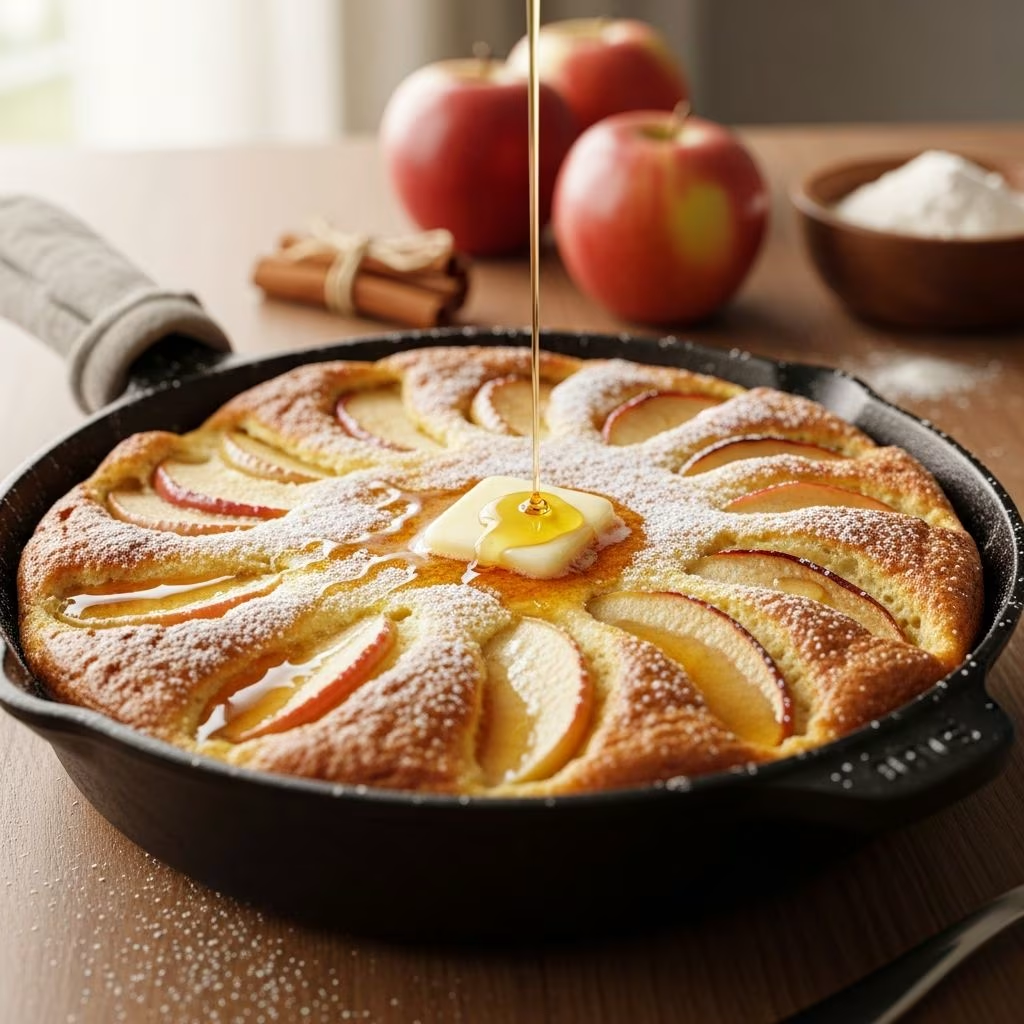
The baked apple pancake, often called a Dutch baby when prepared without fruit, represents a fascinating category of breakfast dishes that blur the line between traditional pancakes and baked goods. Unlike stovetop pancakes that require constant attention and flipping, this version relies on oven heat to create its signature puffy texture. The magic occurs when a simple egg-based batter meets intense, dry heat, causing the moisture in the batter to expand and create an impressively risen dish.
The addition of apples transforms this already impressive dish into something with natural sweetness and elegant presentation. As the apples cook beneath the batter, they soften and release their juices, creating a subtle syrup that flavors every bite. The contrast between the tender fruit, the fluffy batter, and the crispy golden edges creates a multi-textured experience that justifies this dish’s growing popularity among home cooks.
Essential Equipment and Preparation
Success with baked apple pancakes begins with choosing the right cooking vessel. A 10 to 13-inch cast iron skillet serves as the ideal choice, though any oven-safe pan that tolerates stovetop heat will work adequately. Cast iron excels because it distributes heat evenly and develops beautiful browning on the edges. The skillet’s thermal mass helps maintain temperature consistency, crucial for achieving proper puffing.
Before beginning, ensure your oven rack is positioned in the center of your oven, allowing the pancake to rise evenly without the top browning too quickly or touching the heating element. Preheat your oven to 400 to 425 degrees Fahrenheit—the exact temperature varies slightly among recipes, but this range ensures proper puffing without burning. Allow at least 15 minutes for the oven to reach full temperature before you begin cooking.
Ingredient Selection and Substitutions
Choosing Your Apples
The apple variety you select significantly impacts both flavor and texture in your finished dish. Granny Smith apples bring tart notes and maintain their structure well during cooking, resisting mushiness even with extended baking. Golden Delicious apples offer sweeter profiles with softer textures, creating a more dessert-like experience. Honeycrisp varieties provide excellent balance between sweetness and tartness while offering crisp textures that soften pleasantly during baking.
Select apples of similar size to ensure even cooking. Peel, core, and slice them thinly—approximately one-eighth inch thickness works best. Thinner slices cook more uniformly and integrate better with the batter, while thicker slices may remain too firm in the center even as edges soften.
The Batter Foundation
The batter combines five essential components: eggs, milk, flour, sugar, and salt. Eggs serve dual purposes—they provide structure while also contributing to the rising action through water vapor expansion. Using at least three to four eggs per recipe ensures adequate lift and richness. Whole milk creates a tender crumb, though alternatives like buttermilk add subtle tang.
All-purpose flour works reliably, though you may substitute other flours if desired. The flour quantity typically ranges from one-half to three-quarters cup depending on desired thickness and texture. Sugar (usually one to three tablespoons) adds subtle sweetness without overpowering the apple flavors. Salt enhances overall taste complexity and should never be omitted.
Flavor Enhancements
Cinnamon forms the backbone of spice additions, with one-half to one-half teaspoon providing warm notes that complement apples beautifully. Vanilla extract (typically one-half teaspoon) adds depth and richness. Some recipes incorporate nutmeg in smaller quantities for additional warmth. These spices should be whisked into the dry ingredients before adding liquids to ensure even distribution.
Step-by-Step Preparation Process
Creating the Apple Base
Begin by melting four tablespoons of unsalted butter in your cast iron skillet in the preheated oven, approximately five minutes. Remove the skillet carefully—it will be extremely hot—and immediately add the prepared apple slices, arranging them in overlapping rows for even cooking.
Distribute brown sugar (typically three to four tablespoons) over the apples along with your cinnamon mixture. Return the skillet to the oven and allow the apples to cook until they begin softening and the butter starts browning slightly around the edges, usually requiring ten minutes. This initial cooking step begins the caramelization process and releases apple juices that create a flavorful base.
Preparing the Batter
While the apples cook, prepare your batter by whisking together flour, sugar, cinnamon, nutmeg if using, and salt in a medium bowl. In a separate bowl or large measuring cup, whisk together milk, eggs, and vanilla until well combined. Slowly add the wet ingredients to the dry ingredients, whisking continuously to prevent lumps. Continue whisking for two to three minutes until the batter achieves a smooth, creamy consistency. Some recipes recommend allowing the batter to rest for a few minutes before pouring.
The Crucial Pour and Bake
When the apples have softened appropriately, remove the skillet from the oven and immediately pour the prepared batter over the hot apples. The batter will sizzle slightly as it contacts the hot pan—this is the desired reaction. Return the skillet to the oven immediately and set a timer for approximately 20 minutes.
The pancake will rise dramatically during baking, puffing considerably above the rim of the skillet. The edges will turn golden brown while the center remains slightly softer. When ready, the pancake should show firm puffing with minimal jiggling when gently shaken. The exact baking time varies based on your specific oven, so check around the 18-minute mark to prevent over-browning.
Presentation and Serving Recommendations
Baked apple pancakes demand immediate presentation—they maintain their impressive puff for only a few minutes after leaving the oven before beginning to deflate. This natural deflation doesn’t significantly impact flavor or texture, though the visual impact diminishes. Call everyone to the table moments before removal to maximize the “wow factor” of the puffy presentation.
Remove the skillet carefully using heavy oven mitts or a thick kitchen towel, as the handle will be extremely hot. Place the skillet directly on the table using a trivets or heat-safe surface. Dust the entire surface with powdered sugar for an elegant finishing touch, then drizzle with maple syrup, honey, or your preferred topping.
Complementary Accompaniments
While the pancake stands beautifully on its own, various accompaniments enhance the experience. Cinnamon-infused maple syrup creates a particularly harmonious pairing. Fresh berries—raspberries, blackberries, or blueberries—add tartness that balances the caramelized sweetness. Whipped cream or vanilla yogurt provide cooling, creamy elements that offset the warm spices.
Some families prefer consuming the pancake plain, allowing the caramelized apples and cinnamon flavors to take center stage. This approach showcases the dish’s natural elegance and proves that simple preparation doesn’t require elaborate accompaniments.
Common Challenges and Solutions
Insufficient Puffing
If your pancake fails to puff adequately, several factors may be responsible. Ensure your oven temperature truly reaches the specified heat—many home ovens run cooler than indicated. Place an oven thermometer inside to verify actual temperature. Additionally, confirm that your batter isn’t over-mixed, as this develops gluten and reduces rise. Mix just until smooth, approximately one minute of actual whisking after combining wet and dry ingredients.
Uneven Cooking
If the pancake browns excessively on edges while remaining underdone in the center, lower your oven temperature by 25 degrees and extend baking time slightly. Conversely, if the center remains liquid while edges appear overdone, increase temperature slightly and reduce baking time. These adjustments account for individual oven variations.
Excessive Deflation
Some deflation immediately after removal is normal and unavoidable. To minimize this, avoid opening the oven door unnecessarily during baking, as temperature fluctuations can shock the pancake. Additionally, ensure sufficient eggs and proper technique when mixing, as these factors contribute to stable puffing.
Scaling and Variations
The basic recipe easily doubles for feeding larger groups. Simply multiply all ingredients proportionally and use a larger baking dish or prepare two skillets simultaneously. For reduced portions, halve the ingredient quantities and use a smaller oven-safe skillet or baking dish.
Experimentation with apple varieties allows customization to personal preferences. Try combining two different varieties in a single pancake for complex flavor profiles. Substitute other stone fruits like pears or peaches for entirely different presentations while maintaining the same technique and baking times.
Make-Ahead Considerations
While the finished pancake cannot be made in advance, preparation steps can be completed beforehand. Prepare the batter up to two hours ahead, covering and refrigerating it until needed. Peel, core, and slice apples earlier in the day, storing them in lemon juice to prevent browning. These advances allow for faster final assembly and reduce morning stress when serving to guests.
Frequently Asked Questions
Can I make this pancake on the stovetop instead of in the oven?
No, the oven’s dry, consistent heat is essential for creating the characteristic puffing. Stovetop methods won’t generate the steam expansion necessary for the dramatic rise.
Why does my pancake sometimes stay flat?
Flat pancakes usually result from insufficient eggs, over-mixing the batter, or an oven that hasn’t reached proper temperature. Ensure adequate eggs, mix minimally, and verify oven temperature with a thermometer.
Can I use a different pan besides cast iron?
Yes, any oven-safe pan that tolerates stovetop heat works adequately, including glass baking dishes and oven-safe skillets. Cast iron simply excels at heat distribution and browning.
Is it safe to eat the pancake immediately after removing it from the oven?
Yes, though the skillet handle and pan remain extremely hot. Allow 2-3 minutes cooling before cutting, and always use heat protection when handling.
Can I prepare this recipe gluten-free?
Yes, substitute all-purpose flour with quality gluten-free flour blends designed for baking. Results may vary slightly, so test with small batches first.
References
- Apple Puff Pancake Recipe — The Prairie Homestead. 2015. https://www.theprairiehomestead.com/2015/10/apple-puff-pancake-recipe.html
- Easy Apple Puff Pancake – Living The Restaurant Life At Home — Honest and Truly. https://honestandtruly.com/apple-pancake-recipe/
- Puffed Apple Pancake — Tales and Travel. https://talesandtravel.com/all-others/puffed-apple-pancake/
- Cinnamon Apple Puffed Pancake — Half Baked Harvest. https://www.halfbakedharvest.com/cinnamon-apple-puffed-pancake/