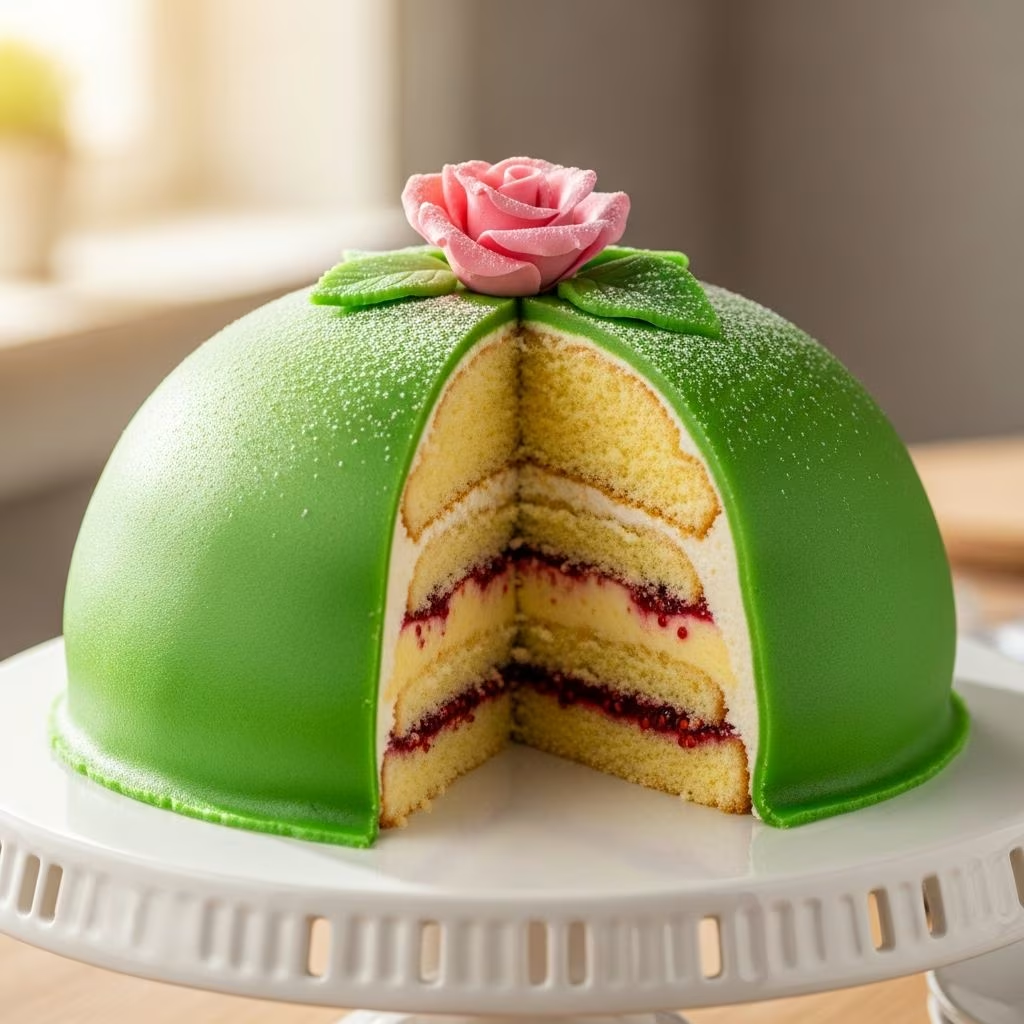
The Swedish Princess Cake, known as Prinsesstårta, stands as a timeless masterpiece in Scandinavian baking. This elaborate dessert combines delicate sponge layers, fruity jam, rich custard, airy whipped cream, and a signature green marzipan dome. Originating in the 1920s, it gained fame through its association with Swedish royalty and has since become a staple for birthdays, weddings, and festive gatherings. Bakers appreciate its visual appeal and complex flavors, though it demands patience and precision.
Historical Roots of Prinsesstårta
Prinsesstårta emerged in Sweden during the early 20th century, credited to Jenny Åkerström, a home economics teacher who instructed the daughters of Prince Carl: Princesses Margaretha, Märtha, and Astrid. Initially called “Grön Tårta” (Green Cake) due to its distinctive marzipan covering, it was renamed in honor of the princesses who adored it. By the 1930s, the cake symbolized elegance and sophistication, evolving into a national favorite. Today, Swedish bakeries produce it seasonally, especially around midsummer, underscoring its cultural significance.
Essential Ingredients for Authentic Flavor
Creating an authentic Prinsesstårta requires high-quality components to balance sweetness, creaminess, and subtle tartness. Key elements include:
- Sponge Cake: Eggs, sugar, flour, and butter form a light, airy base.
- Pastry Cream (Custard): Milk, egg yolks, sugar, cornstarch, and vanilla pods deliver a silky filling.
- Raspberry Jam: Frozen or fresh raspberries provide tart contrast.
- Whipped Cream: Heavy cream, often stabilized with gelatin for structure.
- Marzipan: Almond paste dyed vibrant green, plus pink for decorations.
These ingredients yield one 8-9 inch cake serving 8-12 people. Opt for real vanilla beans for superior aroma and natural food coloring to avoid artificial tastes.
Step-by-Step: Baking the Sponge Layers
The foundation of Prinsesstårta is a classic génoise sponge, baked tall and sliced into three even layers. This method ensures even absorption of fillings.
- Preheat oven to 350°F (175-180°C). Grease and line an 8-9 inch springform pan.
- Whisk 4-6 eggs with 140g caster sugar over simmering water until reaching 140°F (60°C), creating a sabayon-like foam. This step incorporates air for lift.
- Continue whisking off heat until tripled in volume and cooled, about 10 minutes. Use a stand mixer for efficiency.
- Gently fold in sifted self-raising flour (about 2 cups) in thirds, followed by 25g melted butter. Avoid deflating the batter.
- Bake 25-30 minutes until golden and springy. Cool completely, ideally overnight under a cloth to retain moisture.
Tip: Trim browned edges for a pristine look. The sponge improves with age, becoming more tender.
Preparing Silky Vanilla Pastry Cream
Pastry cream, or crème pâtissière, adds luxurious depth. It must be thick yet spreadable.
- Heat 2 cups whole milk with vanilla pod seeds and pod until simmering.
- Whisk 6 egg yolks, 3 tbsp sugar, and 4 tsp cornstarch until pale.
- Temper hot milk into yolk mixture, then return to stove. Cook over medium heat, whisking constantly, until bubbling and thickened (about 2 minutes).
- Strain through a sieve to remove lumps. Cool in an ice bath, stirring occasionally. Cover surface with plastic to prevent skinning.
Prepare 1-2 days ahead. For stability, some fold in whipped cream, creating a lighter diplomat cream variation.
Stabilizing Whipped Cream for Structure
Whipped cream forms the dome’s bulk, so stabilization prevents collapse under marzipan weight.
- Bloom 1 envelope (0.25 oz) gelatin in 2 tbsp cold water for 5 minutes.
- Whip 2-3 cups heavy cream to soft peaks with 1/4 cup powdered sugar and 1 tsp vanilla.
- Melt bloomed gelatin briefly, then drizzle into cream while whipping to stiff peaks.
This holds shape for hours, ideal for transportable cakes.
Layering and Assembly Techniques
Assembly is where precision shines, building from bottom to a curved dome.
| Layer | Filling | Tips |
|---|---|---|
| Bottom Sponge | Raspberry jam + thin whipped cream layer | Keep jam 1/2 inch from edges to prevent leakage. |
| Middle Sponge | Vanilla custard mounded high | Smooth into a gentle hill. |
| Top Sponge (upside down) | Large whipped cream dome | Press edges to curve; cover sides fully. |
Place bottom layer on a turntable. Spread 1/3 cup jam, top with 1/2 cup cream. Add middle sponge. Pipe or spoon custard into a peak. Crown with top sponge, then pile remaining stabilized cream into a smooth hemisphere. Refrigerate 30 minutes to set.
Mastering the Green Marzipan Covering
Marzipan creates the iconic glossy dome. Use 1-1.5 lbs store-bought or homemade almond paste.
- Knead in green gel food color (leaf green) until uniform.
- Roll between parchment dusted with powdered sugar to 1/8 inch thick, larger than the cake by 2 inches.
- Drape over chilled cake, smoothing from top to sides with hands. Trim excess at base with a pastry wheel.
- Tuck edges under cake using a butter knife.
Common pitfalls: Rolling too thin (tears easily) or at room temperature (sticky). Chill marzipan first. Dust hands with sugar for handling.
Decorative Touches and Finishing
Elevate with elegance:
- Rose: Shape pink marzipan into petals or use pre-made icing roses painted rose-pink.
- Leaves/Stars: Cut green marzipan into shapes; attach with corn syrup.
- Dust: Sift powdered sugar over the top for a snowy effect.
Chill assembled cake 2-4 hours before slicing with a serrated knife dipped in hot water.
Common Mistakes and Pro Tips
Avoid these hurdles for success:
- Leaking Fillings: Pipe jam borders; chill between layers.
- Soggy Sponge: Bake ahead; don’t over-soak.
- Cracked Marzipan: Chill cake and marzipan; roll evenly.
- Flat Dome: Use ample stabilized cream; press top layer firmly.
Pro Tips: Scale for minis (bake in smaller pans). Freeze components separately for ease. Pair with coffee or lingonberry liqueur.
Variations for Modern Twists
Adapt tradition:
- Chocolate Version: Cocoa in sponge, chocolate custard.
- Fruit Swap: Blueberry jam or fresh berries.
- Nut-Free: Substitute marzipan with fondant.
- Gluten-Free: Almond flour sponge.
These maintain the cake’s spirit while suiting dietary needs.
Storage and Serving Suggestions
Store refrigerated up to 3 days; best day-of. Freeze whole (without decor) up to 1 month; thaw overnight. Serve chilled in thin wedges to showcase layers. Complements tea, sparkling wine, or Swedish meatballs at parties.
Frequently Asked Questions (FAQs)
Is Prinsesstårta difficult for beginners?
It’s intermediate-advanced due to multi-steps, but detailed guides help. Start with smaller versions.
Can I make it dairy-free?
Yes: Coconut cream for custard/whip, vegan marzipan.
How far ahead can components be prepped?
Sponge/custard: 2 days. Assemble same day.
Why green marzipan specifically?
Historical nod to original recipe; evokes spring freshness.
Substitutes for raspberry jam?
Strawberry or apricot; keep tart to balance sweetness.
References
- Swedish Princess Cake | Prinsesstårta — Global Table Adventure. 2012-01-01. https://globaltableadventure.com/recipe/recipe-swedish-princess-cake-prinsesstarta/
- Princess cake aka Prinsesstårta – recipe — Visit Sweden. 2023-01-01. https://visitsweden.com/what-to-do/food-drink/recipes/princesscake-aka-prinsesstarta-recipe/
- Swedish Princess Cake Prinsesstårta — Sprinkle Bakes. 2019-01-01. https://www.sprinklebakes.com/2019/01/swedish-princess-cake-prinsesstarta.html
- Prinsesstårta (Swedish Princess Cake) — Cristy Sharp, Substack. 2023-01-01. https://substack.com/home/post/p-161825425