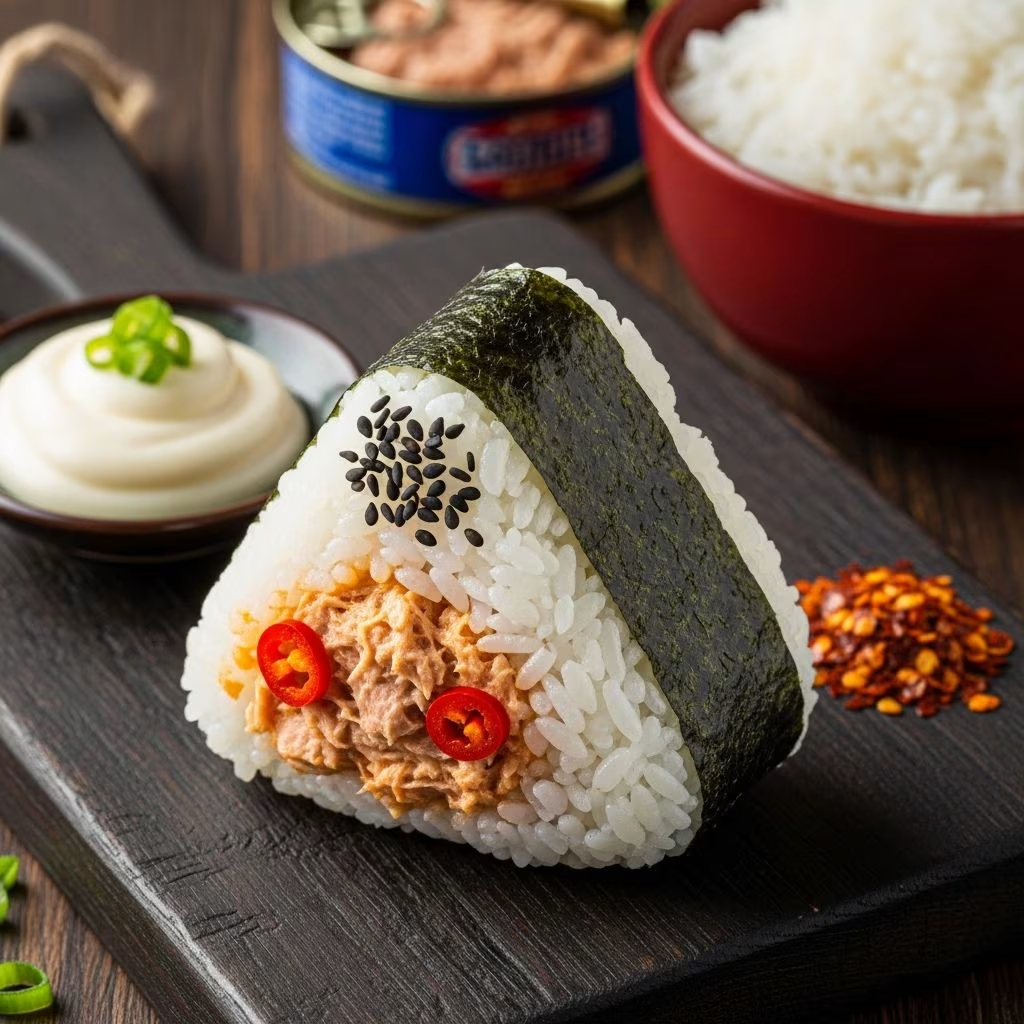
Onigiri represents one of Japan’s most iconic portable foods, embodying simplicity, convenience, and culinary satisfaction in a single palm-sized package. These triangular or spherical rice formations have graced Japanese lunch boxes, convenience store shelves, and home kitchens for generations. Among the countless variations that exist, spicy tuna mayo onigiri stands out as a contemporary favorite that balances heat, creaminess, and umami in perfect harmony.
The beauty of onigiri lies not merely in its cultural significance but in its remarkable versatility. Whether enjoyed as a quick breakfast, a light lunch, or an afternoon snack, these rice balls adapt effortlessly to various occasions and dietary preferences. The spicy tuna mayo version, in particular, appeals to those seeking a more assertive flavor profile than traditional fillings, combining protein-rich tuna with the richness of Japanese mayonnaise and the fiery kick of sriracha.
Understanding the Fundamentals of Onigiri
Before diving into the specifics of preparing spicy tuna mayo onigiri, it helps to understand what makes onigiri special in Japanese culinary tradition. The word “onigiri” simply means “to grip” or “to hold,” describing the hand-shaping technique central to its creation. This method of formation directly connects the cook to the food, infusing each rice ball with personal care and attention.
The basic structure of an onigiri consists of three essential components: seasoned sushi rice as the foundation, a flavorful filling nestled in the center, and a nori (seaweed) wrapper that provides textural contrast and umami enhancement. The interplay between these elements creates a complete sensory experience, with temperature, texture, and flavor all contributing to the overall appeal.
What distinguishes the spicy tuna mayo variation from other onigiri types is its emphasis on heat and creaminess. Rather than relying on traditional pickled plum or salted salmon, this modern interpretation leverages mayonnaise-based preparations enhanced with chili heat, creating a filling that feels luxurious and contemporary while respecting the fundamental onigiri structure.
Selecting Your Rice: The Foundation of Success
The quality of your final onigiri depends substantially on choosing the correct rice variety. Sushi rice, specifically short-grain Japanese rice, serves as the ideal foundation. This rice variety contains higher levels of amylopectin, a starch component that contributes to the rice’s characteristic sticky, cohesive texture. This stickiness proves essential for onigiri formation, allowing the rice grains to adhere together without forming a dense, gluey mass.
When purchasing rice, look for packaging clearly labeled as “sushi rice” or “Japanese short-grain rice.” Avoid medium or long-grain varieties, which lack the necessary binding properties. The most commonly available brands in supermarkets work well for home preparation. Opt for freshly opened packages when possible, as rice quality can diminish over time.
The cooking process significantly impacts your onigiri’s final texture. Many onigiri enthusiasts recommend using a rice cooker for consistent, reliable results. The typical ratio involves combining one part rice with 1.2 to 1.3 parts water by volume. After the rice cooker completes its cycle, allow the rice to cool slightly—warm rice proves much easier to mold than completely cooled rice, and the warmth helps the seasonings incorporate evenly.
The Tuna Mayo Filling: Balancing Flavors and Heat
The spicy tuna mayo filling represents the heart of this onigiri variation, and its preparation deserves careful attention. High-quality canned tuna packed in olive oil or spring water forms the protein base. Oil-packed varieties contribute additional richness and flavor complexity, though water-packed options work equally well for those preferring a lighter preparation.
The mayonnaise component traditionally calls for Kewpie, a Japanese mayonnaise that differs notably from American varieties. Kewpie features a sweeter, richer profile due to its higher egg yolk content and the inclusion of rice vinegar. This unique flavor profile complements the tuna and sriracha beautifully, creating a more nuanced sauce than standard American mayo would provide. However, standard mayonnaise remains an acceptable substitute if Kewpie proves unavailable in your region.
Sriracha supplies the characteristic heat and slight sweetness that defines this filling. The amount used depends entirely on personal heat tolerance—start conservatively with one teaspoon per can of drained tuna, then adjust according to preference. Additional flavor enhancements might include soy sauce for umami depth, rice vinegar for brightness, or fresh scallions for aromatic notes.
The filling preparation process is remarkably straightforward. Drain your canned tuna thoroughly, breaking it into small flakes with a fork. Combine the flaked tuna with two tablespoons of mayonnaise and your chosen sriracha amount in a small bowl. Mix until completely and evenly combined, ensuring no mayonnaise streaks or dry tuna patches remain. This mixture should have a uniform consistency resembling a chunky paste.
Essential Techniques for Perfect Shaping
Mastering the shaping technique separates mediocre onigiri from exceptional ones. Several methods exist, each producing slightly different results. The most common approach involves using wet hands to prevent sticking while working with the warm rice.
Begin by preparing a small bowl filled with room-temperature water mixed with a pinch of salt. This solution serves a practical purpose—the salt prevents rice from adhering excessively to your hands while the moisture lubricates the surface. Continuously dip your hands into this mixture throughout the shaping process.
The traditional three-step hand method works as follows: scoop approximately one-third cup of warm rice into your palm, gently pressing it into a slightly flattened disc. Using your thumb, create a small indentation or crater in the center—this depression will hold your filling. Spoon a generous tablespoon of tuna mayo mixture into this indentation, then cover it with another small portion of rice. Gently shape the rice around the filling using your cupped hands until the tuna filling is completely sealed within, forming either a triangle by pinching three edges or a more rounded shape depending on your preference.
Alternative methods include using onigiri molds—plastic or silicone forms that produce consistent, uniform shapes with minimal effort. These molds typically feature two chambers: press rice into the larger chamber, add filling to the smaller chamber, then press the two together. The resulting onigiri emerges perfectly formed and uniform in size.
Nori Wrapping and Finishing Touches
The nori wrapper serves multiple functions beyond aesthetics. This dried seaweed layer contributes essential umami, provides textural contrast, and offers practical benefit by keeping fingers clean during consumption. Toast the nori lightly before wrapping if you prefer enhanced flavor and increased crispness.
Cut nori sheets into strips approximately one inch wide and long enough to wrap around your shaped onigiri. Timing matters when applying nori—if applied too early, the nori absorbs moisture from the rice and becomes soft and chewy. For crispiest results, add nori immediately before consumption.
Some preparations wrap nori around the onigiri’s middle like a belt, leaving the top and bottom exposed. Others fold nori over the top, creating more complete coverage. Your choice depends on personal preference and presentation goals. For bento box inclusion, wrapping provides structural support and prevents the rice balls from becoming damaged during transport.
Ingredient Variations and Creative Adaptations
While the classic spicy tuna mayo combination provides satisfying results, numerous creative variations deserve exploration. Consider adding diced cucumber for textural contrast and refreshing crunch. Fresh scallions contribute aromatic complexity and visual appeal through green flecks throughout the filling.
Those seeking umami intensification might incorporate a small amount of soy sauce or even Tonkatsu sauce for sweetness and depth. A touch of rice vinegar brightens the overall flavor profile without adding perceivable acidity. Toasted sesame seeds sprinkled over the finished onigiri contribute nutty flavor notes and appealing visual texture.
For heat enthusiasts willing to push spiciness boundaries, substituting a portion of sriracha with Korean gochujang paste or Japanese shichimi togarashi (seven-spice blend) offers new flavor dimensions. Conversely, those preferring milder options can reduce sriracha amounts or incorporate teriyaki sauce for sweet and savory balance instead of pure heat.
Storage and Make-Ahead Strategies
Onigiri’s greatest strength lies in its portability and make-ahead convenience. Properly stored spicy tuna mayo onigiri remains fresh and delicious for up to one day at room temperature, though refrigeration extends shelf life to two days. Store finished onigiri in airtight containers or wrapped individually in plastic wrap or parchment paper.
Apply nori wrapping just before consumption rather than in advance—this timing preserves the seaweed’s desired crispy texture. If preparing onigiri several hours ahead, keep them at room temperature in sealed containers rather than refrigerated, as cold temperatures can harden the rice and compromise texture.
Frequently Asked Questions
Can I use fresh tuna instead of canned?
Yes, high-quality sushi-grade raw tuna finely minced works beautifully in this preparation. Use approximately eight ounces of minced raw tuna as a substitute for one standard can. Ensure your tuna comes from a reputable fishmonger and was previously frozen to minimize food safety risks.
What if I cannot find Kewpie mayonnaise?
Standard American mayonnaise serves as an acceptable substitute. Use the same quantity called for in your recipe. The resulting onigiri will taste slightly less rich and sweet, but still deliver delicious results.
How can I make these gluten-free?
The basic spicy tuna mayo onigiri is naturally gluten-free. However, verify that your soy sauce (if using) and sriracha brands are certified gluten-free, as some formulations contain gluten-containing ingredients.
Can onigiri be frozen?
Yes, unWrapped onigiri freezes successfully for up to one month. Wrap individually in plastic wrap before freezing. Thaw at room temperature for approximately one hour before consuming.
What are suitable side dishes or accompaniments?
Spicy tuna mayo onigiri pairs well with miso soup, cucumber salad, edamame, or pickled vegetables. These complementary dishes balance the spicy filling’s richness with lighter, refreshing elements.
References
- Spicy Tuna Onigiri Recipe — Spoon Fork Bacon. Accessed April 2026. https://www.spoonforkbacon.com/spicy-tuna-onigiri/
- Spicy Tuna Mayo Onigiri Recipe (Japanese Rice Balls) — Simmer and Sage. Accessed April 2026. https://simmerandsage.com/spicy-tuna-mayo-onigiri-recipe-japanese-rice-balls/
- Tuna Onigiri Recipe – Spicy Japanese Rice Balls — Contemplating Sweets. Accessed April 2026. https://www.contemplatingsweets.com/tuna-mayo-onigiri/
- Spicy Tuna Onigiri (How to Make Onigiri) — A Beautiful Plate. Accessed April 2026. https://www.abeautifulplate.com/spicy-tuna-onigiri/
- Tuna Mayo Onigiri: The 15-Min “Sea Chicken” Rice Ball Made Simple — Sudachi Recipes. Accessed April 2026. https://sudachirecipes.com/tuna-mayo-onigiri/