When it comes to classic Southern desserts, few cakes command as much admiration as the sock it to me cake. This distinctive bundt cake has earned its place at Southern tables for generations, combining a moist buttery crumb with a delightful surprise hidden within. The cake’s unusual name has sparked curiosity among bakers and dessert lovers alike, though its true origin remains something of a Southern mystery. What’s certain is that this cake delivers an unforgettable combination of flavors and textures that keeps people coming back for more.
Understanding the Cake’s Unique Characteristics
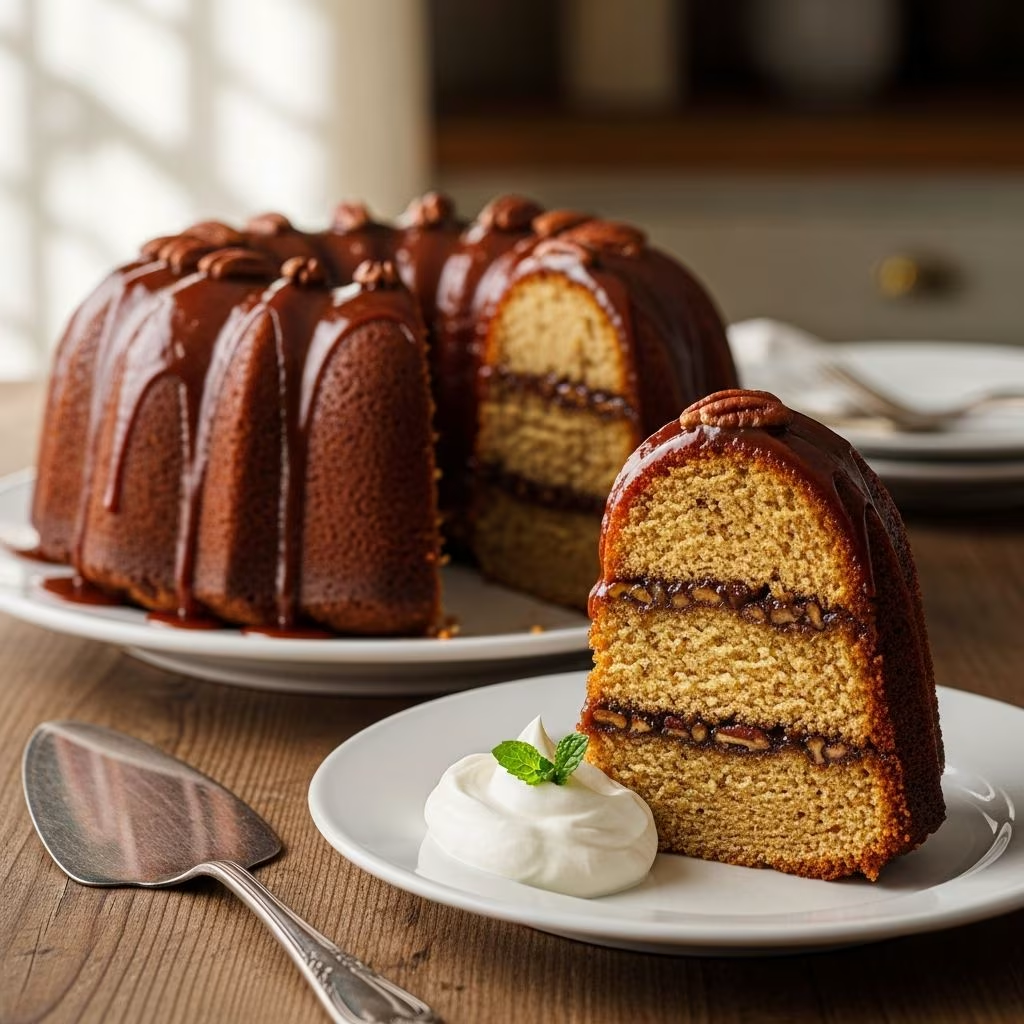
This Southern classic occupies a special place in American baking, standing somewhere between a traditional pound cake and a coffee cake. The defining feature that sets this cake apart is the ribbon of cinnamon-spiced pecan filling that runs through the center, creating a pleasant textural contrast against the tender crumb. The filling provides bursts of warmth and nutty flavor, while the exterior remains smooth and refined thanks to a simple vanilla glaze. Unlike heavily frosted cakes that can feel overly sweet, this design keeps the focus on the quality of the cake itself and the sophistication of its flavors.
The cake’s moisture content is another key characteristic that makes it stand out from standard pound cakes. The addition of sour cream to the batter creates a chemical reaction with baking soda that produces a tender, delicate crumb structure. This ingredient choice ensures that the cake remains moist for several days after baking, making it an excellent option for advance preparation or gifting.
Essential Ingredients and Their Roles
The Cake Foundation
Building the perfect cake starts with understanding each ingredient’s purpose. Quality butter forms the foundation of this recipe, and it must be at room temperature to incorporate properly. Room temperature butter creams more efficiently with sugar, incorporating air that helps the cake rise and develop its characteristic light texture. The eggs should also be at room temperature, as this allows them to blend seamlessly into the batter and provide structure and richness to the final product.
Sour cream serves a dual purpose in this recipe. Beyond adding moisture and tang, the acidity in sour cream reacts with baking soda to create lift and promote browning. Full-fat sour cream is essential here, as the fat content directly contributes to the cake’s luxurious mouthfeel and rich flavor profile. Skimping on fat would result in a less satisfying texture and diminished taste.
All-purpose flour mixed with a minimal amount of baking soda creates the dry foundation for the crumb structure. Careful measurement and proper mixing technique prevent the development of too much gluten, which would make the cake tough rather than tender.
The Surprise Filling
The filling transforms this from a simple butter cake into something truly memorable. A combination of chopped pecans, brown sugar, and ground cinnamon creates layers of flavor that complement the buttery cake. The brown sugar adds molasses notes that deepen the cinnamon’s warmth, while the pecans provide textural contrast and a subtle earthiness. For those seeking variations, toasted nuts intensify the filling’s nuttiness, though walnuts or almonds can substitute if pecans aren’t available or preferred.
The Finishing Glaze
A simple vanilla glaze serves as the perfect finishing touch. Made from powdered sugar, milk, and vanilla extract, this glaze drapes elegantly over the cooled cake without overwhelming it. The glaze’s sweet simplicity allows the cake’s interior flavors to remain the star of the show.
Preparation and Setup Essentials
Success in baking begins before the mixing even starts. Proper preparation creates conditions for excellent results throughout the baking process. First, remove all cold ingredients from the refrigerator and allow them to reach room temperature. This typically takes 30 to 45 minutes for eggs and sour cream, and one to two hours for butter, depending on room temperature. Room temperature ingredients blend uniformly and create a smooth, homogeneous batter.
Next, prepare your bundt pan thoroughly. A 12-cup bundt pan is traditional, and it should be coated generously with non-stick baking spray or butter and flour. Taking time to coat every crevice prevents sticking and ensures the beautiful ridged design transfers perfectly to the finished cake. Some bakers create a homemade cake release from butter, flour, and oil for enhanced non-stick protection.
Preheat your oven to 325°F, which is lower than many cakes require. This gentler temperature allows the cake to bake evenly throughout without browning too quickly on the outside before the interior sets.
Step-by-Step Baking Instructions
Creating the Batter Base
Begin by creaming together room-temperature butter and granulated sugar in a stand mixer on high speed for three to four minutes. This crucial step incorporates air into the mixture, creating the structure that allows the cake to rise. Proper creaming results in a pale yellow, fluffy mixture that has visibly increased in volume. Scrape down the sides of the bowl halfway through to ensure even mixing.
Add eggs one at a time, mixing well after each addition and scraping down the bowl as needed. This gradual incorporation prevents lumps and ensures even distribution throughout the batter. The mixture should transform into a golden-colored batter as the eggs are incorporated.
Combining Dry and Wet Components
Whisk together the flour, baking soda, and salt in a separate bowl. In another small bowl, combine the chopped pecans, brown sugar, and cinnamon for the filling. Having all components prepared before mixing prevents frantic searching during the critical baking stage.
Reduce the mixer to its lowest speed and add the flour mixture in two increments, mixing gently until just combined. Overbeating at this stage develops gluten, resulting in a dense, tough crumb. Finish by adding sour cream and vanilla extract, mixing on low until just combined. The batter should be gorgeous and smooth, not overworked.
Creating the Signature Ribbon
Pour two-thirds of the batter into the prepared bundt pan. Evenly distribute the pecan filling mixture over this bottom layer of batter. Then carefully pour the remaining cake batter over the filling, smoothing the top with a spatula. This layering creates the distinctive ribbon that makes the cake special when sliced.
Baking and Cooling
Bake at 325°F for 65 to 80 minutes, depending on your specific oven. The cake is done when a toothpick inserted into the center comes out clean or with just a few moist crumbs. Baking times vary by oven calibration and altitude, so begin checking around the 60-minute mark.
Allow the cake to cool in the pan for 10 minutes, then invert onto a wire rack. This resting period in the pan allows the structure to set without sticking, while complete cooling on the rack prevents moisture from creating a soggy bottom. Let the cake cool completely before applying the glaze, which typically takes at least one hour.
Glaze Application and Serving
Whisk together powdered sugar, milk, and vanilla extract until smooth. Add milk gradually if needed to achieve the desired consistency—the glaze should pour easily but not be too thin. Spoon the glaze over the cooled cake, allowing it to drape naturally over the sides. The contrast between the white glaze and the cake’s golden brown exterior creates an appealing presentation.
Tips for Perfect Results Every Time
- Toast the pecans: Toasting pecans in a 350°F oven for 8-10 minutes intensifies their nutty flavor, adding extra depth to the filling.
- Don’t skip room temperature ingredients: This seemingly minor detail makes a significant difference in batter consistency and final texture.
- Cream butter and sugar thoroughly: This step is not just about combining ingredients; it’s about incorporating air that helps the cake rise properly.
- Use full-fat sour cream: The fat content directly contributes to moisture and richness that low-fat versions cannot provide.
- Avoid overmixing after adding flour: Gentle mixing prevents gluten development that would create a tough, dense crumb.
- Check for doneness carefully: A toothpick inserted near but not through the filling provides the most accurate test.
- Allow proper cooling time: Rushing this step can result in a cake that falls apart or has an uneven glaze application.
Storage and Make-Ahead Advice
This cake’s moisture content means it keeps beautifully for several days when properly stored. Place the cooled, glazed cake in an airtight container at room temperature for up to three days. The flavors actually deepen and mellow slightly over time, making this an excellent cake to prepare a day in advance of serving.
For longer storage, the unglazed cake can be wrapped tightly and frozen for up to two months. Thaw at room temperature before applying the glaze and serving. This advance preparation option makes the cake convenient for entertaining or gift-giving.
Customization and Variation Ideas
While the traditional recipe remains beloved, bakers can explore variations to suit different preferences and dietary needs. Substitute walnuts or almonds for pecans if nut preferences differ. Try replacing some or all of the cinnamon with nutmeg, apple pie spice, or pumpkin pie spice for different flavor profiles. Some bakers add a layer of streusel-style topping instead of or in addition to the internal filling.
For those who prefer less sweetness, reduce the sugar in the glaze or omit it entirely, allowing the cake’s natural flavors to shine. Experimenting with different vanilla extracts or adding a small amount of almond extract can also create subtle variations on the classic recipe.
Frequently Asked Questions
Why is it called “Sock It to Me” cake?
The origin of this unusual name remains debated among culinary historians. Some attribute it to the surprise filling that metaphorically “socks” the eater, while others suggest it dates back to a particular era or region where this phrase had different connotations. Regardless of the etymology, the name has stuck for generations.
Can I use a different cake pan?
While a bundt pan is traditional, the cake can be made in two round 9-inch cake pans or a standard loaf pan. Adjust baking time accordingly—round pans may bake 5-10 minutes faster, while loaf pans may require the full baking time or slightly longer.
What if my cake sticks to the pan?
Thorough greasing with non-stick spray or a homemade cake release prevents sticking. If sticking occurs, run a thin knife around the edges and attempt to invert again after waiting a few minutes. A hair dryer’s warm air can sometimes help release a stubborn cake.
Can I make this cake without sour cream?
Sour cream is difficult to replace due to its unique chemical properties. Greek yogurt or regular yogurt can substitute in a pinch, though the results may be slightly different. Avoid using low-fat or fat-free versions, as they lack the richness essential to this cake.
How should I serve this cake?
Serve slices at room temperature with coffee or tea. The cake pairs beautifully with fresh berries, whipped cream, or a simple fruit compote for special occasions.
References
- Sock it to Me Cake Recipe — AllRecipes. Retrieved from https://www.allrecipes.com/recipe/7505/sock-it-to-me-cake-iii/
- Easy Sock It to Me Cake Recipe You’ll Love — YouTube. Retrieved from https://www.youtube.com/watch?v=wKrt07NxN-0
- Sock it to Me Cake – Preppy Kitchen — Preppy Kitchen. Retrieved from https://preppykitchen.com/sock-it-to-me-cake/
- Southern Sock It To Me Cake from Scratch — Grandbaby Cakes. Retrieved from https://grandbaby-cakes.com/sock-it-to-me-cake/
- Easy Sock It To Me Cake Recipe — To Simply Inspire. Retrieved from https://www.tosimplyinspire.com/sock-it-to-me-cake.html