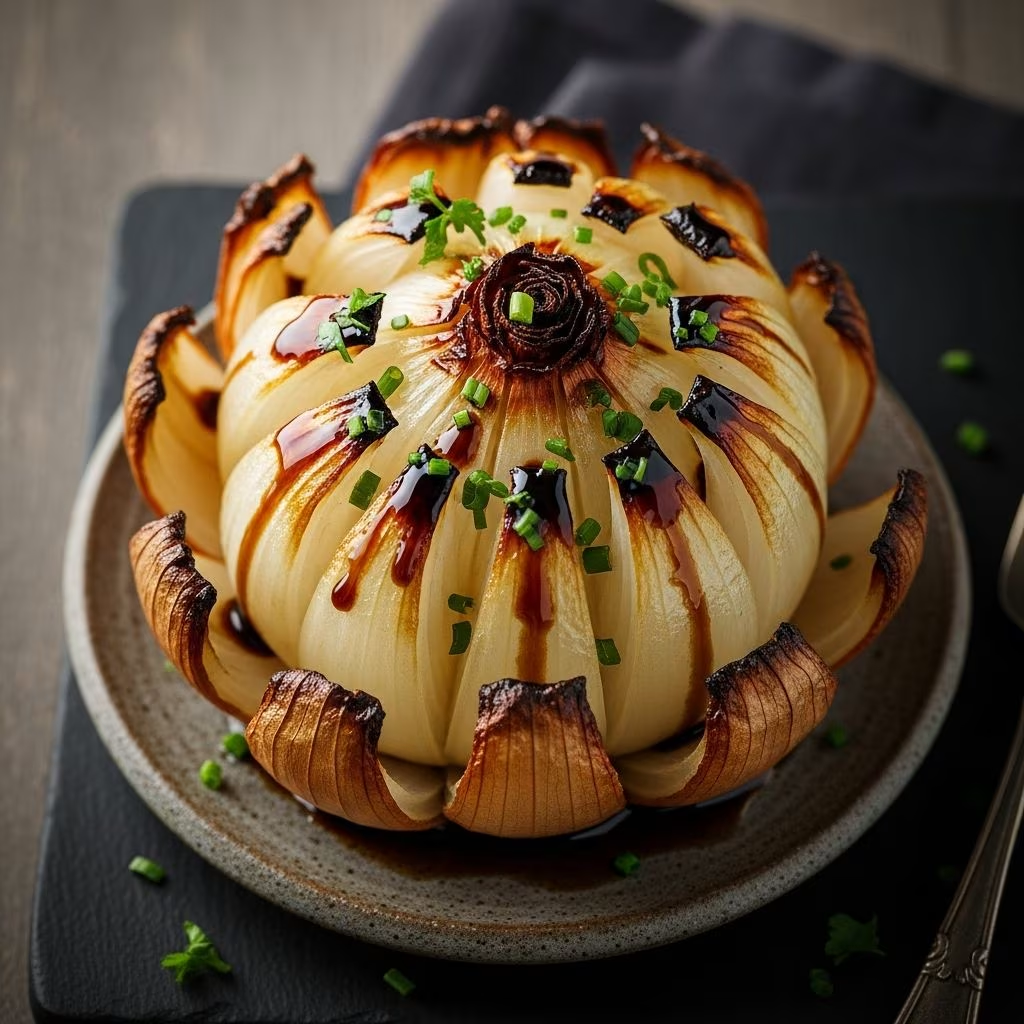
Creating visually striking dishes doesn’t always require complicated techniques or exotic ingredients. Sometimes the most impressive culinary moments emerge from transforming humble pantry staples through thoughtful preparation. Roasted onion blooms represent exactly this philosophy—a simple vegetable elevated into an elegant presentation that captures attention on any dining table. This technique involves strategic cutting and careful roasting to produce onions that naturally unfold into captivating flower-like forms, complete with caramelized edges that deliver rich, sweet flavor.
Understanding the Foundation: Choosing Your Onions
The success of this dish begins with selecting the right onion variety. While several types can work, certain varieties produce superior results due to their natural sweetness and structural characteristics. Red onions are frequently chosen for their striking color and ability to develop deep caramelization during roasting. Their purple-hued layers intensify visually as they cook, creating a more dramatic presentation. However, the culinary possibilities extend beyond this single option.
White onions and yellow onions also perform admirably in this preparation method. White onions contribute subtle golden tones as they roast, offering a more understated aesthetic while maintaining excellent flavor development. Yellow onions bring earthier sweetness and tend to caramelize more quickly due to their higher natural sugar content. Vidalia onions and other sweet onion varieties represent premium choices, as their inherently lower sulfur content produces milder, more delicate flavor profiles that shine when the cooking process concentrates their sugars.
Size matters considerably in this preparation. Selecting small to medium onions ensures even cooking throughout and maintains the visual impact of the final presentation. Oversized onions may become unwieldy to serve and lose the delicate flower-like appearance that defines this dish. Aim for onions approximately 2 to 3 inches in diameter for optimal results.
Mastering the Cutting Technique
The distinctive bloom appearance depends entirely on precise cutting methodology. This technique requires confidence and careful attention to prevent cutting completely through the onion base, which holds all layers together as they expand during roasting.
Step-by-step cutting process:
- Begin by trimming a thin slice from the root end to create a flat, stable base that prevents the onion from rolling
- Position the onion root-side up on your cutting board
- Make your first cut from the top, moving toward the root but stopping approximately half an inch above the base—this distance proves critical
- Rotate the onion ninety degrees and make an identical cut perpendicular to the first
- Rotate again and repeat this cutting pattern two more times until the onion is divided into eight equal wedge-like segments
- If you prefer a more elaborate chrysanthemum effect with greater petal density, divide each of the eight sections in half by making additional cuts between existing ones
A helpful technique involves placing wooden spoon handles on either side of your onion while cutting. These implements act as depth guides, preventing your knife from penetrating too deeply and compromising the structural integrity of the base. This safety measure proves especially valuable when working with smaller onions or when you’re still developing confidence with the technique.
Creating the Perfect Flavor Base
Roasted onions benefit tremendously from a well-constructed flavor infusion applied both before and during cooking. The cooking liquid serves dual purposes: it seasons the onion layers and creates a glaze that caramelizes on the exterior surfaces, developing complex, savory sweetness.
Essential flavor components:
| Ingredient | Function | Typical Amount |
|---|---|---|
| Olive Oil | Promotes browning and carries fat-soluble flavors | 3 tablespoons |
| Balsamic Vinegar | Adds depth and acidity to balance sweetness | 2 tablespoons |
| Salt | Enhances natural onion flavor | To taste |
| Black Pepper | Provides subtle heat and complexity | To taste |
The combination of olive oil and balsamic vinegar creates a particularly harmonious pairing. The vinegar’s acidity cuts through the natural sweetness that develops during roasting, while the oil promotes even browning and helps distribute heat throughout the onion layers. This balance prevents the dish from becoming cloying while allowing the onion’s inherent sugars to concentrate and caramelize.
Alternative flavor profiles expand the possibilities considerably. Fresh herbs such as thyme, rosemary, or oregano introduce Mediterranean complexity. Dijon mustard adds sharp, tangy notes that interact beautifully with caramelized onion sweetness. Lemon juice brightens the overall flavor profile, particularly when paired with fresh herbs. Wine vinegar substitutes provide different aromatic qualities compared to balsamic options.
The Roasting Process and Temperature Considerations
Proper oven temperature balances the need for effective caramelization against the risk of burning or undercooking. Most recipes call for temperatures between 400°F and 425°F. This range allows sufficient heat to penetrate the onion layers and trigger the Maillard reaction—the chemical process that creates brown color and complex flavor compounds—while providing enough time for the vegetable to soften completely before exterior edges become excessively charred.
Roasting timeline:
Initial covered roasting typically lasts 25 to 30 minutes at 425°F. Aluminum foil covering traps steam, creating a moist environment that gently softens the onion layers while beginning the caramelization process. During this phase, the onion’s natural juices combine with the added oil and vinegar, creating a flavorful braising liquid. The foil prevents excessive moisture loss while allowing enough heat penetration to develop color on exposed surfaces.
After removing the foil, continue roasting for an additional 10 minutes uncovered. This final stage allows exterior moisture to evaporate, promoting browning and crisping of the onion’s outer layers. The exposed surfaces develop caramelized edges that curl naturally upward, creating more pronounced petal-like formations. Resist the urge to rush this stage—leaving the onions slightly longer than expected actually enhances the final appearance and deepens flavor complexity.
Achieving the Ideal Texture and Doneness
The target consistency requires onions that are tender enough to cut with minimal pressure yet firm enough to maintain their shape when plated. The layers should separate easily but remain attached at the base. Slight caramelization on exterior edges indicates proper doneness, while the interior remains moist and flavorful.
Testing for readiness involves gently pressing the onion’s side with a fork or knife tip. The flesh should yield readily without requiring excessive pressure. If the onion still feels firm, return it to the oven for additional cooking time. Conversely, if layers begin separating completely at the base or exterior edges turn very dark brown, reduce oven time in future preparations.
Presentation and Serving Suggestions
The visual appeal of roasted onion blooms makes them versatile for various dining contexts. Individual servings can be presented as standalone components or incorporated into composed plates. The natural flower-like appearance requires minimal garnishing, though thoughtful additions enhance both visual and flavor dimensions.
Serving options include:
- Garnishing with capers for briny contrast and textural interest
- Sprinkling toasted pine nuts or pecans for nutty depth
- Adding fresh herb elements such as parsley or chives for brightness
- Pairing with protein components including grilled meats, roasted poultry, or baked fish
- Presenting as part of composed vegetable arrangements on sharing platters
- Serving as an appetizer with complementary dipping sauces
Temperature flexibility extends the utility of this preparation. Serve the onions warm immediately after roasting for maximum textural contrast. Room temperature presentations work equally well for entertaining, as the blooms maintain their appearance and flavor qualities for several hours after cooking. This flexibility makes the preparation particularly valuable for advance preparation during busy entertaining schedules.
Practical Storage and Make-Ahead Strategies
Roasted onion blooms store effectively in sealed containers within the refrigerator for up to four days. The flavor actually intensifies slightly as the components meld overnight, making this dish an excellent candidate for advance preparation. Simply reheat gently in a 300°F oven for 10 minutes before serving to restore optimal texture and temperature.
The preparation phase can be completed several hours ahead of serving. Cut onions, prepare the flavor base, and assemble everything in the baking dish. Cover and refrigerate until ready to roast. Add approximately 5 to 10 minutes to the roasting time when starting from refrigerated temperature to account for the cooler starting point.
Frequently Asked Questions
- Can I use large onions instead of small ones?
- While large onions can technically be used, they present practical challenges. Larger onions require extended roasting time, potentially resulting in mushy texture. The flower-like appearance becomes less pronounced with oversized specimens. Stick with small to medium onions for best results.
- What if my onions don’t open properly during roasting?
- Inadequate opening typically results from insufficient roasting time or excessive cutting depth at the base. Ensure you’re stopping your cuts at least half an inch from the base to allow structural support. If onions seem reluctant to open, extend roasting time by 5 to 10 minutes.
- Can I substitute the balsamic vinegar?
- Absolutely. Red wine vinegar, white wine vinegar, or apple cider vinegar each produce different flavor profiles. White wine vinegar creates more delicate, subtle results. Red wine vinegar contributes earthier tones. Experiment to find your preference.
- Are roasted onion blooms suitable for vegetarian menus?
- Yes, this preparation is inherently vegetarian and works beautifully as a standalone side dish or component of vegetable-focused meals.
- How far ahead can these be prepared?
- Onions can be cut and assembled in baking dishes up to 8 hours in advance. Roasted onions keep refrigerated for 4 days and reheat effectively.
Conclusion: Elevating Simple Ingredients
Roasted onion blooms demonstrate how thoughtful technique transforms everyday ingredients into memorable dishes. This preparation requires no special equipment or advanced culinary skills, yet produces results that impress diners and expand the repertoire of accessible gourmet cooking. Whether entertaining guests or creating weeknight side dishes that elevate simple proteins, this technique offers reliable visual and flavor impact that belies its straightforward methodology. Master the cutting technique, respect the roasting timeline, and this elegant preparation becomes a permanent fixture in your entertaining strategies.
References
- 12 Tomatoes: Roasted Onion Flower — 12 Tomatoes. Accessed 2026. https://12tomatoes.com/roasted-onion-flower/
- Recipe: Roasted Onion Flowers — Farnsworth Art Museum. https://www.farnsworthmuseum.org/about/fam-blog/recipe-roasted-onion-flowers/
- Onion Flowers — LCBO. 2012. https://www.lcbo.com/en/recipe/onion-flowers/201205041
- Cooking with Kids: Big Beautiful Baked Blooming Onion — Kitchen Frau. https://www.kitchenfrau.com/baked-blooming-onion/