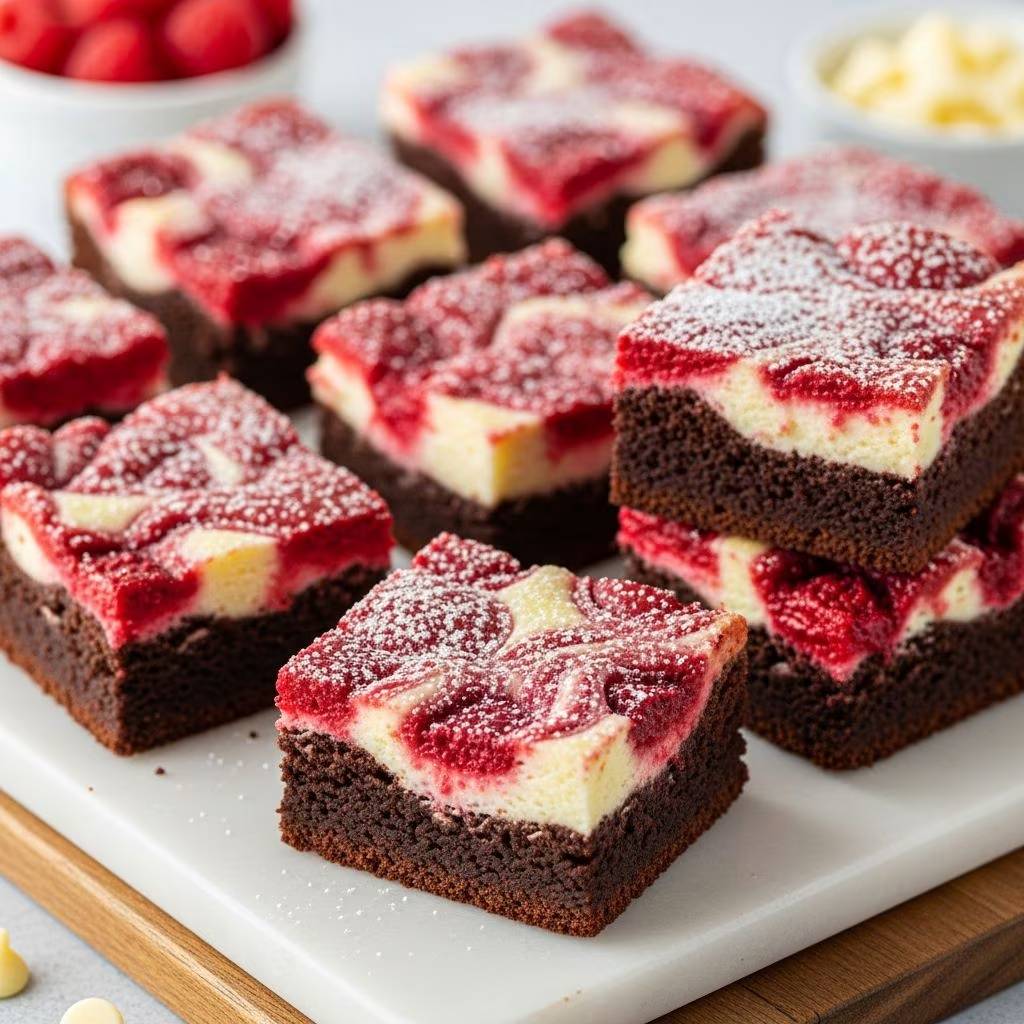
Red velvet cheesecake swirl brownies represent a sophisticated fusion of classic dessert traditions, merging the elegance of red velvet cake with the indulgence of fudgy brownies and the tartness of creamy cheesecake. This three-layer confection has become increasingly popular for celebrations, gatherings, and special occasions, offering both visual appeal and complex flavor profiles that satisfy multiple taste preferences in a single bite. Whether you’re an experienced baker or someone exploring red velvet desserts for the first time, these brownies provide an accessible yet impressive result that will earn admiration from family and friends.
Understanding the Foundational Components
The success of red velvet cheesecake swirl brownies depends on understanding each of the three distinct layers that compose the final product. Each layer brings its own textural and flavor characteristics, and the interplay between them creates the distinctive appeal of this dessert.
The red velvet base layer combines traditional brownie elements with specific coloring and flavoring techniques unique to red velvet preparations. Rather than relying solely on chocolate, red velvet brownies incorporate cocoa powder in modest quantities, allowing the red coloring to remain prominent and visually striking. The addition of white vinegar serves a crucial purpose beyond flavor—it intensifies the red hue and provides a subtle tangy undertone that contrasts beautifully with the sweetness of surrounding layers.
The cream cheese layer introduces a creamy, tangy element that provides textural variety and flavor complexity. This layer remains relatively soft even after baking, creating pockets of richness throughout the finished brownies. The cream cheese mixture is deliberately kept simple, allowing the subtle vanilla notes and gentle tartness to complement rather than overpower the red velvet elements.
Finally, the marbled surface pattern isn’t merely decorative—the swirled combination of red velvet batter and cream cheese mixture creates varied flavor experiences in each portion, ensuring no two bites are identical.
Essential Ingredients and Their Roles
For the Red Velvet Brownie Component
- Unsalted Butter (typically ½ to ¾ cup): Provides moisture and richness. Using room-temperature butter when called for, or melted butter as specified, affects the final texture and mixing process.
- Granulated Sugar (usually 1 cup): Creates sweetness and contributes to the brownie’s dense, fudgy structure.
- Eggs (typically 2 large): Bind ingredients and create the brownie’s characteristic chewy texture. They should be at room temperature for optimal incorporation.
- All-Purpose Flour (approximately ¾ cup): Provides structure without developing excessive gluten, which would create a cake-like rather than fudgy texture.
- Unsweetened Cocoa Powder (¼ cup): Delivers subtle chocolate undertones without overwhelming the red velvet character. Sifting prevents lumps.
- Red Gel Food Coloring (1 to 1½ teaspoons): Produces the distinctive red hue. Gel coloring is preferable to liquid as it provides more vibrant color without excess moisture.
- White Vinegar (¾ to 1 teaspoon): Intensifies the red coloring through chemical reaction with cocoa powder and adds subtle tang.
- Vanilla Extract (1 to 2 teaspoons): Enhances overall flavor complexity with warm, aromatic notes.
- Salt (⅛ teaspoon): Balances sweetness and enhances chocolate notes.
For the Cheesecake Swirl Component
- Full-Fat Cream Cheese (8 ounces): Must be softened to room temperature for smooth mixing. Full-fat varieties produce superior flavor and texture compared to reduced-fat alternatives.
- Granulated Sugar (¼ cup): Sweetens the cream cheese layer while maintaining its distinctive tartness.
- Egg Yolk (1 large): Provides richness and helps set the cheesecake layer during baking. Using only the yolk rather than whole eggs prevents excessive moisture.
- Vanilla Extract (½ teaspoon): Adds subtle flavor without competing with the red velvet elements.
Preparation Techniques That Ensure Success
Pan Setup and Oven Preparation
Begin by preheating your oven to 350°F, allowing adequate time for the oven to reach stable temperature. Prepare an 8×8-inch baking pan by lining it with parchment paper, which facilitates easy removal of the finished brownies and prevents sticking. Some bakers prefer additionally greasing the parchment paper with a light coating of butter or cooking spray, though this is optional given parchment’s naturally non-stick properties.
Creating the Red Velvet Base
The red velvet brownie batter requires careful attention to ingredient incorporation order, as this influences both flavor distribution and final texture. Begin by melting the butter in a microwave-safe bowl in 30-second increments, stirring between intervals to ensure even melting without overheating. Once melted, immediately whisk in sugar, creating a smooth mixture. The subsequent additions should follow a specific sequence: vanilla extract, cocoa powder, salt, red food coloring, and white vinegar should each be incorporated and fully mixed before adding the next ingredient. This sequential approach prevents streaking and ensures even color distribution.
After combining the wet ingredients with these flavorings, beat the eggs separately in a small bowl, then whisk them into the mixture. Finally, fold in the flour using a spatula or wooden spoon with gentle motions—this prevents overdevelopment of gluten that would compromise the brownie’s characteristic fudginess. The batter should be smooth and homogeneous with no visible flour streaks.
Portion the finished batter by pouring approximately three-quarters into the prepared pan, reserving about ¼ cup for the final surface layer. Spreading the initial batter evenly to the corners ensures even baking.
Preparing the Cream Cheese Filling
Using an electric mixer (either handheld or stand-mounted), beat the softened cream cheese, sugar, egg yolk, and vanilla extract together on medium speed for approximately one minute. The mixture should be completely smooth and homogeneous—lumps indicate insufficient mixing and will remain visible in the finished brownies. Scrape the bowl periodically with a spatula to ensure all ingredients are fully incorporated.
The Swirling Technique: Creating Visual Appeal
The swirling process determines both the visual appearance and the flavor distribution throughout the finished brownies. Begin by dolloping spoonfuls of the cream cheese mixture across the surface of the red velvet batter, spacing them relatively evenly across the pan but not connecting them completely. The individual dollops should be approximately 1 to 1.5 inches in diameter.
Next, distribute the reserved red velvet brownie batter by dolloping small amounts over and between the cream cheese portions. This creates opportunities for mixing without completely homogenizing the layers.
Using a knife, skewer, or toothpick—any implement with a sharp point and thin profile—drag it gently through the layers in a back-and-forth or zigzag pattern. The key distinction between successful and unsuccessful swirling is pressure: too much pressure disrupts the structural integrity of both layers, while too little prevents adequate mixing to create the marbled effect. The implement should pass through both layers but not scrape the bottom of the pan. Dragging the tool through the prepared pan approximately 8 to 12 times in alternating directions creates an attractive marbled appearance without over-mixing.
Baking Process and Timing Considerations
Place the prepared pan in the preheated 350°F oven and bake for 25 to 30 minutes, depending on your specific oven’s temperature calibration and heating characteristics. The brownies are properly baked when the edges appear set and firm, while the very center may still appear slightly underbaked or jiggly—approximately a 1 to 2-inch circle in the absolute center. This apparent underbaking is intentional, as residual heat continues cooking the brownies as they cool, resulting in a fudgy rather than cakey texture.
Overbaking results in dry brownies with diminished cream cheese flavor, while underbaking leaves them too soft to cut cleanly. If uncertain, begin checking at 23 minutes and continue monitoring every 2 minutes until the desired doneness is achieved.
Cooling and Storage Protocols
After removing the brownies from the oven, allow them to cool in the baking pan at room temperature for a minimum of one hour. Many bakers prefer refrigerating the completely cooled brownies for an additional 1 to 2 hours before cutting, as this firms both the red velvet and cream cheese layers, making clean cuts significantly easier. Cold brownies also maintain their shape better and exhibit superior presentation.
Use a sharp knife or an unwaxed dental floss (pulled taut between your fingers) for cutting. Clean the cutting implement between each cut to prevent batter accumulation and ensure clean edges. Cut the brownies into 9, 12, or 16 pieces depending on your preferred portion size.
Store finished brownies in an airtight container at room temperature for up to 4 days, or refrigerate for up to one week. These brownies freeze exceptionally well for up to three months when individually wrapped and placed in a freezer-safe container.
Flavor Profile and Serving Suggestions
Red velvet cheesecake swirl brownies offer a sophisticated flavor experience combining multiple sensory elements. The red velvet layer provides subtle chocolate undertones balanced by the tartness of vinegar and the subtle vanilla notes, while the cream cheese layer introduces pronounced tang and creamy richness. The combination creates a dessert that’s neither overwhelmingly sweet nor aggressively chocolate-forward—making these brownies appealing to individuals with diverse dessert preferences.
These brownies pair exceptionally well with coffee, offering excellent balance to the dessert’s sweetness. Cold milk provides a classic pairing, while champagne or sparkling wine complements their elegant presentation for special occasions. Serve them at room temperature for optimal cream cheese flavor and brownie texture.
Common Challenges and Solutions
| Challenge | Likely Cause | Solution |
|---|---|---|
| Pale red color | Insufficient food coloring or poor quality coloring | Use gel food coloring in slightly higher quantities; ensure vinegar is added |
| Cakey rather than fudgy texture | Overmixing flour or overbaking | Fold flour gently; remove from oven when edges are set but center jiggles slightly |
| Cream cheese layer doesn’t set | Insufficient baking time or oven temperature too low | Verify oven temperature with thermometer; extend baking time by 2-3 minutes |
| Lumpy cream cheese mixture | Cold cream cheese or insufficient mixing | Ensure cream cheese is fully softened; beat for full minute |
| Uneven swirl pattern | Excessive or insufficient tool passes; inconsistent dollop size | Make 8-12 deliberate passes; use consistent dollop sizes |
Frequently Asked Questions
Can I use liquid food coloring instead of gel?
While possible, liquid food coloring introduces excess moisture that affects the brownie’s texture. Gel coloring produces superior color intensity and doesn’t compromise the batter’s consistency. If only liquid coloring is available, reduce other liquid ingredients slightly to compensate.
What if I don’t have white vinegar?
White vinegar specifically enhances the red coloring. Apple cider vinegar works as an alternative, though it imparts slight flavor differences. Avoid red wine vinegar, which adds undesirable color and flavor.
Is the egg yolk really necessary in the cream cheese layer?
Yes, the egg yolk contributes to proper setting and adds richness. Omitting it results in a filling that remains too soft and may separate slightly during cooling.
Can these brownies be made dairy-free?
The red velvet layer can be made dairy-free using dairy-free butter and eliminating the cream cheese layer. Creating a successful dairy-free cream cheese alternative presents significant challenges due to the specific texture and flavor requirements unique to cheesecake.
How should I wrap individual brownies for gifting?
Allow brownies to cool completely, then wrap individually in plastic wrap or parchment paper. Place wrapped brownies in a decorative box or tin. These beautifully marbled brownies make impressive gifts for colleagues, friends, and family members.
References
- Red Velvet Cream Cheese Swirl Brownie — YouTube. Accessed 2026-04-09. https://www.youtube.com/watch?v=5lJ-0YS3VoM
- Red Velvet Cheesecake Swirl Brownies — Sally’s Baking Addiction. Accessed 2026-04-09. https://sallysbakingaddiction.com/red-vellet-cheesecake-swirl-brownies/
- Red Velvet Cheesecake Brownies — Just a Taste. Accessed 2026-04-09. https://www.justataste.com/valentines-day-red-velvet-cheesecake-brownies-recipes/
- Red Velvet Cheesecake Swirl Brownies — Crisp and Crumble. Accessed 2026-04-09. https://crispandcrumble.com/red-velvet-cheesecake-swirl-brownies/
- Cheesecake Swirled Red Velvet Brownies — Lifestyle of a Foodie. Accessed 2026-04-09. https://lifestyleofafoodie.com/cheese-cake-swirled-red-vellet-brownies/