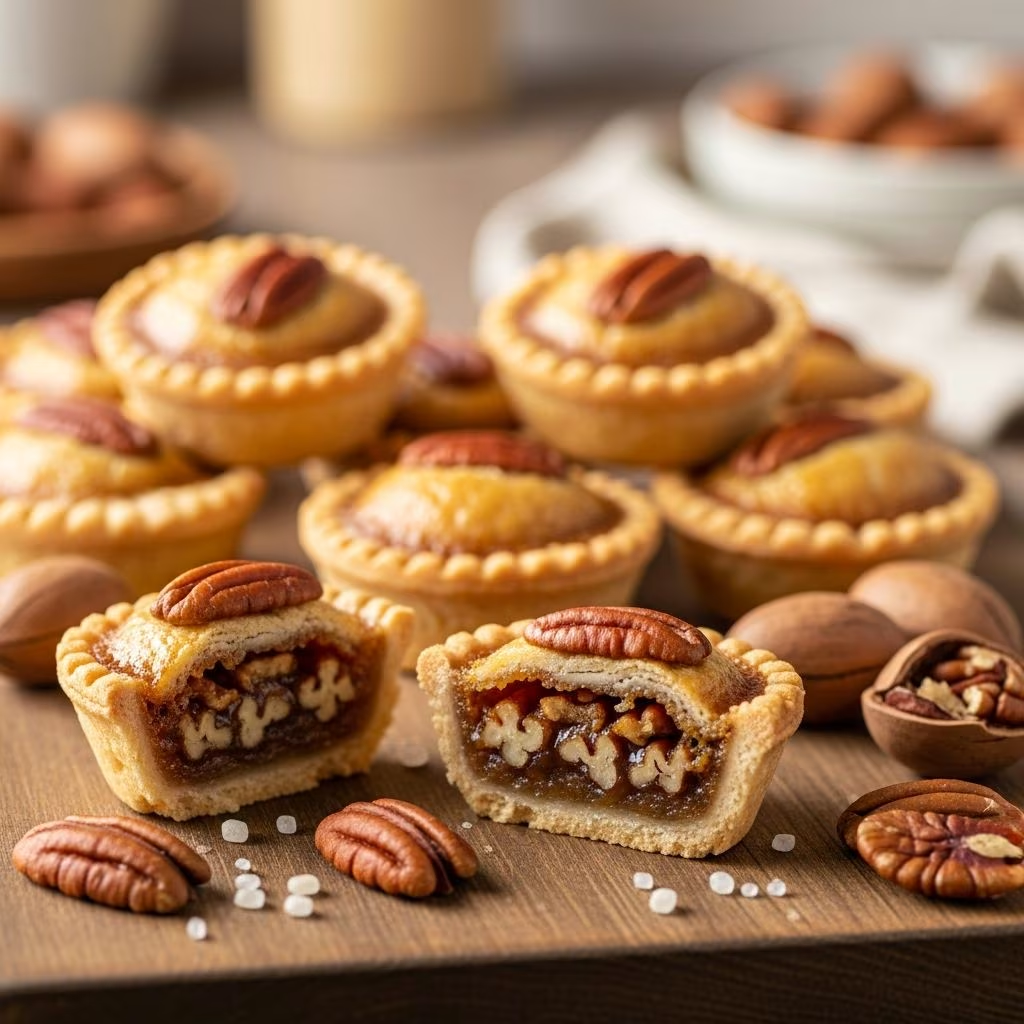
Pecan tassies represent an elegant solution for those seeking to serve classic pecan pie flavors in individual, manageable portions. These diminutive desserts showcase the same beloved combination of buttery pastry and sweet, nutty filling that defines traditional pecan pie, but in a format that proves far more convenient for entertaining and everyday indulgence alike. Understanding the techniques behind creating these sophisticated treats transforms them from intimidating delicacies into accessible homemade confections.
Understanding the Foundation: What Makes Tassies Distinctive
The term “tassie” refers to a small cup or container, which perfectly describes the vessel-like form these miniature pastries take. Unlike standard cookies or petit fours, tassies require the construction of edible containers that hold a substantial filling while maintaining structural integrity throughout the baking process.
The distinguishing characteristic that elevates these desserts beyond ordinary mini pies lies in their crust composition. The incorporation of cream cheese alongside butter creates a pastry shell that achieves multiple desirable qualities simultaneously. This addition produces a notably tender crumb structure while contributing subtle tang that balances the sweetness of the filling. The resulting texture can be described as remarkably flaky yet sturdy enough to contain the liquid filling without compromising its shape.
Preparing the Pastry Base
Combining Fats and Dairy Components
The initial stage of tassie preparation involves combining softened butter and cream cheese until these ingredients achieve a uniform, smooth consistency. This process typically requires two to three minutes of mixer operation at medium speed. The room-temperature state of both components proves essential, as cold ingredients resist blending and create an inferior texture. During this phase, the butter and cream cheese gradually incorporate air, developing the light and fluffy foundation necessary for a tender final product.
Integrating the Flour
Once the butter and cream cheese mixture reaches its optimal consistency, the flour gets added gradually in several increments rather than all at once. This methodical approach prevents overworking the dough, which would develop excessive gluten strands and result in a tough, dense pastry. The mixer speed reduces to low during this stage. The flour incorporation continues until the dough pulls away from the bowl sides and forms a cohesive ball.
The Crucial Refrigeration Step
After the dough achieves the proper consistency, it requires a period of refrigeration—typically one hour—before any shaping occurs. This resting period serves multiple critical functions. The cold temperature allows the flour particles to fully hydrate, while the butter resolidifies, creating a more workable dough texture. Additionally, refrigeration prevents the dough from spreading excessively during baking, ensuring the pastry shells maintain their intended dimensions and shape.
Shaping the Edible Vessels
Portioning the dough into uniform balls represents an important consideration for consistent baking results. Most recipes recommend rolling pieces approximately three-quarters of an inch in diameter, which yields approximately 24 individual tassies from a standard batch. These balls then require careful pressing into the cavities of a well-prepared mini muffin pan.
The pressing technique demands gentle yet deliberate pressure to avoid tearing the dough. Using either fingers or a small spoon, the baker carefully forms each dough ball into a cup shape, pressing it up the sides of the muffin cavity to create an even wall thickness throughout. Some bakers prefer allowing the dough to extend slightly above the muffin pan rim, which provides additional capacity for filling and creates a more rustic appearance.
Before proceeding to the filling stage, lightly coating the bottom of each pastry shell with chopped pecans provides textural contrast and prevents the filling from creating a soggy base. This preliminary layer of nuts also ensures that every bite contains the signature crunch expected from these treats.
Crafting the Custard-Like Filling
Component Selection and Combination
The filling for pecan tassies mirrors the composition of traditional pecan pie but in a more condensed form. The primary components include eggs, brown sugar, melted butter, and vanilla extract, combined to create a custard-like mixture that sets during baking while maintaining slight moisture and a gooey consistency within the cooked filling.
The brown sugar selection merits consideration. Light brown sugar produces a milder, more delicate flavor profile, while dark brown sugar contributes deeper molasses notes that some bakers prefer. The choice ultimately depends on individual taste preferences, though most standard recipes employ light brown sugar as the default option.
The Mixing Process
Combining the filling ingredients requires gentle but thorough blending to ensure even distribution of components. The egg receives light beating first, creating a uniform base to which the brown sugar, melted butter, vanilla extract, and salt are added. Whisking or stirring these components together produces a homogeneous mixture before the chopped pecans get folded in at the final stage.
The timing of pecan incorporation proves important because overstirring after adding the nuts can break them into smaller pieces, diminishing the textural contrast in the final baked product. Folding—a gentle combining technique that lifts and combines ingredients without excessive stirring—represents the preferred method for incorporating pecans into the filling mixture.
Filling and Baking Considerations
Portion Control and Distribution
Distributing filling evenly among the 24 prepared shells requires measuring care. Approximately one tablespoon of filling per tassie proves standard, though the exact amount may vary slightly depending on the specific recipe proportions and desired fullness level. Overfilling creates messy overflow during baking and makes removal from the pan more challenging, while underfilling results in insufficient filling-to-crust ratio.
Oven Temperature and Baking Duration
The conventional oven temperature for tassies is 350 degrees Fahrenheit. At this moderate heat, the pastry shells bake through completely while the filling custard sets without browning excessively. The typical baking duration ranges from 20 to 25 minutes, with the exact time depending on individual oven characteristics and the specific positioning of the pan within the oven.
Visual cues help determine doneness with greater reliability than strict timing. The pastry shells should achieve a light golden-brown color, while the filling appears puffy during baking, with perhaps slight browning on the surface. The filling should set but retain slight jiggle in the center—not completely firm, as this indicates the ideal moisture level has been achieved.
Cooling and Storage
The cooling process unfolds in stages. Initially, the tassies cool within the muffin pan for approximately 15 minutes, allowing the filling to firm up enough for safe removal without collapsing. During this period, the residual heat continues to set the filling while the pastry shell cools to a manageable temperature.
After the initial pan-cooling phase, running a small knife around the interior rim of each tassie helps separate it from the pan sides, facilitating removal without damage. Transferring the tassies to a wire cooling rack allows air to circulate around all sides, promoting even cooling and preventing the development of condensation that could make the pastry soggy.
Fully cooled tassies can be stored in an airtight container at room temperature for several days. For longer preservation, refrigeration extends shelf life to approximately one week, though the pastry texture may become slightly less crisp over extended storage periods.
Troubleshooting Common Issues
Crust Challenges
Pastry shells that become too brown before the filling sets adequately may require oven temperature reduction or earlier removal from the oven. Conversely, undercooked shells that remain pale and soft after the filling has set through indicate the oven may be running cool, necessitating temperature adjustment.
Filling Consistency Problems
Filling that remains too liquid after baking suggests either insufficient baking time or oven temperature that is too low. If the filling appears overly dry or pulls away from the crust sides, excessive baking or higher-than-intended oven temperature caused the issue.
Variations and Creative Adaptations
The fundamental tassie recipe accommodates numerous variations that maintain the essential character while introducing new flavor dimensions. Some bakers substitute maple syrup or honey for a portion of the brown sugar, creating more complex sweetness. Others incorporate bourbon or rum into the filling for adult-oriented versions. Spice additions such as cinnamon or nutmeg complement the pecan flavor beautifully.
Alternative nut selections, including walnuts or a combination of nuts, provide different flavor profiles while maintaining the essential texture and appearance. Toasting nuts before incorporating them intensifies their flavor and adds another layer of complexity to the finished desserts.
Presentation and Service Suggestions
Pecan tassies shine on dessert platters and holiday tables due to their individually sized format and elegant appearance. Dusting finished tassies with powdered sugar adds visual refinement and a subtle sweetness to each bite. A dollop of whipped cream or a small quenelle of vanilla ice cream transforms these already-impressive treats into restaurant-quality petit fours suitable for the most formal occasions.
The bite-sized nature of tassies makes them ideal for parties where guests enjoy sampling multiple dessert options without overindulging, or for gift-giving in attractive packaging to friends and family members.
Frequently Asked Questions
Can I prepare tassies in advance?
Yes, tassies can be prepared one to two days ahead. Store them in an airtight container at room temperature. This advance preparation proves especially useful for holiday entertaining when kitchen time is at a premium.
What if I don’t have a mini muffin pan?
Mini muffin pans are readily available at kitchenware retailers and cost relatively little. However, some bakers have successfully created tassies using small tartlet molds or even larger muffin pan cavities, adjusting ingredient quantities and baking times accordingly.
Can I freeze unbaked tassies?
Yes, the prepared shells can be frozen in the muffin pan for several weeks. Proceed with filling and baking directly from the frozen state, adding a few extra minutes to the baking time as needed.
Why did my pastry shells tear while pressing into the pan?
Dough that is too warm or hasn’t been adequately refrigerated tears more easily. Ensure the dough reaches proper consistency and temperature before shaping. If problems persist, allow more refrigeration time before portioning.
How many tassies does a standard recipe yield?
Most recipes produce 24 individual tassies from the stated ingredient quantities, corresponding to the standard size of a mini muffin pan with 24 cavities.
References
- Easy Pecan Tassies — Small Town Woman. Accessed April 2026. https://www.smalltownwoman.com/pecan-tassies/
- Classic Pecan Tassies — One Hot Oven. Accessed April 2026. https://onehotoven.com/pecan-tassies/
- Easy Christmas Pecan Tassies — Life Love and Sugar. Accessed April 2026. https://www.lifeloveandsugar.com/pecan-tassies/