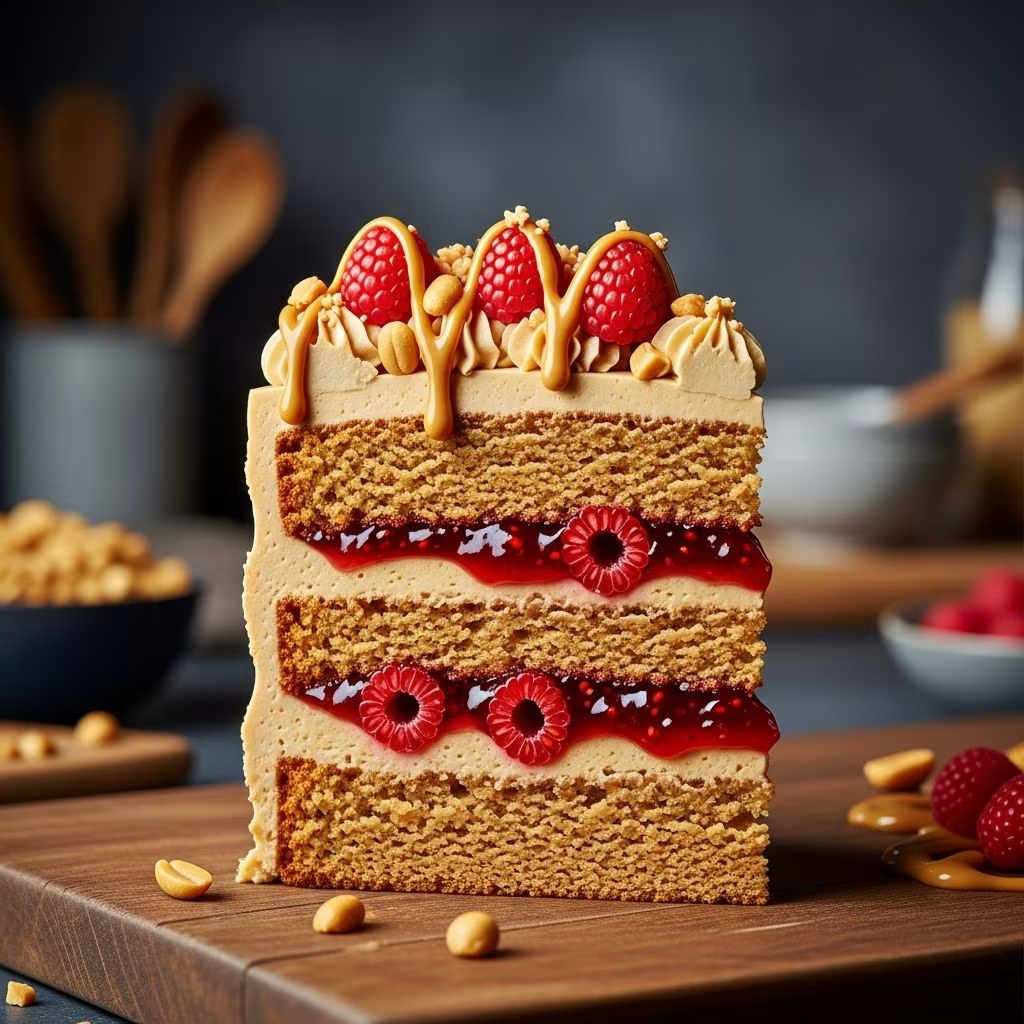
Indulge in the timeless flavors of peanut butter and raspberry transformed into a multi-layered masterpiece. This cake elevates the simple childhood sandwich into a sophisticated dessert featuring moist vanilla-infused layers, creamy peanut butter frosting, tangy homemade raspberry filling, and an optional white chocolate drip for visual flair. Ideal for birthdays, gatherings, or casual treats, it balances rich nuttiness with bright fruit notes.
Why This Cake Captivates Bakers and Eaters Alike
The allure lies in its playful nod to nostalgia while delivering bakery-quality results at home. Peanut butter provides a deep, savory creaminess that pairs seamlessly with raspberry’s tart sweetness, creating contrast in every bite. Unlike basic sheet cakes, this version stacks flavors for drama and texture—think soft cake, smooth frosting, jammy pockets, and fresh berries.
Bakers love its forgiving nature: the batter comes together quickly, fillings can be made ahead, and assembly is straightforward. Serve it chilled for clean slices or at room temperature for maximum flavor. Yields 10-12 servings, with components preppable up to two days in advance.
Essential Ingredients for Success
Gather high-quality staples for the best taste. Opt for natural peanut butter without added sugars for pure flavor, and frozen raspberries for consistent jam texture year-round.
- Cake Layers (for three 8-inch rounds): 2½ cups all-purpose flour, 2½ tsp baking powder, ½ tsp salt, 1½ cups granulated sugar, ½ cup unsalted butter (softened), 4 large eggs, 1 cup whole milk, 2 tsp vanilla extract.
- Peanut Butter Frosting: 1 cup creamy peanut butter, 1 cup unsalted butter (softened), 4 cups powdered sugar (sifted), ¼ cup heavy cream, 1 tsp vanilla, pinch of salt.
- Raspberry Filling: 4 cups frozen raspberries, ¾ cup granulated sugar, 2 tbsp lemon juice, ¼ cup water (divided), 3 tbsp cornstarch, 1 tbsp liqueur (optional, like orange or framboise).
- Drip & Garnish: 4 oz white chocolate, ½ cup reserved raspberry filling, fresh raspberries, chopped peanuts.
Pro tip: Weigh ingredients for precision—grams ensure even rising and texture.
Building the Perfect Cake Base
Start with tender, vanilla-scented layers that absorb fillings without sogginess. Preheat oven to 350°F (175°C). Grease and line three 8-inch pans with parchment.
- Whisk dry ingredients: flour, baking powder, salt.
- Cream butter and sugar until pale, about 3 minutes. Add eggs one at a time, then vanilla.
- Alternate adding dry mix and milk, starting/ending with dry. Mix until just combined—overmixing toughens crumb.
- Divide batter evenly (about 1½ cups per pan). Bake 22-28 minutes until toothpick tests clean. Cool in pans 10 minutes, then fully on racks.
For even layers, level domes with a serrated knife. Wrap and freeze extras for up to a month.
Crafting Silky Peanut Butter Frosting
This frosting is the glue—stable yet pipeable, with peanut butter’s toasty depth.
- Beat butter and peanut butter until fluffy, 2 minutes.
- Gradually add powdered sugar, then vanilla, salt, and cream. Whip to airy peaks, 3-4 minutes.
- Taste and adjust: more cream for softness, sugar for sweetness.
Chill 30 minutes for spreadability. Yields enough for crumb coat, filling, and exterior.
Homemade Raspberry Filling: Tart and Thick
Skip store-bought jam for vibrant, seedless purity. This cooks in 15 minutes.
- Simmer raspberries, sugar, lemon juice, and half the water until berries burst, 8-10 minutes.
- Strain puree, pressing solids—discard seeds for smoothness.
- Whisk cornstarch with remaining water; stir into puree. Cook until bubbling and thick, 2-3 minutes. Cool completely; stir in liqueur for elegance.
Reserve ½ cup for drip. Stores refrigerated up to a week.
Layering for Maximum Impact
Assembly on a turntable ensures pro results. Use a cake board for stability.
| Step | Action | Amount |
|---|---|---|
| 1 | Bottom layer on board; crumb coat thin frosting | ½ cup frosting |
| 2 | Pipe frosting border; add filling | ⅓ cup filling |
| 3 | Repeat for middle layer | Same |
| 4 | Top layer; full frost exterior | Remaining frosting |
Chill 20 minutes between steps to set. Smooth sides with bench scraper; edge top with offset spatula.
Adding the Dazzling Drip Effect
Warm reserved filling with melted white chocolate for a glossy cascade.
- Melt chocolate gently; stir in ½ cup filling until uniform.
- Cool slightly to thicken. Pour over chilled cake edges, guiding with spoon.
- Garnish with fresh raspberries and peanut crumbles while drip sets.
This element adds shine and ties flavors visually.
Variations to Suit Every Craving
- Chocolate Twist: Swap ½ cup flour for cocoa powder; add ganache drip.
- Snack Size: Bake batter in 9×13 pan, swirl filling in, bake 35 minutes.
- Nut-Free: Use sunflower seed butter; strawberry filling alternative.
- Vegan: Plant milk, vegan butter/peanut butter, aquafaba meringue frosting.
- Coffee Cake Style: Single layer with streusel top, studded berries.
Troubleshooting Common Hiccups
| Issue | Cause | Fix |
|---|---|---|
| Dense cake | Overmixing | Mix minimally; check leavening freshness |
| Runny filling | Undercooked cornstarch | Boil fully next time |
| Crumbly frosting | Cold ingredients | Soften fully; add cream gradually |
| Sliding layers | No chill | Frost dam + freeze 15 min |
Storage and Serving Wisdom
Store covered in fridge up to 5 days; frosting firms when cold. Thaw slices 30 minutes before serving. Freezes whole (unfrosted) up to 2 months—thaw overnight, then frost.
Pair with coffee, milk, or vanilla ice cream. For crowds, slice into 16 petite portions.
Nutrition Snapshot (Per Slice, 12 Servings)
- Calories: ~550
- Protein: 8g (peanut power)
- Carbs: 65g (mostly from sugar/flour)
- Fat: 30g (healthy from nuts)
- Fiber: 3g (berries contribute)
Moderation key—rich but satisfying.
Frequently Asked Questions
Can I use crunchy peanut butter?
Yes, for texture, but blend smooth first to avoid lumps in frosting.
Best jam substitute?
Fresh or frozen raspberries yield superior tartness; blueberry works too.
How far ahead can I prep?
Cake/fillings: 2 days. Assemble/frost day-of for freshness.
Gluten-free option?
1:1 gluten-free flour blend; add ¼ tsp xanthan gum if not included.
Scaling for smaller batches?
Halve for two 6-inch layers; bake 20-25 minutes.
Pro Baker Tips for Elevate Results
- Room-temp ingredients blend seamlessly.
- Double-strain filling for ultra-smoothness.
- Pipe dams prevent filling squeeze-out.
- Invest in acetate sheets for sharp edges.
- Flavor boost: Infuse milk with peanut butter before mixing.
References
- Peanut Butter and Jam Sandwich Cake — Margot Dreams of Baking. 2020-08-01. https://margotdreamsofbaking.ca/2020/08/01/peanut-butter-and-jam-sandwich-cake/
- Peanut Butter and Jelly Cake — Pies and Tacos. N/A. https://www.piesandtacos.com/peanut-butter-and-jelly-cake/
- Peanut Butter and Jelly Snack Cake — Simply Whisked. N/A. https://www.simplywhisked.com/peanut-butter-and-jelly-snack-cake/