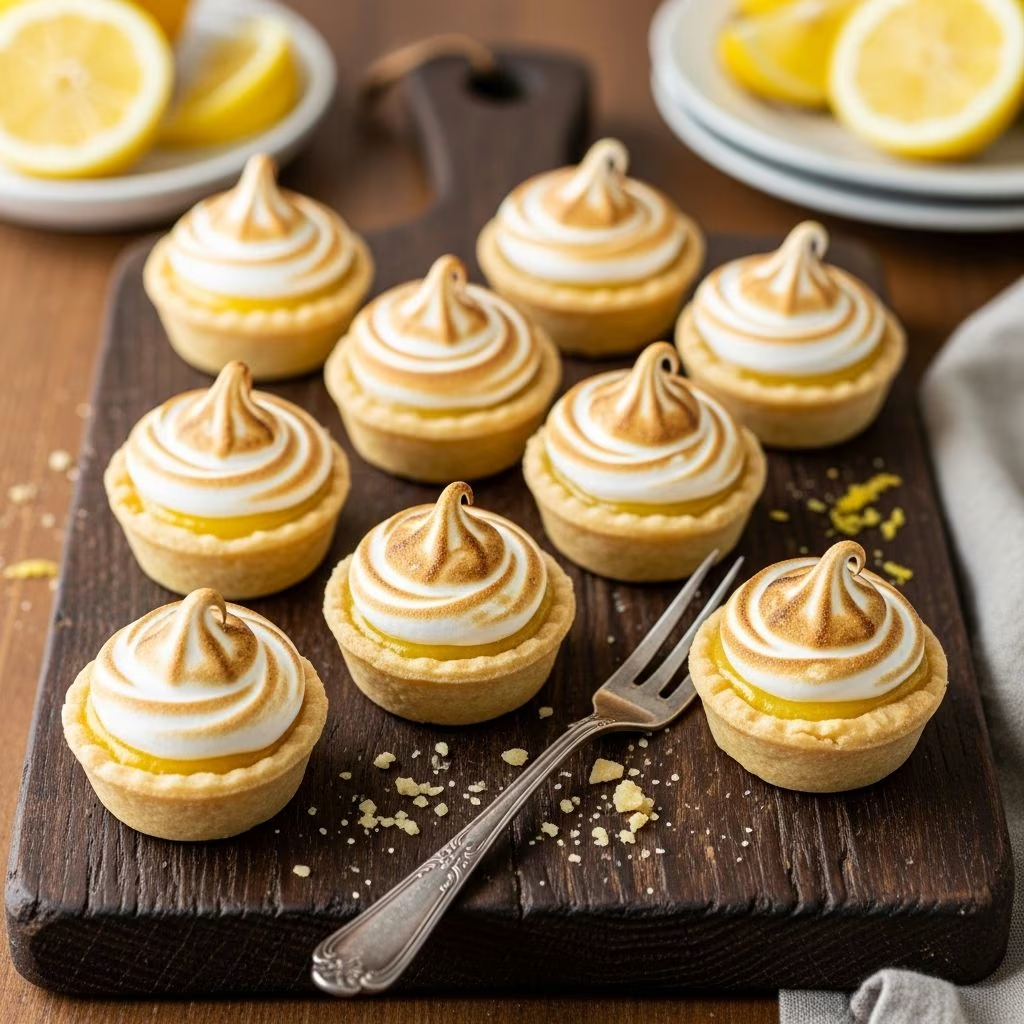
The lemon meringue pie stands as a timeless dessert classic, beloved for its contrast between tart filling and sweet topping. However, scaling this traditional dessert into miniature portions transforms it into something equally elegant yet more convenient for serving. These diminutive versions offer sophisticated plating opportunities while maintaining all the flavor complexity of their larger counterparts. Whether you’re preparing dessert for a special gathering or seeking an impressive addition to your baking repertoire, mini lemon meringue pies present an achievable challenge for both novice and experienced bakers.
Understanding the Three Essential Components
Creating successful mini lemon meringue pies requires mastering three distinct elements that work together harmoniously. Each component demands specific techniques and attention to ensure the final dessert achieves the perfect balance of texture, flavor, and visual appeal. Understanding how these components interact will strengthen your baking foundation and increase your success rate considerably.
The Foundation: Choosing Your Crust
The base of your mini pie serves multiple purposes: it provides structural support, offers a textural contrast, and contributes its own subtle flavor to complement the filling and topping. You have several viable options depending on your time constraints and skill level. Store-bought phyllo shells offer the fastest route to completion and work excellently for time-constrained bakers seeking reliable results. These delicate, paper-thin layers crisp beautifully during baking and require minimal preparation beyond filling. Alternatively, refrigerated pie dough circles provide another convenient option requiring only cutting and molding into muffin tins before baking. For bakers interested in deeper flavor development, homemade pastry crusts deliver superior taste and texture control. Traditional pie dough made from flour, butter, salt, and water creates a flaky, golden base that elevates the entire dessert. Sugar cookie-based shells offer an entirely different approach, providing sweetness that complements rather than competes with the lemon filling. Whichever crust option you select, proper preparation ensures stability and prevents soggy bottoms that plague inferior preparations.
The Star: Lemon Curd Filling
Lemon curd represents the soul of this dessert, delivering the bright, tangy flavor that defines the experience. This custard-like filling combines eggs, sugar, lemon juice, and butter into a luxurious, intensely flavored spread. The beauty of lemon curd lies in its flexibility; you can prepare it days in advance, allowing you to separate preparation stages and reduce day-of stress. Creating lemon curd involves carefully tempering egg yolks to prevent scrambling while achieving a creamy consistency. Begin by whisking together yolks with sugar, then gradually incorporate lemon juice and zest for maximum citrus intensity. Heat this mixture gently while stirring continuously until it thickens sufficiently to coat the back of a spoon. The addition of butter at the end creates a silky texture and adds richness that balances the acidity. Fresh lemon juice provides superior flavor compared to bottled alternatives, as the brighter, more complex notes become apparent in the finished dessert. Straining the finished curd through a fine mesh removes any egg particles and creates an impossibly smooth texture.
The Crown: Meringue Mastery
Meringue transforms simple egg whites and sugar into billowing clouds that brown beautifully under heat. This seemingly simple ingredient list belies the technical skill required to achieve ideal meringue every time. The key lies in understanding how protein molecules in egg whites reorganize when beaten, creating foam structures that stabilize with sugar and heat. Starting with room-temperature egg whites in a scrupulously clean bowl prevents oily residue from inhibiting foam formation. Begin beating at low speed until the mixture becomes foamy, then gradually increase speed as soft peaks develop. At the soft peak stage, the foam holds its shape momentarily before relaxing back into itself. Continue beating while adding sugar gradually to dissolve completely, which prevents crystallization and graininess in the finished meringue. The stiff peak stage represents the ideal endpoint where the meringue holds its shape firmly without becoming overbeaten and separating into liquid and foam.
Gathering Your Ingredients and Equipment
| Component | Essential Ingredients | Alternative Options |
|---|---|---|
| Crust | Phyllo shells, refrigerated pie dough, or homemade pastry | Sugar cookie dough, shortbread base |
| Filling | Eggs, sugar, lemon juice, lemon zest, butter | Store-bought lemon curd, lime curd for variation |
| Topping | Egg whites, granulated sugar, cream of tartar | Vanilla extract, vinegar for stabilization |
Beyond ingredients, proper equipment dramatically impacts your baking success. A mini muffin tin provides the ideal vehicle for shaping individual crusts if not using pre-formed shells. Electric mixers, whether handheld or stand models, make whipping meringue significantly easier than manual whisking and produce more consistent results. Piping bags with various tips allow precise filling and meringue application, creating visually refined presentations. A kitchen torch offers professional-looking browning of meringue without requiring oven broiling, though a broiler works effectively as well. Having all equipment assembled before beginning prevents mid-project frustration and maintains workflow efficiency.
The Assembly and Baking Process
Preparing Your Crusts
If beginning with store-bought shells, simply position them on a baking sheet and proceed to filling. For those using pie dough circles, roll chilled dough to approximately quarter-inch thickness and cut rounds sized appropriately for your muffin tin. Press each round gently into the tin, creating a shallow well without overstretching the dough. Prick the bottoms with a fork to prevent excessive puffing during baking. Bake preheated crusts at 350°F for approximately twelve to fifteen minutes until golden brown and crisp. Some recipes suggest blind baking with pie weights to prevent bubbling, while others accept minor imperfections that flatten during filling. Once cooled completely, the crusts become sturdy vessels ready to receive filling and topping.
Filling with Purpose
Using a piping bag fitted with a plain tip allows precise distribution of lemon curd into each crust without overfilling. Alternately, a simple ziplock bag with the corner cut off serves equally well for budget-conscious bakers. Fill each crust approximately two-thirds full, leaving adequate space for the meringue topping. Consistent filling levels ensure uniform appearance and prevent meringue from sliding off insufficiently filled pies. At this stage, filled pies can rest at room temperature while you prepare meringue, or chill briefly to stabilize the filling.
Topping and Browning
Transfer freshly whipped meringue into a piping bag fitted with a decorative tip, then apply peaks or swirls atop each pie. Alternatively, use a spoon to add rustic dollops that achieve an equally charming presentation. The meringue should completely cover the filling and reach the crust edges to prevent shrinkage and separation during baking. Bake in a preheated 350°F oven for approximately ten to fifteen minutes until the meringue peaks develop light golden-brown coloration. Broiling offers an accelerated alternative if working with pre-chilled pies, requiring only minutes under moderate broiler heat for achieving desired color. A kitchen torch provides the most control and professional appearance, allowing you to brown the peaks while leaving valleys pale.
Troubleshooting Common Challenges
Meringue Issues
Weeping meringue, where liquid beads form on the surface, typically results from inadequate sugar incorporation or overbaking. Ensure granulated sugar dissolves completely during beating by continuing to mix several minutes after adding all sugar. Avoid temperatures exceeding 325°F and limit baking time to the minimum required for browning. Meringue that fails to peak properly usually indicates grease contamination from egg yolks or bowl residue. Thoroughly clean all equipment with hot soapy water, rinse completely, and wipe dry with paper towels rather than cloth. If meringue separates into foamy and liquid layers, you’ve overbeaten it past the stiff peak stage; discard and start fresh with new egg whites.
Crust Problems
Soggy bottoms indicate insufficient initial baking or exposure to excessive moisture from the filling. Pre-bake crusts until they achieve pale golden color rather than barely done, then cool completely before filling. If using lemon curd, ensure it has cooled to room temperature before application. Overly thick crusts may result from insufficient baking time or oven temperature variations; invest in an oven thermometer to verify accurate temperatures.
Filling Consistency
Lemon curd that remains too thin suggests insufficient cooking time or inadequate egg content. Cook longer over medium heat while stirring constantly, watching for the mixture to coat a spoon thickly. If curd separates during cooking, you’ve overheated it; strain through fine mesh to restore some smoothness, though prevention through careful temperature control proves superior.
Storage and Make-Ahead Strategies
These individual pies maintain quality for two to three days when stored in an airtight container in the refrigerator. The meringue texture softens slightly over time as it absorbs moisture from the filling, but flavor remains excellent. For optimal texture, prepare meringue topping and bake no more than four hours before serving. Lemon curd can be prepared up to one week in advance and stored separately, allowing you to assemble pies quickly on serving day. The cooled crusts maintain crispness for several days in airtight storage, making them excellent candidates for advance preparation. Some bakers freeze completely assembled, unbaked pies for up to one month, then bake directly from frozen, adding several minutes to the baking time.
Serving and Presentation
These miniature desserts shine when presented on elevated dessert stands or tiered cake pedestals, creating visual drama at any gathering. Individual plate presentations with complementary garnishes elevate the dining experience further. Fresh mint leaves, candied lemon peel, or edible flowers provide sophisticated finishing touches. Serving these pies slightly chilled rather than at room temperature preserves the crisp meringue texture better. A light dusting of powdered sugar across the peaks adds subtle visual refinement without overwhelming the natural beauty of properly browned meringue.
Frequently Asked Questions
Can I make these pies without an oven?
Mini phyllo shells combined with pre-made lemon curd and Italian meringue (made with a sugar syrup) can create no-bake versions. The phyllo shells are already baked, and Italian meringue doesn’t require oven cooking, making this approach viable for those without functioning ovens or seeking quicker assembly.
How far in advance can I prepare these?
Crusts can be prepared two days ahead, filling up to one week prior, and meringue topping within four hours of serving. Complete assembly and baking should occur no more than one day before serving to maintain meringue texture.
What can I substitute for egg whites in meringue?
Pasteurized egg whites purchased in cartons work identically to fresh eggs and eliminate food safety concerns. Aquafaba, the liquid from canned chickpeas, creates vegan meringue using identical beating techniques, though the result texture differs subtly.
Can I use bottled lemon juice?
Fresh lemon juice produces superior flavor, but bottled juice works acceptably if necessary. Use fresh juice from concentrate rather than pre-mixed drinks for best results.
Why did my meringue brown unevenly?
Oven hot spots or incorrect rack positioning cause uneven browning. Rotate the baking sheet halfway through cooking, and verify oven temperature accuracy with a reliable thermometer.
References
- Food Science of Egg Proteins and Foam Formation — McGee, Harold. On Food and Cooking: The Science and Lore of the Kitchen. 2004. Penguin Random House
- Professional Baking Standards and Temperatures — Culinary Institute of America. Professional Cooking. 8th ed. 2019. Pearson Education
- Sugar Crystallization in Meringue Production — Hui, Yiu H. Handbook of Food Science, Technology, and Engineering. 2006. Taylor & Francis Group
- Egg Safety and Pasteurization Guidelines — U.S. Food and Drug Administration. Shell Eggs from Farm to Table. FDA.gov
- Lemon Juice Composition and Flavor Chemistry — Kader, Adel A. Postharvest Technology of Horticultural Crops. 3rd ed. 2002. University of California Agricultural and Natural Resources. UC Davis