A classic dessert that combines the natural sweetness of baked apples with the delightful texture of a crispy topping and fluffy marshmallows, marshmallow apple crisp offers a comforting treat perfect for any occasion. This timeless dessert brings together simple, accessible ingredients to create a dish that appeals to both children and adults. Whether you’re preparing dessert for a family gathering or seeking a straightforward baking project, understanding the fundamentals of this recipe ensures consistent, delicious results every time.
Understanding the Core Components
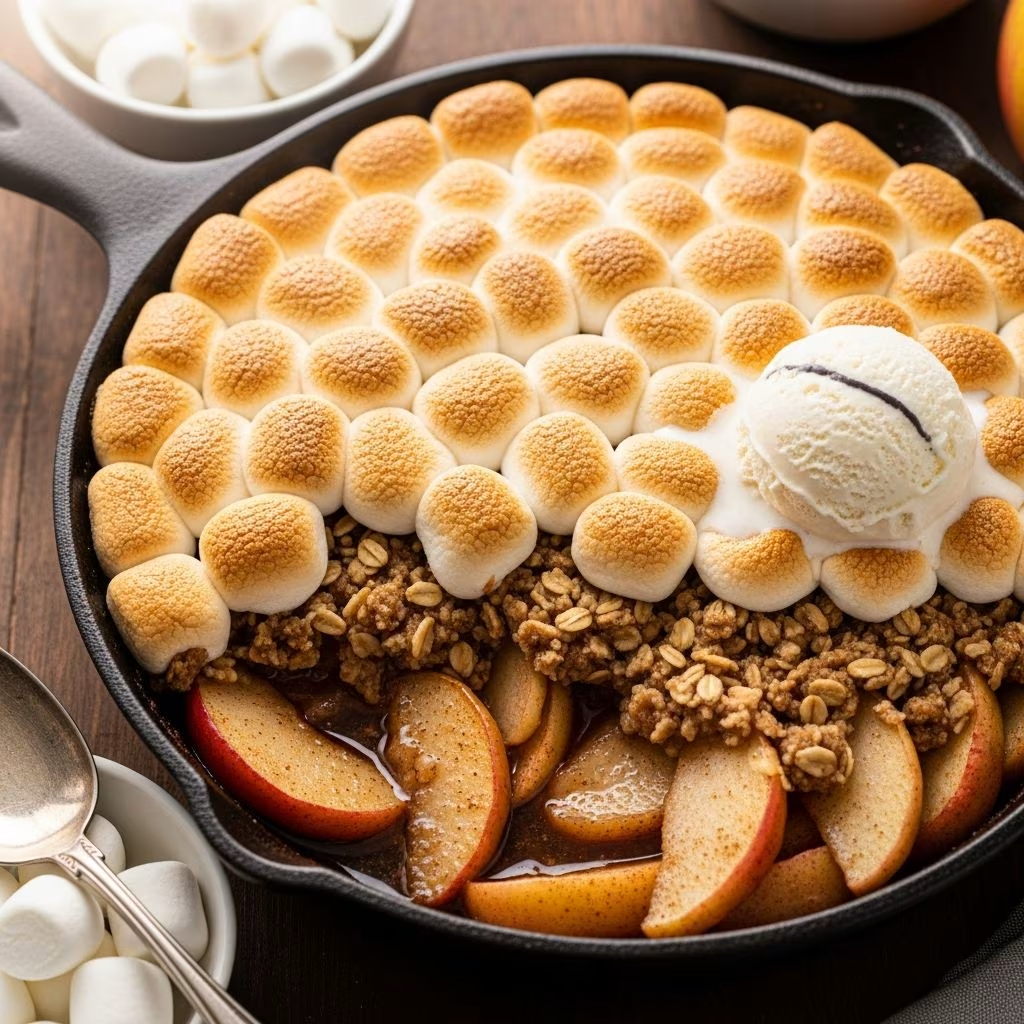
Marshmallow apple crisp consists of three essential layers that work together to create the finished dish. The foundation begins with fresh apples, which provide natural flavor and texture. These apples are seasoned and moistened to develop a tender, slightly juicy filling as they bake. The middle layer features a streusel-style topping made from flour, sugar, cinnamon, and butter, which creates the characteristic crispy texture that contrasts beautifully with the soft apples beneath. The final crowning element is the marshmallow layer, which adds sweetness and a fun, interactive quality to the dessert.
Selecting Quality Apples for Optimal Results
The choice of apple variety significantly influences the final dish’s flavor profile and texture. Baking apples should possess characteristics that allow them to maintain structure during the cooking process while still becoming tender enough to eat easily. Popular baking varieties include Granny Smith, which offers a tart flavor that balances the sweetness of the topping and marshmallows, as well as Honeycrisp apples, known for their sweetness and crisp texture that softens pleasantly when baked. Some recipes benefit from combining two varieties to achieve complexity in flavor. Approximately four cups of peeled, sliced apples typically suffices for a standard eight-inch baking pan.
Preparing Your Baking Equipment and Workspace
Proper preparation of your baking space and equipment ensures smooth execution and optimal results. Begin by preheating your oven to 350 degrees Fahrenheit, allowing adequate time for the oven to reach the target temperature before baking begins. Gather all ingredients and measuring tools beforehand, a practice known as mise en place in culinary arts, which streamlines the baking process. An eight-inch square baking pan serves as the standard vessel, though you may substitute a nine-inch round or similarly sized baking dish. Lightly butter your chosen pan to prevent sticking and ensure easy serving later.
Creating the Apple Filling
Begin by peeling your selected apples using a vegetable peeler or small knife, removing the skin completely. Core each apple by removing the center seed cavity, either with an apple corer tool or by cutting the apple into quarters and cutting away the core. Slice the prepared apples into even pieces approximately one-quarter inch thick, which promotes uniform cooking throughout the filling. Transfer your sliced apples to the prepared baking pan, arranging them in an even layer. Pour approximately one-quarter cup of water over the apples, which creates steam during baking and helps soften the fruit while preventing excessive drying.
Mixing the Crispy Topping Ingredients
The topping provides textural contrast and holds the marshmallows in place during baking. In a separate mixing bowl, combine three-quarters cup of all-purpose flour with one-half cup of granulated sugar, one teaspoon of ground cinnamon, and one-quarter teaspoon of salt. These dry ingredients establish the flavor foundation of your topping while the flour provides structure. Whisk these ingredients together thoroughly to distribute the cinnamon evenly and eliminate any lumps that might interfere with achieving a uniform topping texture.
Incorporating Butter for the Ideal Texture
The addition of butter is crucial for developing the characteristic crispy-crumbly texture of the topping. Cut one-half cup of cold butter into small cubes approximately the size of peas. Add the butter pieces to your flour mixture and use a pastry cutter, two knives, or your fingertips to work the butter into the dry ingredients. This technique, called “cutting in,” distributes the butter throughout the flour mixture, creating small pockets that become crispy during baking. Continue this process until the mixture resembles coarse breadcrumbs or sand. The texture should not be smooth or paste-like but rather have visible tiny pieces of butter throughout.
Assembling and Initial Baking
Once your topping mixture achieves the proper texture, sprinkle it evenly over the apple layer in your prepared baking pan. Use a fork or your fingers to distribute the topping so all apples are covered. Place the pan in your preheated 350-degree oven and bake for approximately 35 to 40 minutes. During this initial baking period, the apples will soften, the topping will begin to turn golden brown, and the mixture will start bubbling around the edges. The apples are ready when a fork easily pierces the largest pieces.
Adding Marshmallows and Broiling
Once the initial baking period concludes, carefully remove the pan from the oven and allow it to cool for a few minutes. Adjust your oven setting to broil mode and position the rack appropriately for toasting the marshmallow topping without burning it. Distribute miniature marshmallows across the surface of the apple crisp in a single, even layer. Return the pan to the oven under the broiler and watch carefully as the marshmallows toast. This process typically requires three to four minutes. The marshmallows will transform from white to golden brown with slightly darker edges. Remain attentive during this stage to prevent over-browning or burning.
Temperature Guidelines and Cooking Times
| Baking Stage | Temperature | Duration | Purpose |
|---|---|---|---|
| Initial Apple Baking | 350°F | 35-40 minutes | Soften apples and brown topping |
| Marshmallow Toasting | Broil Setting | 3-4 minutes | Toast marshmallows until golden |
| Cooling Period | Room Temperature | 5-10 minutes | Firm up before serving |
Serving and Storage Recommendations
Allow your completed marshmallow apple crisp to rest for five to ten minutes after broiling, which allows the marshmallows to set slightly and the filling to stabilize. This brief cooling period also reduces the risk of burns when serving. The dessert can be served directly from the baking pan into individual bowls or plates. A small scoop or serving spoon helps portion the dish while keeping layers intact. The combination of warm apple filling, crispy topping, and toasted marshmallows creates an appealing contrast of temperatures and textures.
Leftovers can be stored in an airtight container in the refrigerator for up to three days. Reheat portions in a conventional oven at 300 degrees for approximately ten minutes to restore some crispness to the topping. The dish does not freeze well due to the marshmallow component becoming tough and unpalatable after thawing.
Ingredient Variations and Customization Options
While the basic recipe remains consistent, several variations allow for personalization based on preferences and dietary considerations. Some bakers substitute margarine for butter in the topping, though butter provides superior flavor. The marshmallow component offers flexibility, as both miniature and jumbo marshmallows work effectively, with the choice depending on desired appearance and texture. Some variations incorporate graham cracker crumbs mixed into the topping for added texture and a subtle honey flavor that complements the apples beautifully. Others include additional spices such as nutmeg or allspice alongside cinnamon for deeper complexity.
Troubleshooting Common Baking Challenges
Understanding potential issues and their solutions helps ensure consistent success. If your topping mixture appears too smooth rather than crumbly, the butter may have been too warm or worked into the flour too thoroughly. For future batches, use cold butter directly from the refrigerator and work quickly to prevent melting. If the apples remain too firm after baking, they require additional time in the oven. Check doneness by piercing the largest apple slice with a fork; it should yield with minimal resistance. Conversely, if apples become mushy or separate into individual segments, reduce baking time in future attempts or select firmer apple varieties. If marshmallows burn before browning adequately, position the oven rack lower to increase distance from the broiler element.
Flavor Enhancements and Ingredient Additions
Beyond the basic recipe, several additions can elevate the flavor profile. A splash of vanilla extract, approximately one-half teaspoon, stirred into the water before pouring over apples adds subtle warmth and depth. Lemon or orange zest mixed into the apple layer brightens the overall flavor and provides complexity. Some recipes include a small amount of bourbon or apple cider for adult versions, though these remain optional. A light drizzle of caramel sauce over individual portions adds richness without significantly altering the baking process.
Frequently Asked Questions
Can I prepare marshmallow apple crisp in advance?
Yes, you can assemble the dish up to the initial baking stage several hours in advance. Cover the prepared pan with plastic wrap and refrigerate. When ready to bake, add approximately five additional minutes to the baking time to account for the cold starting temperature. However, the marshmallow layer should only be added immediately before broiling for best results.
What baking pan size works best?
An eight-inch square pan remains the standard choice for this recipe. A nine-inch round pan also works effectively and accommodates the same ingredients. Avoid very large pans, which spread ingredients too thinly and result in insufficient topping coverage.
How do I prevent marshmallows from burning?
Position your oven rack so the marshmallow layer sits approximately four to six inches from the broiler element. Watch carefully throughout the broiling period and remove the pan immediately when marshmallows achieve golden-brown color.
Can I use fresh versus frozen apples?
Fresh apples produce superior results with better texture and flavor. If using frozen apples, thaw them completely and drain any excess liquid before proceeding with the recipe.
Is this dessert suitable for dietary restrictions?
The basic recipe contains gluten from all-purpose flour and dairy from butter and marshmallows. Gluten-free flour blends and dairy-free alternatives for butter and marshmallows exist in most grocery stores, though results may vary slightly.
References
- Just A Pinch Recipes – Marshmallow Apple Crisp Recipe — Just A Pinch. Accessed April 2026. https://www.justapinch.com/recipes/dessert/fruit-dessert/marshmallow-apple-crisp-2.html
- Easy Apple Crumble with Graham Crackers and Marshmallows — Easy Weeknight Recipes. Accessed April 2026. https://easyweeknightrecipes.com/easy-apple-crumble-graham-crackers/
- Crockpot Apple Crisp — The Salty Marshmallow. Accessed April 2026. https://thesaltymarshmallow.com/crockpot-apple-crisp/
- Bourbon Apple Crisp with Salted Caramel & Toasted Marshmallow — This Worthy Life. Accessed April 2026. https://www.thiswortheylife.com/bourbon-apple-crisp-with-salted-caramel-toasted-marshmallow/