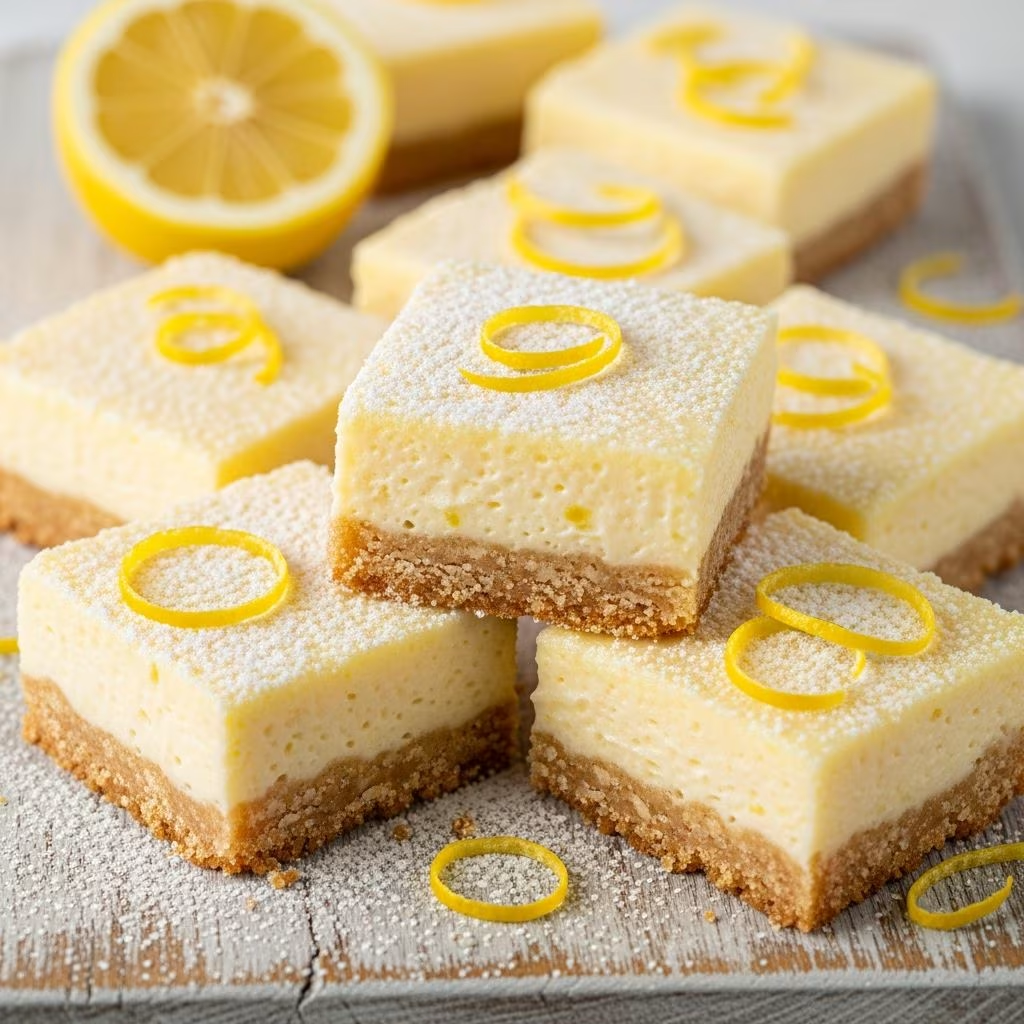
Lemon cream cheese bars represent a delightful fusion of flavors and textures that has captivated dessert enthusiasts for years. These bars combine the richness of cream cheese with the bright, zesty punch of fresh lemon, all anchored by a buttery shortbread foundation. Unlike traditional lemon bars that rely solely on a custard-like filling, this variation elevates the experience by incorporating smooth, tangy cream cheese into the topping layer. The result is a sophisticated yet approachable dessert that works equally well at casual family gatherings or more formal entertaining occasions.
Understanding the Three-Layer Structure
The magic of lemon cream cheese bars lies in their thoughtfully constructed composition. Each layer serves a distinct purpose, creating a harmonious balance of flavors and textures that keeps people reaching for another piece.
The Foundation: Building Your Shortbread Base
The bottom layer forms the structural foundation of your bars and provides a crucial textural contrast to the creamy filling above. This crust relies on simple pantry staples: all-purpose flour, granulated sugar, and cold butter. The technique for creating this layer differs slightly depending on your preferred method.
When using a food processor, combine your flour, sugar, and cubed cold butter and pulse until the mixture resembles coarse breadcrumbs or wet sand. This texture indicates that the butter has been adequately distributed throughout the flour without being fully incorporated. The partially mixed butter creates steam pockets during baking, resulting in a flaky, tender crust rather than a dense, heavy base.
After processing, transfer the mixture to your prepared baking pan (typically a 9×13-inch rectangle) and use the back of a spoon to press it evenly across the bottom. Take time to ensure even coverage and consistent thickness, as this prevents some areas from baking faster than others. Pre-baking your crust for approximately 10 minutes at 350°F creates a slight firmness that helps support the filling layer and prevents sogginess.
The Star: Crafting the Cream Cheese Filling
The filling layer distinguishes these bars from countless other lemon desserts. Beginning with softened cream cheese is essential—cold cream cheese resists smooth blending and creates lumps in your final mixture. Allow your cream cheese to sit at room temperature for 30 minutes to an hour before beginning.
The mixing process matters significantly. Start by beating the cream cheese alone until it becomes smooth and creamy, then gradually incorporate your sugars. This approach prevents overmixing while ensuring even distribution. Different recipes incorporate varying sugar ratios: some use exclusively granulated sugar, while others combine granulated with powdered sugar for a more refined texture.
Fresh lemon juice provides the essential tang that defines these bars, typically ranging from ¾ to 1 cup depending on the recipe and your personal preference for lemon intensity. Always use freshly squeezed juice rather than bottled alternatives, as bottled juice often contains additives that affect flavor and texture. Similarly, fresh lemon zest contributes bright, aromatic notes that dried zest cannot replicate.
Eggs bind the filling and create the proper set during baking. Most recipes call for between 3 and 6 eggs, with the variation depending on overall filling volume and desired richness. Add eggs individually to your mixture, beating briefly after each addition to ensure proper incorporation without excessive air exposure.
The Finishing Touch: Powdered Sugar Dusting
The final flourish—a generous dusting of powdered sugar—serves both aesthetic and functional purposes. Beyond creating an attractive presentation, the powdered sugar provides a subtle sweetness that balances the tartness of lemon and adds visual elegance to each cut bar.
Ingredient Selection and Quality Considerations
While lemon cream cheese bars require only basic ingredients, the quality of each component directly impacts your final result.
- Butter: Use unsalted butter to maintain control over salt content. European-style butter with higher fat content produces richer, more tender crusts than standard grocery store butter.
- Cream Cheese: Full-fat cream cheese delivers superior texture and flavor. Avoid whipped varieties, which contain air and produce inferior results.
- Lemon: Choose heavy, fragrant lemons with thin, bright-colored skin. Larger lemons often contain more juice than smaller, bumpy-skinned varieties.
- Flour: All-purpose flour works perfectly for this recipe; specialty flours like cake flour or bread flour alter the final texture undesirably.
- Eggs: Room temperature eggs combine more smoothly with other ingredients, creating a more cohesive filling.
Step-by-Step Preparation Instructions
Pre-Baking Preparation
Begin by preheating your oven to 350°F and preparing your baking pan. Line a 9×13-inch pan with parchment paper, allowing the paper to extend 1-2 inches beyond the pan’s edges on two opposite sides. This overhang creates convenient handles for removing your cooled bars from the pan. Spray the parchment-lined pan with nonstick cooking spray, paying special attention to corners and edges.
While your oven heats, remove cream cheese from the refrigerator to allow it to soften. If you’re short on time, cut the cream cheese block into smaller pieces to accelerate the softening process. Juice and zest your lemons during this prep phase as well, ensuring all components are ready before you begin mixing.
Crust Assembly and Initial Baking
Combine flour, sugar, and cold butter cubes in a food processor and pulse until the mixture resembles coarse breadcrumbs. Transfer this mixture to your prepared pan and press firmly and evenly using the back of a spoon. Work systematically from the center outward, ensuring the crust extends completely to the corners and edges.
Place the pan in your preheated oven and bake for approximately 10 minutes. The crust should remain pale but feel slightly firm to the touch. Remove and allow to cool slightly while you prepare the filling.
Filling Preparation and Assembly
In a stand mixer fitted with the paddle attachment, beat softened cream cheese on low speed for about one minute until smooth. Gradually add your sugar combination while continuing to beat on low speed. Increase the mixer speed to medium-high and beat for 2-3 minutes until the mixture becomes light and fluffy.
Reduce the mixer speed to low and add your eggs one at a time, beating briefly after each addition. Pour in your fresh lemon juice, add the zest, and incorporate vanilla extract. Mix until just combined, being careful not to overmix, which can develop unwanted gluten structure in your filling.
Pour the filling mixture over your partially baked crust, spreading evenly to the edges. The filling will be quite thick; use an offset spatula or the back of a spoon to distribute it evenly.
Final Baking and Cooling
Return the pan to your oven and bake for 50-55 minutes. The bars are done when the edges appear slightly browned and the center is set but still holds a slight jiggle when gently shaken—this indicates a creamy texture rather than an overbaked, rubbery consistency. The internal temperature should reach approximately 160°F when tested with an instant-read thermometer in the center.
Remove from the oven and allow the bars to cool in the pan for approximately one hour at room temperature. This cooling period allows the filling to continue setting and prevents the bars from falling apart when removed. Once cooled, cover the pan loosely and refrigerate for at least four hours, preferably overnight. This extended refrigeration time is crucial for achieving clean, neat slices and developing optimal flavor.
Recipe Variations and Adaptations
Cake Mix Variations
Many home bakers enjoy adapting this recipe using cake mix, which dramatically reduces preparation time. Combine a box of yellow or lemon cake mix with melted butter and one egg to create a base layer. Press this mixture into your pan and bake for 10 minutes. Prepare your cream cheese filling using the same techniques described above, pour it over the partially baked cake mix base, then crumble the remaining cake mix mixture over top. This variation produces a more casual, homestyle appearance and often features a slightly different texture.
Crescent Roll Variations
For a flakier, more buttery crust alternative, some recipes employ refrigerated crescent roll dough as the base. Roll out the crescent dough and press it into your baking pan, pricking the surface with a fork to prevent puffing. Bake until lightly golden, then proceed with the filling as described above.
Topping Variations
Beyond traditional powdered sugar, consider these topping alternatives: a thin layer of lemon curd for intensified lemon flavor, a sprinkle of freeze-dried lemon pieces for textural interest, or even a light glaze made from lemon juice and confectioners’ sugar for a more elegant appearance.
Troubleshooting Common Issues
| Problem | Likely Cause | Solution |
|---|---|---|
| Crumbly crust that falls apart | Insufficient butter or overmixing | Ensure butter is cold and don’t overmix; the mixture should resemble coarse crumbs |
| Filling cracks or separates during baking | Overmixing or excessive heat | Mix gently until just combined; verify oven temperature with a thermometer |
| Bars are too tart or too sweet | Incorrect sugar-to-lemon ratio | Adjust lemon juice or sugar in future batches based on taste preference |
| Soggy crust or bottom layer | Insufficient pre-baking or excess moisture | Pre-bake crust for full recommended time; ensure proper cooling before adding filling |
| Rough, unclean slice edges | Cutting before thorough chilling | Refrigerate for at least 4-6 hours; use a hot, wet knife and wipe between cuts |
Storage and Make-Ahead Guidelines
Properly stored lemon cream cheese bars maintain quality for up to five days when kept in an airtight container in the refrigerator. These bars actually improve as they sit, allowing flavors to meld and intensify. For longer storage, freeze the cooled bars in a single layer on a baking sheet for 2-3 hours, then transfer to a freezer bag and store for up to three months. Thaw at room temperature for approximately two hours before serving.
These bars present excellent make-ahead possibilities. Complete the recipe through the filling stage up to two days in advance, cover tightly, and refrigerate. When ready to proceed, bring to room temperature and complete the baking process as directed. Alternatively, prepare the bars completely and freeze; they thaw beautifully with minimal texture loss.
Frequently Asked Questions
Can I substitute the fresh lemon juice with lemon extract or bottled juice?
While bottled juice works in an emergency, it contains preservatives that affect flavor nuance and may alter the final texture slightly. Lemon extract would provide flavor but lacks the moisture and acidity that fresh juice contributes to the filling structure. Fresh lemon juice is strongly recommended for optimal results.
What if my cream cheese is still cold when I start mixing?
Microwave the cream cheese in 10-second intervals, stirring between each interval, until softened. Alternatively, cut the block into smaller cubes and allow them to reach room temperature more quickly. Never heat cream cheese beyond soft—overheating causes it to become grainy.
How do I achieve perfectly clean bar edges when cutting?
Use a sharp, long knife dipped in hot water and wiped dry between each cut. Chill the bars thoroughly before cutting; bars straight from the refrigerator slice much cleaner than those at room temperature. Cut slowly using a gentle sawing motion rather than pressing down forcefully.
Can I double this recipe?
Yes, doubling works well with minor adjustments. Use a 9×13-inch pan for the standard recipe and a full sheet pan (18×13 inches) for double batches. The baking time may increase slightly, so monitor carefully and add 5-10 additional minutes if needed.
What can I serve alongside these bars?
These bars pair beautifully with fresh whipped cream, vanilla ice cream, fresh berries, or herbal tea. Their bright lemon flavor also complements berry sauces or coulis for an elegant presentation.
Conclusion: Why These Bars Deserve a Place in Your Recipe Collection
Lemon cream cheese bars represent the perfect convergence of simplicity and sophistication. They require only basic ingredients and straightforward techniques, yet deliver results that rival bakery offerings. Whether you’re seeking an impressive dessert for entertaining or a reliable treat for casual family meals, these bars deliver consistently delicious results. By understanding the purpose behind each component and following the guidance provided in this comprehensive guide, you’ll create bars that become a treasured addition to your regular baking rotation.
References
- Lemon Cream Cheese Bars Recipe — The Rebel Chick. Retrieved April 10, 2026. https://therebelchick.com/lemon-cream-cheese-bars-recipe/
- Best Lemon Cream Cheese Bars Recipe — The Pioneer Woman. Retrieved April 10, 2026. https://www.thepioneerwoman.com/food-cooking/recipes/a64209838/lemon-cream-cheese-bars-recipe/
- Lemon Cream Cheese Cake Bars — Grandma Honey’s House. Retrieved April 10, 2026. https://grandmahoneyshouse.com/2025/05/lemon-cream-cheese-cake-bars/
- Lemon Cream Cheese Bar Recipe — Jenna Braddock. Retrieved April 10, 2026. https://jennabraddock.com/lemon-cream-cheese-bar/
- Lemon Cream Cheese Bars: Flaky Crescent Citrus Squares — Paul S Show. Retrieved April 10, 2026. https://www.youtube.com/watch?v=rYDrhBUNw10