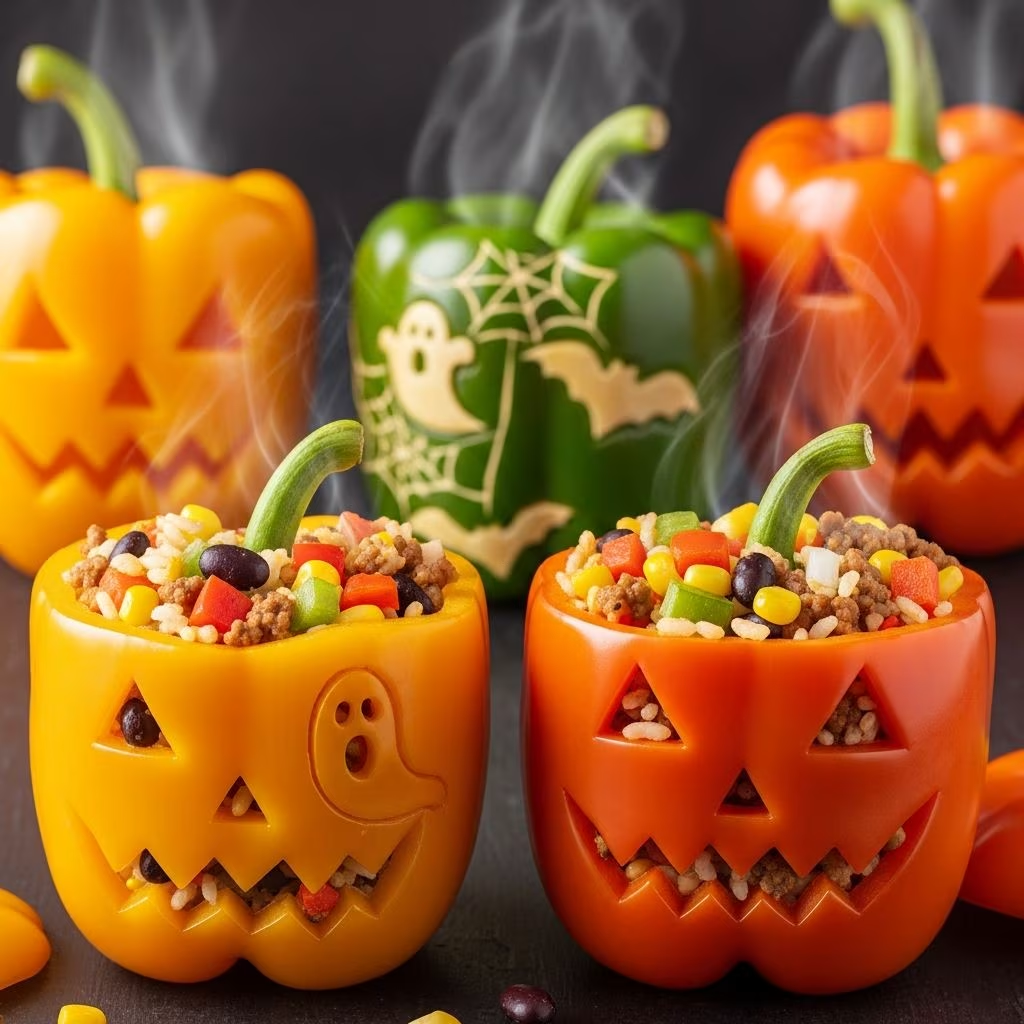
Halloween entertaining reaches new heights when you transform ordinary ingredients into visually striking dishes that double as conversation starters. One such creation involves hollowing out vibrant orange bell peppers and carving them into classic jack-o’-lantern faces before filling them with a savory ground meat and grain mixture. This approach combines culinary creativity with practical ease, making it an ideal centerpiece for autumn gatherings.
Understanding the Core Components of This Dish
The appeal of jack-o’-lantern stuffed bell peppers lies in their multi-sensory impact. Guests encounter an unexpected combination of texture, flavor, and theatrical presentation that elevates what might otherwise be a standard dinner component. The orange exterior of the peppers provides the perfect canvas for jack-o’-lantern features, while the interior cavity becomes a vessel for hearty, seasoned filling.
The structural integrity of a bell pepper makes it ideal for this culinary transformation. Unlike softer vegetables that might collapse during cooking, peppers maintain their shape and provide a sturdy edible container. The natural sweetness of orange bell peppers complements savory meat-based fillings without requiring extensive seasoning adjustments.
Selecting and Preparing Your Bell Peppers
Success begins with choosing the right peppers. Orange bell peppers are essential for authentic jack-o’-lantern aesthetics, though variations exist depending on regional availability and personal preference. Select peppers that are firm, unblemished, and roughly uniform in size to ensure even cooking times. Peppers should feel substantial when held, indicating they contain adequate flesh for carving.
Before carving begins, wash the peppers thoroughly under running water and pat them dry. This removes surface debris and prevents moisture from interfering with carving precision. Place each pepper stem-side up on a cutting board. Using a sharp paring knife, carefully cut around the stem to remove the top, creating a lid that you’ll set aside. This lid becomes part of the finished presentation, so handle it carefully to maintain structural integrity.
The next critical step involves removing internal membranes and seeds. Insert your fingers or a small spoon into the pepper cavity and scrape away the white pith and loose seeds. This step is often overlooked but proves essential for achieving the authentic hollow appearance of a carved pumpkin. Thorough removal ensures the finished dish has a clean, professional appearance.
Mastering the Carving Technique
Carving jack-o’-lantern features into the pepper surface requires a steady hand and appropriate tools. A small, sharp paring knife works better than larger kitchen knives because it provides superior control for intricate cuts. The goal is creating recognizable facial features—typically two triangular eyes, a triangular nose, and a curved or jagged mouth—similar to traditional pumpkin carving.
When approaching the carving process, start with the eyes. Mark their placement lightly with the knife tip before committing to full cuts. Small triangular shapes achieve immediate recognition as jack-o’-lantern eyes. The nose typically occupies the center of the pepper, and positioning a triangle here maintains visual balance.
The mouth presents an opportunity for personal creativity. Some cooks prefer a simple curved grin, while others attempt more complex expressions. Jagged or uneven cuts often photograph well, suggesting a rustic, hand-carved aesthetic. Work slowly to avoid accidentally cutting through the pepper’s exterior, which would compromise its ability to hold liquid during cooking.
For those uncomfortable with freehand carving, alternative approaches exist. Some cooks use a toothpick to outline features before cutting, providing a visual guide. Others embrace the imperfect nature of homemade carving, allowing slight asymmetry to enhance the rustic charm of the finished dish.
Building the Perfect Filling Mixture
The interior filling establishes the flavor profile of the dish. Most traditional recipes begin with ground meat—either beef or turkey—cooked in a skillet over medium heat until browned and crumbled. Draining excess fat after cooking prevents the filling from becoming greasy. This foundational ingredient provides protein and savory depth.
Aromatic vegetables come next. Diced yellow onion and minced garlic cloves, when cooked briefly in the meat drippings or added oil, develop sweet and complex flavors that permeate the entire filling. The proportion typically ranges from half a cup of onion to several cloves of garlic for six peppers, though personal preference guides adjustment.
Cooked rice serves as a binding agent and volume multiplier, stretching the meat to fill all four to six pepper cavities. White rice, wild rice blends, or even riced cauliflower work successfully depending on dietary preferences. Pre-cooking the rice according to package directions before combining with other ingredients ensures proper texture in the finished dish.
Tomato-based components contribute acidity and umami. Options include canned tomato sauce, diced tomatoes, or tomato paste mixed with water. These ingredients provide moisture essential for preventing the filling from drying during baking. Quantity varies by recipe approach, but generally ranges from one to two cans depending on desired consistency.
Cheese selection adds richness and helps bind ingredients. Shredded mozzarella, cheddar, or Mexican cheese blends work well. Some recipes incorporate cheese throughout the filling while others reserve it as a topping for a more pronounced melted appearance.
Seasoning Profiles and Flavor Development
The seasoning approach dramatically influences the final flavor profile. Two distinct schools of thought predominate in contemporary recipes.
Traditional approach: This method emphasizes warm, earthy spices including cumin, chili powder, and Italian seasoning. These spices evoke comfort-food sensibilities and pair naturally with beef and rice. Garlic powder and black pepper round out the profile with predictable, crowd-pleasing results.
Southwestern variation: This approach incorporates jalapeño peppers for heat, along with cumin and salsa components. This profile appeals to those preferring bolder, spicier flavor dimensions and often pairs ground turkey rather than beef. Fresh cilantro occasionally appears as a garnish.
Salt and black pepper serve as foundational seasonings in both approaches. Tasting the filling mixture before stuffing allows for final adjustment. Remember that cheese adds saltiness, so moderate the salt addition initially and taste again after incorporating dairy components.
The Stuffing and Baking Process
With peppers carved and filling prepared, the assembly phase begins. Arrange peppers upright in a baking dish large enough to accommodate all of them without crowding. This arrangement allows heat to circulate evenly around each pepper.
Spoon filling into each pepper cavity, dividing the mixture evenly. Fill to slightly below the rim, leaving room for the pepper top to rest securely. If using cheese as a topping, sprinkle it over the filling at this stage. Finally, place the reserved pepper tops back on each stuffed pepper, creating the finished jack-o’-lantern appearance.
Baking temperatures range from 350°F to 400°F depending on the specific recipe. Lower temperatures (350°F) typically require 35-45 minutes, while higher temperatures (400°F) reduce cooking time to 25-35 minutes. A baking dish with approximately one-quarter inch of water in the bottom, covered with aluminum foil, creates a steaming environment that keeps peppers moist during cooking.
Most recipes finish with an uncovered baking period of 5-10 minutes to allow cheese to brown and create an appetizing finished appearance. Some cooks employ broiling for the final stage, watching carefully to prevent burning while achieving desired cheese browning.
Serving and Presentation Considerations
These peppers shine as the centerpiece of an autumn dinner table. Place finished peppers on a serving platter where their jack-o’-lantern faces are immediately visible. The visual appeal alone often generates conversation and interest before guests taste a single bite.
Serving immediately after cooking ensures optimal texture, with the filling still warm and cheese properly melted. If preparing ahead, covered peppers reheat well at 325°F for 10-15 minutes, just long enough to restore warmth without additional cooking that might compromise texture.
Portion sizes typically range from one to two peppers per person depending on appetite and what accompaniments are served. A simple salad or steamed green vegetable complements the hearty filling nicely, while cornbread or simple bread rolls round out the meal.
Frequently Asked Questions
Can I prepare these peppers in advance?
Yes, peppers can be carved and stuffed up to one day ahead. Cover them with plastic wrap or foil and refrigerate. Baking time may increase by 5-10 minutes if starting from a cold state. Alternatively, you can bake them completely, then reheat gently before serving.
What if my peppers tip over during cooking?
This occasionally happens despite careful positioning. Prevent this by ensuring the baking dish bottom has sufficient water for stability. If tipping occurs, simply right the pepper and continue cooking. Small amounts of filling that may escape won’t significantly impact the dish.
Are there vegetarian alternatives to ground meat?
Absolutely. Substitute ground meat with lentils, crumbled tofu, or additional rice. Increase seasoning proportionally to compensate for the umami flavor that meat provides. Some recipes successfully use black beans or chickpeas combined with sautéed vegetables.
How do I know when the peppers are properly cooked?
Pierce the pepper exterior with a fork; the flesh should give way easily but maintain structural integrity. The filling should be heated through, steaming when the peppers are cut. Overall cooking time averages 35-45 minutes depending on pepper size and oven temperature.
Can I freeze stuffed peppers?
Yes, uncooked stuffed peppers freeze successfully for up to three months. Wrap each pepper individually in plastic wrap, then place in freezer bags. Bake directly from frozen, adding 10-15 minutes to standard cooking time. Alternatively, freeze after cooking, then thaw in the refrigerator overnight before reheating.
Variations and Creative Adaptations
The basic structure accommodates numerous variations based on dietary preferences and available ingredients. Ground turkey offers a leaner protein alternative to beef, while Italian sausage adds distinctive seasoning and richness. Vegetarian versions thrive with bean-based fillings combined with abundant vegetables and legumes.
Wild rice or quinoa replace white rice for nutritional variation or dietary preferences. Roasted vegetables like zucchini, mushrooms, and bell peppers incorporate into the filling for increased nutritional density. Hot sauce, salsa, or pesto additions transform the flavor profile to match specific cuisine preferences.
Some entertaining professionals prepare multiple batches with different seasonings, allowing guests to experience variety. This approach works particularly well for buffet-style serving where individual preferences can be accommodated.
References
- USDA FoodData Central: Bell Peppers, Raw — U.S. Department of Agriculture. 2024. https://fdc.nal.usda.gov
- Food Safety Guidelines for Home Cooking — CDC (Centers for Disease Control and Prevention). 2024. https://www.cdc.gov/foodsafety
- Cooking Temperatures and Food Safety — USDA Food Safety and Inspection Service. 2024. https://www.fsis.usda.gov
- Nutritional Properties of Capsicum Species — Journal of the Science of Food and Agriculture. Academic Publishing, 2023. https://onlinelibrary.wiley.com/journal/10970010