Roasted garlic transforms from a pungent raw ingredient into a creamy, sweet, and buttery component that elevates countless dishes. Whether you’re making soups, spreading it on bread, or incorporating it into sauces, roasted garlic adds depth and sophistication to your cooking. However, many home cooks hesitate to prepare it because they believe they need aluminum foil to contain the garlic while it roasts. The truth is that you can achieve perfectly roasted garlic using equipment you already have in your kitchen.
Why Roast Garlic at Home?
Roasting garlic serves multiple culinary purposes. The heat mellows the sharp, pungent qualities of raw garlic, creating a mellow sweetness that works beautifully in appetizers, main courses, and side dishes. The cloves become soft enough to squeeze directly onto bread or puree into spreads. Homemade roasted garlic offers superior flavor compared to store-bought versions and costs significantly less when you prepare it yourself.
Beyond flavor, roasting garlic at home allows you to control the ingredients and cooking process. You can adjust salt levels, choose your preferred oil, and ensure nothing unnecessary enters your food. This is particularly important for those avoiding aluminum exposure or seeking to minimize packaging waste in their kitchens.
Essential Preparation Steps Before Roasting
Regardless of which cooking method you choose, proper preparation determines your success. Begin by selecting firm garlic bulbs without soft spots or sprouting. The quality of your starting ingredient directly impacts the final result.
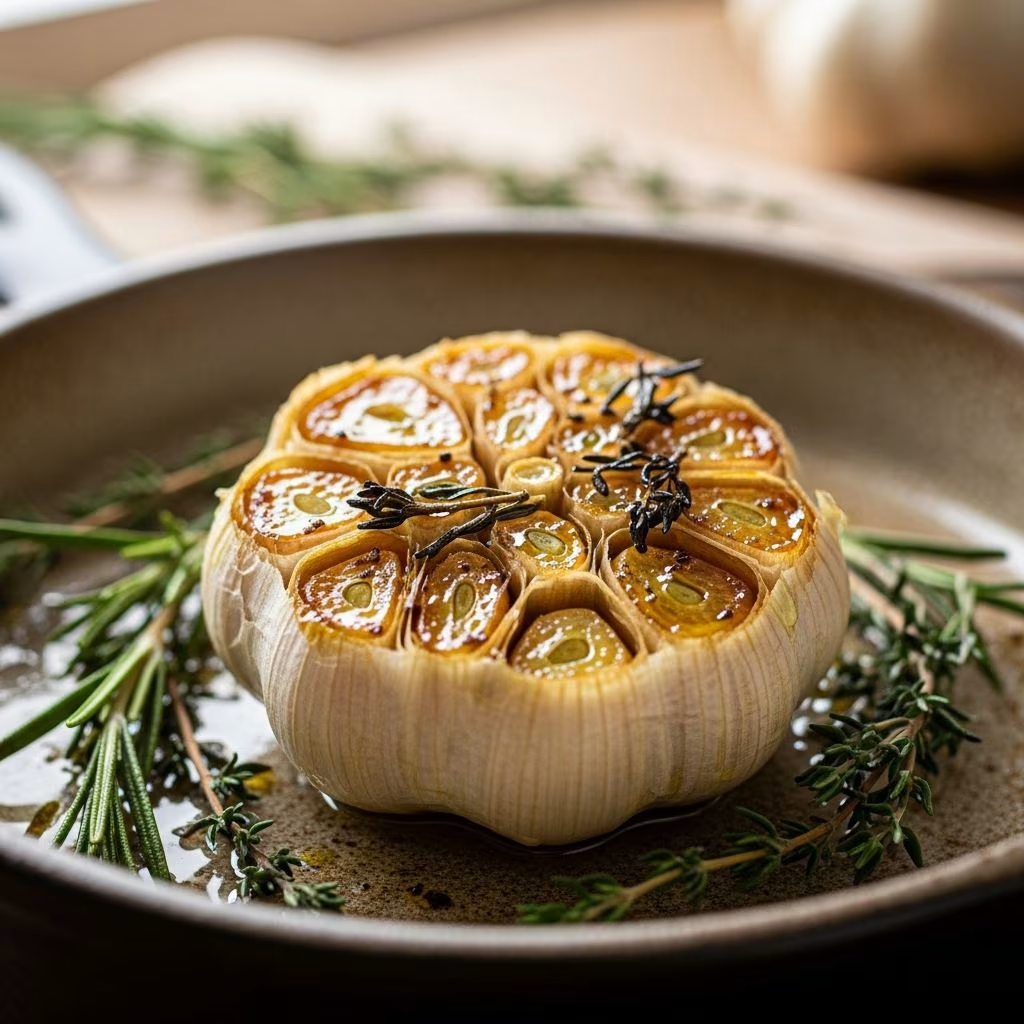
The most critical preparation step involves cutting the top of your garlic bulb. Using a sharp knife, slice horizontally across the top of the bulb, removing approximately one-quarter to one-half inch from the crown. This exposes the individual clove tops while keeping the papery skin intact on the lower portion. The exposed cloves should be visible, and you should be able to see the top of each individual piece.
If any papery skin remains on the exposed portions, carefully use a paring knife to remove just the skin from those spots. This prevents burning and ensures even cooking. Some cooks prefer leaving the papery skin intact wherever possible, as it helps the bulb roast evenly and contain moisture.
Method One: The Classic Covered Pot Technique
This method represents the simplest approach for most home cooks because it uses equipment every kitchen contains. After preparing your garlic bulb as described above, place it cut-side up directly into an oven-safe pot or Dutch oven. You can fit multiple bulbs in a larger pot by arranging them in a single layer with cut sides facing upward.
Drizzle olive oil generously over the cut surface of each bulb. The oil should coat all exposed cloves, helping them develop a tender, creamy texture. If desired, sprinkle flaky sea salt and freshly ground black pepper over the oiled surface. Some cooks add dried herbs like thyme or rosemary at this stage for additional flavor complexity.
Cover the pot with its lid, ensuring the garlic is completely enclosed. This trapping of steam is what allows the garlic to soften and caramelize without drying out. Place the covered pot into an oven preheated to 400 degrees Fahrenheit. Roast for 45 minutes to one hour, depending on your bulb size and oven characteristics. The garlic is finished when the cloves are completely soft, spreadable with slight pressure from a spoon, and the interior appears creamy and golden.
This method works exceptionally well because the pot’s lid creates an ideal steaming environment. The contained heat circulates evenly around the garlic, and you have visual confirmation when you remove the lid to check on progress. Dutch ovens are particularly effective because their heavy construction maintains consistent temperature throughout cooking.
Method Two: Muffin Pan with Cookie Sheet Cover
For cooking multiple garlic bulbs simultaneously, a muffin pan offers excellent results. After cutting and preparing your garlic, place one bulb cut-side up into each cup of a standard or jumbo muffin tin. If using jumbo garlic, ensure the bulb fits without excessive compression.
Drizzle olive oil into each muffin cup, making sure every exposed clove receives coating. The oil accumulating at the bottom of each cup will help roast the garlic thoroughly. Sprinkle salt and pepper if desired.
The key to this method is covering the entire muffin tin with an inverted cookie sheet or baking sheet. This creates a sealed environment similar to using foil, trapping steam and heat around the garlic. The cookie sheet should be large enough to cover the muffin tin completely, extending to all edges.
Place the covered muffin tin into a preheated 400-degree oven for 45 to 60 minutes. The advantage of this setup is that you can prepare six to twelve bulbs at once if using a standard or jumbo muffin tin, making it ideal for meal preparation or when you want to roast garlic in quantity.
Method Three: Ramekin and Baking Dish Combination
This creative approach works beautifully when you have individual oven-safe ramekins or small oven-proof bowls. After preparing your garlic bulb, place it cut-side up in a shallow baking dish. The baking dish serves as your base, and the ramekin acts as your cover.
Drizzle the exposed garlic with olive oil, then invert an oven-safe ramekin directly over the bulb. The ramekin should fit snugly enough to trap steam while allowing air circulation. This creates a personalized cooking chamber for each bulb.
Roast in a preheated 400-degree oven for 45 minutes to one hour. This method is particularly useful if you’re roasting just one or two bulbs, as it uses minimal oven space and creates an elegant presentation if you plan to serve the garlic in the ramekin.
Alternative Approaches and Equipment Options
Beyond the three primary methods, several other equipment options work effectively. A glass baking dish with a matching lid creates an excellent roasting vessel with the added benefit of being able to monitor cooking progress through the transparent sides. An oven-safe casserole dish with a lid works similarly.
Some cooks use baking sheets topped with inverted oven-safe bowls or mixing bowls to create individual covered spaces for each bulb. This approach requires a bowl size that adequately covers the garlic while fitting within your oven.
For those with air fryers, roasted garlic can be prepared at 392 degrees Fahrenheit for approximately 25 minutes, though this method requires using parchment paper inside foil packets, which somewhat defeats the purpose of avoiding foil entirely.
Timing and Temperature Considerations
The standard roasting temperature of 400 degrees Fahrenheit produces optimal results for most home cooks. This temperature is hot enough to develop caramelization and sweetness without burning the exterior or drying out the interior.
Cooking time typically ranges from 45 minutes to one hour, depending on several factors. Larger bulbs require longer cooking than smaller ones. Additionally, your specific oven’s characteristics influence timing—some ovens run hotter or cooler than their settings indicate. The most reliable indicator of doneness is the texture of the garlic itself. When completely roasted, the cloves should be soft enough to easily separate from the bulb with your fingers and spreadable with minimal pressure.
Check your garlic at the 40-minute mark by carefully removing the cover or ramekin. If the cloves still feel firm, return the garlic to the oven and check again in five-minute intervals.
Seasoning and Flavor Enhancement
While simple roasted garlic with only salt, pepper, and olive oil is delicious, you can experiment with additional seasonings. Dried herbs like thyme, oregano, rosemary, or Italian seasoning sprinkled over the cut surface add complexity. Fresh rosemary sprigs placed directly on the garlic impart a sophisticated flavor.
Some cooks prefer smoked sea salt or finishing salts like Maldon salt for their distinctive taste and texture. A pinch of red pepper flakes adds subtle heat if desired. Balsamic vinegar drizzled over the finished garlic creates an interesting sweet-savory profile.
The type of oil you choose also influences flavor. While traditional olive oil works well, you can experiment with avocado oil, truffle oil, or garlic-infused oils for different effects. Choose an oil you enjoy eating, as its flavor will be prominent in the finished dish.
Storage and Using Your Roasted Garlic
Properly stored roasted garlic lasts for several days in your refrigerator. Once cooled to room temperature, transfer the roasted bulbs to an airtight container. Roasted garlic keeps for at least five days when refrigerated and can be frozen for longer storage.
To use roasted garlic, simply squeeze the soft cloves directly out of the papery skin, or use a small spoon to scoop them out. The cloves should slide out easily from the cooked bulb. Spread roasted garlic on bread, crackers, or crostini for a simple appetizer. Mix it into mashed potatoes, soups, pasta sauces, or risotto for added depth. Blend roasted garlic with mayonnaise or sour cream for flavored spreads and dips.
Common Issues and How to Avoid Them
| Problem | Cause | Solution |
|---|---|---|
| Burnt exterior | Uncovered cooking or excessive heat | Ensure complete covering and maintain 400°F temperature |
| Hard, unyielding cloves | Insufficient cooking time | Return to oven for additional 10-15 minutes |
| Dry, shriveled garlic | Overcooking or insufficient oil | Reduce cooking time slightly or increase oil amount |
| Uneven cooking | Poor heat distribution or bulbs too close together | Arrange in single layer with space between bulbs |
Frequently Asked Questions
Can I roast garlic at a lower temperature?
Yes, you can roast garlic at 350 degrees Fahrenheit, though it will require approximately 60 to 75 minutes instead of 45 to 60 minutes. Lower temperatures take longer but may result in less browning on the exterior.
What should I do if my garlic starts smoking?
Smoking indicates the garlic or oil is burning. Reduce your oven temperature to 375 degrees Fahrenheit and check that your garlic is completely covered. Ensure the oil isn’t pooling excessively around the bulbs.
Can I roast multiple bulbs of different sizes together?
Yes, but arrange smaller bulbs where they receive slightly less direct heat and larger bulbs in hotter spots. Check smaller bulbs first for doneness, as they’ll finish before larger ones.
Is there a difference between roasting whole bulbs versus cloves?
Roasting whole bulbs produces creamy, spreadable results suitable for many applications. Roasting individual cloves produces different results—they can become more caramelized and less uniform in texture. The whole-bulb method is generally recommended for best results.
Can I prepare roasted garlic in advance?
Absolutely. Roasted garlic keeps refrigerated for five days and freezes well for up to three months. Freeze it in ice cube trays for convenient portioning, then transfer cubes to freezer bags for storage.
Final Thoughts on Foil-Free Roasting
Roasting garlic without aluminum foil is not only possible but often produces superior results through improved steam circulation and visual monitoring. The methods described here use common kitchen equipment, making them accessible to every home cook. Whether you choose the simplicity of a covered pot, the batch-cooking efficiency of a muffin pan, or the charm of individual ramekins, you can create restaurant-quality roasted garlic in your own kitchen.
The key to success lies in proper preparation, appropriate covering to trap steam, and patience as the garlic transforms from pungent bulbs into creamy, sweet cloves. Once you’ve mastered this technique, you’ll find countless ways to incorporate roasted garlic into your cooking, from simple preparations to complex culinary creations.
References
- How to Make Perfect Roasted Garlic – No Foil Needed! — Kalejunkie. 2024. https://kalejunkie.com/how-to-make-perfect-roasted-garlic-no-foil-needed/
- How to Roast Whole Garlic Without Tinfoil — Zero-Waste Chef. 2023-02-21. https://zerowastechef.com/2023/02/21/how-to-make-roasted-garlic-without-tinfoil/
- How to Roast Garlic Without Aluminum Foil — Buttered Side Up. 2024. https://www.butteredsideupblog.com/how-to-roast-garlic-without-aluminum-foil/
- Easy Roasted Garlic (Without Aluminum Foil) — Mommypotamus. 2024. https://mommypotamus.com/easy-roasted-garlic/
- Air Fryer Roasted Garlic (No Foil Option) — Our Nourishing Table. 2024. https://ournourishingtable.com/air-fryer-roasted-garlic-no-foil-option/