Indian puri represents one of the most beloved fried breads in South Asian cuisine, known for its characteristic puffed appearance and golden exterior. This versatile bread serves as an essential component in many regional cuisines across India, from breakfast tables to festive celebrations. Creating authentic puri at home requires understanding fundamental techniques, precise ingredient measurements, and proper execution of time-honored methods passed down through generations of Indian cooks.
Understanding the Foundation: Puri Fundamentals
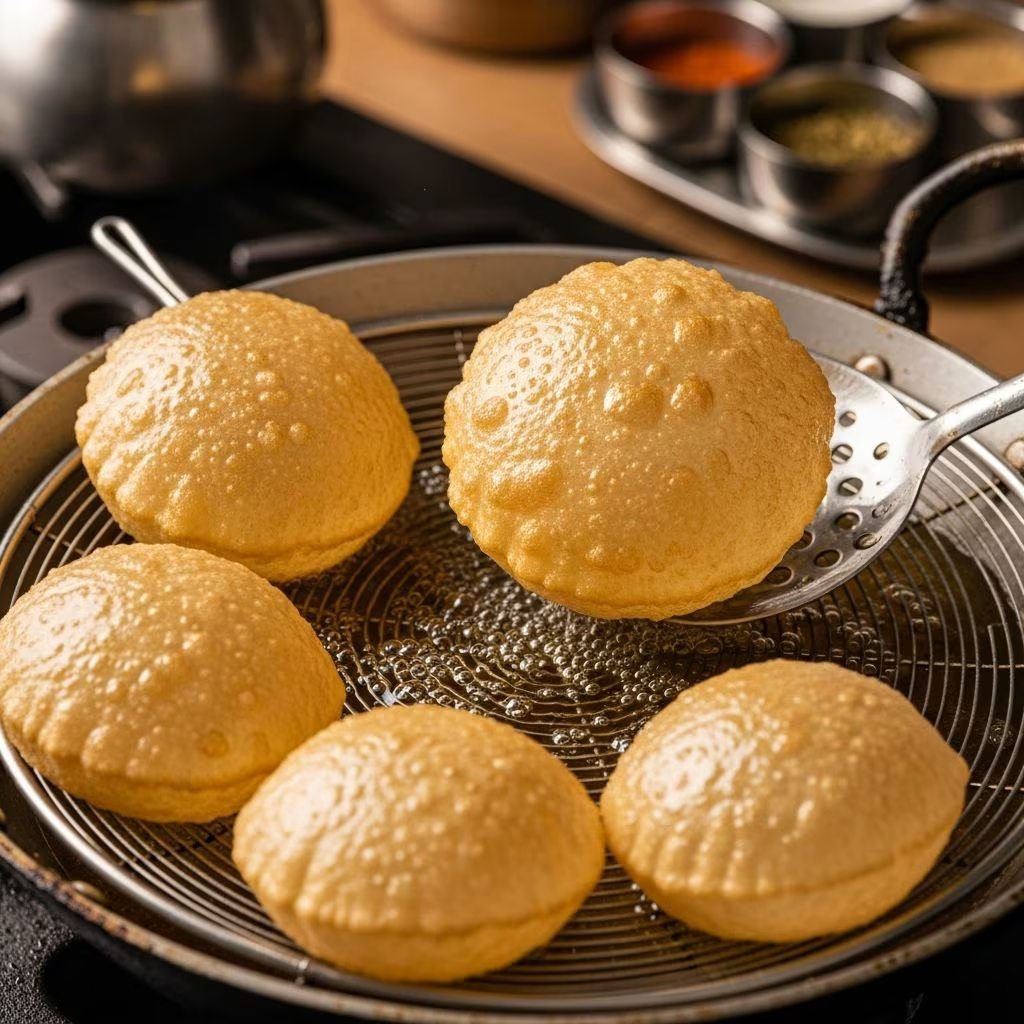
Puri stands apart from other Indian breads due to its unique preparation method and texture characteristics. Unlike chapati or roti that remain relatively flat, authentic puri develops a distinctive hollow interior with a crispy exterior when properly prepared. The bread’s signature puff emerges from the combination of precise hydration levels in the dough and controlled frying temperatures that create steam within the structure.
The basic ingredient list for puri remains remarkably simple, featuring readily available pantry staples. All-purpose flour forms the foundation, supplemented with water, salt, and oil. This straightforward combination, when properly executed, transforms into an exceptionally satisfying bread that complements curries, subzis, and other Indian preparations.
Essential Ingredients and Preparation
Creating successful puri begins with understanding the role each ingredient plays in developing proper dough consistency and texture. The dough must achieve a specific consistency that balances hydration with elasticity—neither too dry nor excessively wet.
- All-purpose flour: The primary structural component, typically requiring 2 cups for a standard batch
- Water: Incorporated gradually to achieve the desired dough consistency
- Salt: Enhances flavor and strengthens gluten development
- Oil: Contributes to texture and aids in dough manipulation
- Additional flour for dusting: Prevents sticking during rolling and shaping
The initial dough-making process requires careful attention to achieving the correct texture. Rather than adding all water at once, experienced cooks incorporate water gradually while mixing, allowing observation of the dough’s development. The ideal consistency feels satiny and smooth, neither crumbly nor excessively sticky. When properly mixed, the dough should release cleanly from the work surface and mixing vessel.
The Kneading Process and Dough Development
Proper kneading represents a critical step that many home cooks underestimate. Unlike bread dough that may require extended kneading periods, puri dough typically needs approximately 10 minutes of consistent, firm kneading to develop adequate gluten structure. During kneading, the dough undergoes transformation from a rough, uneven mixture into a smooth, cohesive mass with a uniform texture.
The kneading technique involves pushing the dough away with the heel of your hand, folding it back over itself, rotating it slightly, and repeating this motion with consistent pressure. This rhythmic action develops the gluten network necessary for proper puffing during frying. Many cooks find this meditative process enjoyable, though the mechanical consistency matters more than personal preference.
After completing the initial kneading, the dough enters the resting phase. Transferring the kneaded dough to an oiled bowl and covering it with plastic wrap allows the gluten to relax and the flour to fully hydrate. This resting period typically lasts 30 minutes, during which the dough’s appearance transforms from somewhat tight and slightly crumbly to visibly relaxed and smooth with a satiny finish.
Portioning and Initial Shaping Techniques
Following the resting period, the dough requires division into appropriate portion sizes. Traditional Indian methods, while more labor-intensive than some modern shortcuts, yield superior results in terms of uniformity and texture development. The process begins by cutting the main dough mass in half using a sharp knife, then dividing each half into progressively smaller pieces.
A systematic approach involves cutting the dough in half, then cutting each resulting half in half again, and finally dividing each quarter into two pieces. This method produces approximately eight even portions from a standard batch. The key advantage of this approach lies in achieving consistent sizing, which ensures uniform cooking and puffing throughout the batch.
Once portioned, each piece requires gentle rolling into a smooth ball. Dusting hands lightly with flour prevents excessive sticking while allowing the tactile feedback necessary for proper shaping. This step resembles working with play-dough—a quality that appeals to both experienced cooks and children learning to cook. The rolling motion continues until each portion develops a smooth, even exterior without visible creases or rough patches.
The Rolling and Stretching Method
Transforming the small dough balls into thin, uniform circles requires a specific technique that differs somewhat from rolling chapati or other Indian breads. Rather than immediately applying rolling pressure, the initial phase involves gently stretching the dough ball between your hands, creating a slightly flattened disc approximately 2-3 inches in diameter.
The rolling process emphasizes starting from the center of the dough and rolling away from your body, then picking up the partially rolled dough, repositioning it in the center, and rolling toward your body. This quarter-turn method ensures that pressure distributes evenly across the entire circle, preventing the irregular, map-like shapes that result from random rolling patterns.
Throughout the rolling process, consistent hand pressure combined with gradual extension produces the desired thinness. The target thickness hovers around 1/8 inch—thin enough to puff dramatically but thick enough to maintain structural integrity during frying. Experienced cooks develop an intuitive sense for proper thickness through repeated practice, though thickness gauges or simple visual comparison to reference objects aids less-experienced cooks.
Proper rolling technique incorporates both downward pressure and outward hand movement. As the rolling pin moves forward, the hands simultaneously spread outward, applying gentle lateral pressure that stretches the dough rather than merely compressing it. This combination of actions produces the thin, elastic circles essential for proper puffing.
Managing Humidity and Stickiness
Environmental humidity significantly affects dough consistency during preparation. In more humid conditions, dough requires additional flour for dusting to prevent excessive stickiness. Conversely, drier environments may necessitate minimal flour additions. Experienced cooks adjust flour quantities continuously during rolling and shaping, responding to real-time observations of dough behavior.
If sticky dough presents challenges during rolling, a brief dusting of flour applied to both the work surface and the rolling pin typically resolves the issue. The key involves using just enough flour for functional purposes without creating a dry, floury exterior that prevents proper sealing and puffing. Many cooks keep a small bowl of flour nearby for quick access during the rolling process.
Frying Temperature and Oil Considerations
The frying stage represents where puri truly develops its characteristic appearance and texture. Proper oil temperature proves absolutely essential—too cool, and the bread becomes greasy without puffing; too hot, and the exterior browns excessively while the interior remains raw. Most traditional recipes suggest oil temperatures around 350-375°F (175-190°C), though slight variations occur based on individual stove characteristics and oil type.
Neutral-flavored oils with high smoke points work best for puri preparation. Vegetable oil, canola oil, and peanut oil all perform admirably, offering consistent results across multiple batches. Using fresh oil rather than repeatedly reheated oil improves both flavor and puffing consistency.
The frying process itself requires attentive observation. Once a rolled circle enters the hot oil, it should begin puffing within seconds. Using a slotted spoon to gently press the center of the bread encourages full puffing if the initial expansion proves incomplete. Excessive pressing, however, risks deflating the bread or creating holes. The total frying time per puri typically ranges from 30-60 seconds per side, with color development progressing from pale to golden to deeper brown.
Achieving Consistent Results Across Batches
Consistency in puri production emerges from combining accurate technique with attention to detail at each stage. Measuring ingredients by weight rather than volume provides superior accuracy compared to cup measurements, particularly for flour which varies in density. Kitchen scales eliminate guesswork and contribute significantly to reproducible results.
Maintaining consistent dough temperature throughout preparation also enhances outcomes. Avoid working with dough that feels cold or has been refrigerated, as temperature variations affect hydration and gluten behavior. Room-temperature ingredients and ambient conditions facilitate smoother, more predictable dough development.
Troubleshooting Common Issues
Despite careful preparation, home cooks occasionally encounter challenges during puri production. Understanding potential issues and their solutions empowers cooks to adjust technique and achieve improved results.
- Failure to puff: Usually indicates insufficient dough thinness or oil temperature too low. Ensure proper rolling and allow oil adequate heating time
- Greasy, heavy texture: Suggests prolonged frying or oil that has cooled during cooking. Maintain consistent oil temperature and limit frying duration
- Irregular shapes: Results from inconsistent rolling pressure or incomplete quarter-turn rotation. Practice systematic rolling methodology
- Tough, chewy texture: May indicate over-kneading or excessive gluten development. Standard kneading duration typically suffices
- Dough sticking excessively: Address through judicious flour dusting or reduced hydration in future batches
Serving and Storage Guidelines
Freshly fried puri tastes best consumed immediately while still warm, as the texture gradually loses its crispness as it cools. Serving hot puri alongside curries, dal preparations, or vegetable dishes represents the traditional presentation method. Many regional Indian meals feature puri as the primary bread component, particularly during special occasions and celebrations.
Storage of leftover puri requires airtight containers to minimize moisture loss and maintain texture quality for 2-3 days. Reheating can briefly restore some texture through gentle warming in a dry skillet, though freshly prepared puri always surpasses reheated versions in quality and satisfaction.
Frequently Asked Questions
- Can puri dough be prepared in advance?
- Yes, prepared dough stores well in the refrigerator for up to 24 hours when properly covered. Remove from refrigeration 30 minutes before use to allow warming to room temperature.
- What oil type works best for frying?
- Neutral oils with high smoke points perform optimally. Vegetable oil, canola oil, and refined peanut oil all produce excellent results.
- Why aren’t my puris puffing properly?
- Check that dough has been rolled thin enough and that oil temperature maintains the proper range. Thin dough at correct temperature virtually guarantees puffing.
- Can I use whole wheat flour instead of all-purpose flour?
- Yes, though results differ slightly. Whole wheat flour produces denser puri. Many cooks use flour blends combining whole wheat with all-purpose flour.
- How many puris does a standard recipe yield?
- Standard recipes using 2 cups flour typically produce 16-20 individual puris depending on size and portioning method.
Exploring Variations and Regional Styles
While basic puri remains consistent across most regions, variations exist reflecting local preferences and ingredient availability. Some cooks incorporate yogurt into the dough for enhanced tenderness, while others add spices or minced vegetables for flavor complexity. These variations maintain the fundamental technique while offering creative opportunities for culinary exploration.
Experimentation with portion sizes yields different presentations—larger puri work well for individual servings, while smaller versions suit appetizer applications or casual meals. The fundamental technique remains constant regardless of sizing adjustments.
References
- How to Make Indian Poori, Part 2 — Epicurious. 2020. https://www.youtube.com/watch?v=UoRjRuz85Pg
- Indian Bread and Staple Foods: Nutritional Composition and Health Benefits — International Journal of Food Sciences and Nutrition. 2023. https://pubmed.ncbi.nlm.nih.gov
- Traditional Indian Cooking Techniques and Food Preparation Methods — Ministry of Food Processing Industries, Government of India. 2022. https://mofpi.gov.in
- Oil Smoke Points and Culinary Applications — U.S. Department of Agriculture. 2024. https://www.usda.gov