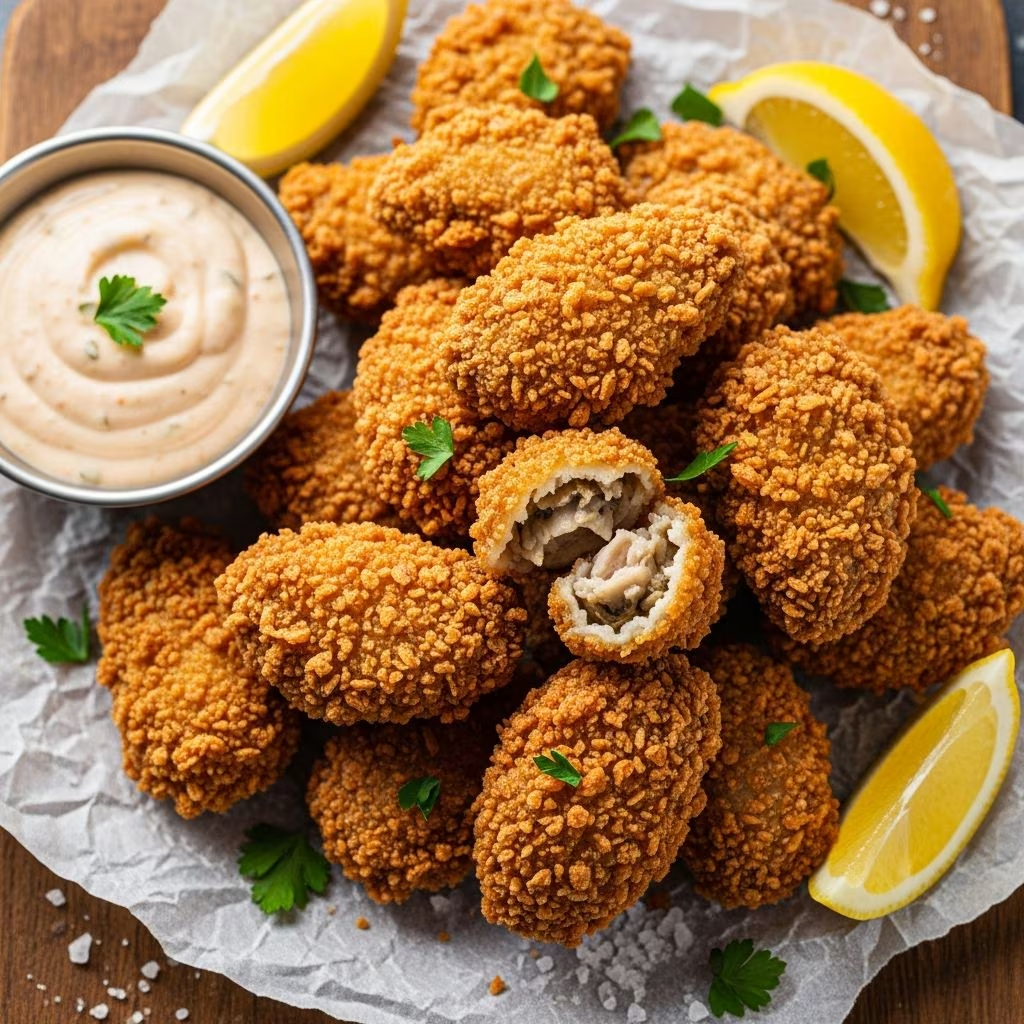
Deep-fried oysters represent one of the most beloved preparations in American coastal cuisine, particularly throughout the Gulf Coast and Southern regions. This preparation method transforms fresh oysters into a satisfying appetizer or main course component, featuring a golden, crunchy exterior that contrasts beautifully with the tender bivalve within. The technique has evolved from simple home cooking into a refined culinary skill that combines proper ingredient selection, precise temperature control, and well-executed technique. Understanding each element of this preparation ensures consistent, restaurant-quality results that will impress family and guests alike.
Understanding Oyster Selection and Preparation
The foundation of exceptional deep-fried oysters begins with selecting the highest quality oysters available. Fresh oysters should be sourced from reputable seafood vendors who maintain proper cold storage and handle their products with care. Gulf oysters are particularly prized for frying due to their size and flavor profile, though oysters from other regions can work equally well. When obtaining oysters, request that they be freshly shucked or plan to shuck them yourself immediately before cooking.
Once you have your oysters, proper handling makes a significant difference in the final result. After shucking, allow the oysters to drain in a colander, removing excess liquid while keeping them moist. This step is crucial because oysters that are completely dry will not accept the breading properly, while those that are overly wet will create steam pockets during frying. The ideal oyster for breading retains enough moisture to help the coating adhere without being dripping wet. Reserve the oyster liquor if you plan to use it for other recipes, or discard it according to your preferences.
Pat each oyster gently with paper towels before breading to achieve the proper moisture balance. This careful preparation prevents unnecessary moisture from interfering with the dredging process and helps create an even, adherent coating.
The Breading Foundation: Cornmeal and Flour Combinations
The distinctive texture of properly fried oysters depends heavily on the breading mixture. Unlike many fried seafood preparations that rely primarily on flour, authentic fried oysters incorporate cornmeal as a key component. The combination of all-purpose flour and yellow cornmeal creates a coating that achieves optimal crunchiness while maintaining enough structure to stay firmly attached to the oyster during cooking.
The ratio of these ingredients matters considerably. A balanced mixture typically uses equal parts flour and cornmeal, combined with complementary seasonings. Yellow cornmeal specifically provides superior texture compared to white cornmeal, creating that signature crispy exterior that characterizes restaurant-quality fried oysters. Avoid self-rising cornmeal in this application, as the leavening agents can create an undesirable texture.
Seasoning the dry mixture represents an important opportunity to build flavor into the dish. Traditional options include:
- Creole seasoning blends that combine paprika, garlic powder, onion powder, cayenne pepper, and other spices
- Cajun seasoning mixtures featuring bold, assertive flavors
- Simple salt and black pepper combinations for a more classic approach
- Smoky paprika additions for depth and complexity
Some recipes incorporate cayenne pepper or other heat elements directly into the breading, while others reserve spicy components for accompanying sauces. This flexibility allows you to customize the preparation to match your heat preferences and ingredient availability.
Creating the Perfect Binding Layer with Buttermilk
The buttermilk soak serves a critical function in traditional fried oyster preparation. Unlike breaded chicken or fish that often employ an egg wash, authentic fried oysters rely on buttermilk as their primary binding agent. This approach offers several advantages: buttermilk’s acidity and fat content help the breading adhere evenly, while its protein components create a more cohesive coating during frying.
To prepare the buttermilk mixture, simply pour approximately two cups of buttermilk into a shallow container and add a tablespoon of Louisiana-style hot sauce. This addition complements the oyster’s natural brininess and adds subtle complexity to the overall flavor profile. The buttermilk should remain at room temperature before using, allowing the oysters to coat evenly and efficiently.
The dredging process requires attention to detail. Remove each oyster from the buttermilk mixture individually, allowing excess liquid to drip back into the container. This step prevents the breading mixture from becoming overly saturated, which would create clumping and uneven coating. Gently toss the buttermilk-coated oyster in the breading mixture, using your fingers to press the coating gently onto all surfaces. This deliberate pressure ensures maximum adhesion and even coverage.
Oil Selection and Temperature Management
The cooking medium profoundly affects the success of your fried oysters. Peanut oil remains the traditional choice for this preparation, offering a high smoke point and neutral flavor that doesn’t compete with the oyster’s natural taste. Vegetable oil and canola oil serve as acceptable alternatives, though peanut oil is preferred when available. Avoid olive oil and other specialty oils with lower smoke points and distinctive flavors.
Temperature control represents perhaps the most critical factor in achieving perfect fried oysters. A heavy-bottomed stockpot or Dutch oven fitted with a deep-frying thermometer allows you to monitor and maintain consistent heat. The ideal frying temperature ranges from 350 to 375 degrees Fahrenheit, with most recipes calling for approximately 375 degrees. This temperature point ensures the oysters cook through while developing a golden-brown exterior without absorbing excessive oil.
Maintaining steady temperature throughout the cooking process requires attention and adjustment. When you add cold oysters to hot oil, the temperature will drop. Resist the temptation to work with more than four to six oysters per batch, as larger quantities will lower the oil temperature excessively, resulting in greasy rather than crispy results. Allow the oil to return to the target temperature between batches before continuing.
A helpful technique for gauging oil readiness involves dropping a single grain of rice into the oil. If the rice immediately floats to the surface and begins cooking, the oil has reached the appropriate temperature for frying oysters.
The Frying Process: Technique and Timing
Proper frying technique transforms carefully prepared oysters into a refined dish. Working with your dredged oysters and preheated oil, carefully place each oyster into the hot oil individually or in small batches. The oysters should immediately sizzle and begin floating to the surface. The characteristic curling of the oyster as it cooks indicates proper doneness—this physical change signals that the oyster has cooked through while remaining tender.
Cooking time typically ranges from 90 seconds to three minutes, depending on oyster size, oil temperature, and personal preference. Smaller oysters cook more quickly, while larger specimens require additional time. Resist the urge to move the oysters excessively in the oil; instead, allow them to cook undisturbed for the initial period before flipping if necessary. Many traditional preparations cook oysters without flipping, relying on the oil’s circulation and the oysters’ natural buoyancy to ensure even cooking.
Visual cues help determine when oysters have reached optimal doneness. The coating should achieve a rich golden-brown color, not pale yellow or dark brown. Undercooked oysters will appear pale and soft, while overcooking results in excessive browning and potentially dry oyster meat. Consistent timing and temperature management produce consistently excellent results.
Remove cooked oysters using a slotted spoon or spider strainer, transferring them immediately to a plate lined with paper towels or brown paper bags. This draining step removes excess oil while the oysters are still hot, contributing to the final texture. Allow oysters to rest briefly before serving, but serve them while still warm for optimal eating experience.
Classic Accompaniments and Sauces
Rémoulade represents the traditional sauce accompanying fried oysters, particularly throughout the South and Gulf Coast. This tangy, complex sauce combines mayonnaise with numerous flavor-building ingredients that complement the oyster’s briny character.
A traditional rémoulade typically includes:
- Mayonnaise as the creamy base
- Creole or Dijon mustard for tanginess and complexity
- Hot sauce for heat and additional flavor dimension
- Honey to balance the acidic and spicy elements
- Minced garlic for aromatic intensity
- Capers for briny, piquant notes
- Filé powder for a traditional Louisiana touch
- Fresh green onions for subtle onion flavor and color
Alternative sauce options accommodate different taste preferences. A simple buttermilk dressing combines mayonnaise with buttermilk, red wine vinegar, hot sauce, black pepper, and salt for a lighter option. Chipotle aioli brings smoky heat for those preferring Southwestern flavors, while basic vinegar or lemon-based condiments provide bright acidity that cuts through the richness of fried oysters.
Serving Suggestions and Complementary Dishes
Deep-fried oysters function effectively as standalone appetizers or as components of larger meals. Serve them immediately after cooking while they maintain their optimal texture, never allowing them to sit for extended periods. Traditional Southern presentations feature fried oysters atop crisp lettuces with buttermilk dressing and crispy bacon, creating a composed salad that highlights the oysters’ textural contrast.
As appetizers, fried oysters pair exceptionally well with cold beverages, particularly crisp beers that offer effervescence and slight bitterness to balance the rich, salty flavors. Wine selections should emphasize acidity and freshness; Sauvignon Blanc or other herbaceous white wines provide excellent complementary options. Cocktails with citrus components or spirits-based drinks also work well with fried oysters.
When serving fried oysters as part of a composed plate, consider light sides that won’t overwhelm the delicate seafood flavor. Green salads with vinaigrette, steamed vegetables, or simple rice preparations provide balanced accompaniments. Avoid heavy cream sauces or rich starches that would make the overall meal feel overly indulgent.
Troubleshooting Common Issues
Understanding why problems occur allows you to prevent them in future preparations. Greasy oysters indicate oil temperature that was too low during cooking, preventing proper browning and allowing excess oil absorption. Maintaining the target temperature range and working with smaller batches solves this issue. Coating that separates or falls off during cooking suggests insufficient dredging adherence, often caused by overly wet oysters or inadequate pressure during the dredging process. Ensuring proper oyster moisture and deliberate pressure application prevents this problem.
Unevenly cooked oysters can result from irregular sizing, inconsistent oil temperature, or overcrowding the cooking vessel. Selecting similarly-sized oysters and maintaining careful temperature control help achieve uniform results. Pale coating without adequate browning indicates insufficient oil temperature or undercooking; conversely, excessively dark or burned coating suggests oil temperature that was too high or excessive cooking time.
Storage and Make-Ahead Considerations
Fried oysters are best served fresh and warm, making them a less-ideal candidate for advance preparation. However, breaded oysters can be prepared several hours in advance and refrigerated until ready to fry. Arrange breaded oysters on a parchment-lined baking sheet, cover with plastic wrap, and refrigerate until needed. Frying chilled oysters requires slightly longer cooking time but produces acceptable results.
Leftover fried oysters can be refrigerated for up to two days but will not maintain the original textural quality. Reheating in a low oven partially restores crispness, though the results won’t match fresh-fried oysters. Most cooks find the best approach involves frying oysters in the quantity needed rather than preparing excess.
Frequently Asked Questions
Can I freeze breaded oysters?
Yes, breaded oysters can be frozen for up to three months. Arrange them on a baking sheet and freeze completely before transferring to freezer bags. Fry directly from frozen, adding approximately 30 seconds to the cooking time.
What’s the difference between frying and deep frying oysters?
Deep frying typically involves immersing oysters completely in oil at a specific temperature, while shallow frying uses less oil. Deep frying produces superior texture and more consistent results.
Can I use an air fryer for fried oysters?
Air fryers can produce acceptable results, though traditional deep frying creates superior texture. Air-fried oysters will be crispier than baked but may lack the authentic fried appearance.
How do I know when oysters are cooked through?
Properly cooked oysters curl slightly and feel firm to the touch. The coating will be golden brown, and the internal temperature should reach 145 degrees Fahrenheit if measured with a food thermometer.
Can I reuse the frying oil?
Oil can be reused several times if properly strained and stored. Cool completely, strain through fine mesh or cheesecloth to remove particles, and store in an airtight container away from light and heat.
Conclusion: Achieving Excellence
Mastering deep-fried oysters involves understanding ingredient selection, proper technique, and careful temperature management. By following these comprehensive guidelines, home cooks can replicate the restaurant-quality results that make fried oysters such a beloved dish. The combination of fresh oysters, proper breading mixture, correct frying temperature, and traditional accompaniments creates a memorable culinary experience that celebrates these remarkable bivalves.
References
- Seafood Safety Guidelines — U.S. Food and Drug Administration. 2024. https://www.fda.gov/food/seafood-haccp-hazard-analysis-and-critical-control-point/seafood-safety-guidance
- USDA Complete Guide to Home Food Preservation — U.S. Department of Agriculture. 2015. https://www.nchfp.uga.edu/publications/nchfp/A-Z_Guide.html
- Temperature and Oil Smoke Points Reference — International Olive Oil Council. 2023. https://www.internationaloliveoil.org/
- Gulf Seafood Safety and Quality Standards — Gulf States Marine Fisheries Commission. 2024. https://www.gsmfc.org/
- Culinary Techniques for Shellfish Preparation — The Culinary Institute of America. 2022. https://www.ciachef.edu/