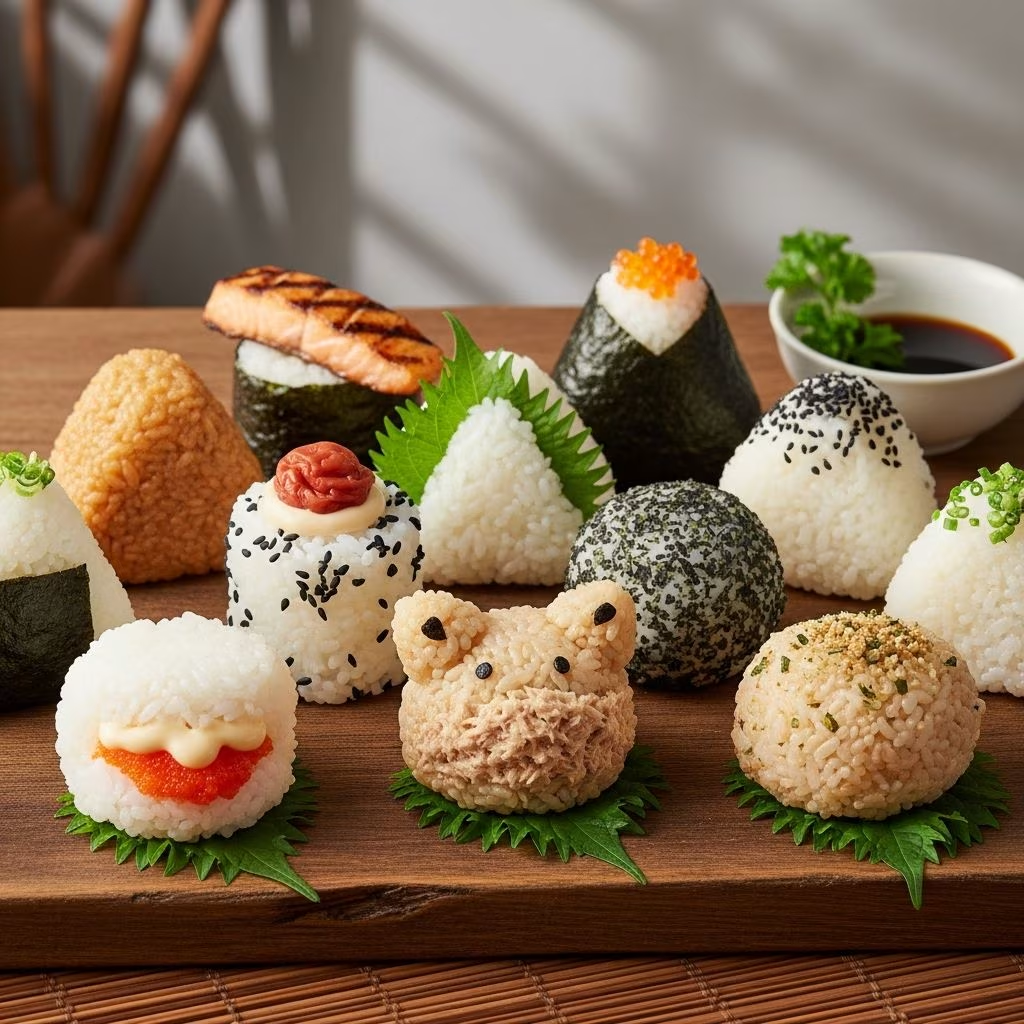
Onigiri, also known as Japanese rice balls, represent a cornerstone of everyday Japanese eating. These compact, portable snacks combine sticky short-grain rice with savory fillings, wrapped in seaweed for easy handling. Versatile enough for breakfast, lunch, or picnics, onigiri offer endless customization while staying true to their simple origins.
The Timeless Appeal of Onigiri in Japanese Culture
Dating back over a thousand years, onigiri evolved from rice wrapped in bamboo leaves during the Heian period to the triangular shapes we recognize today. Samurai carried them as rations, and modern convenience stores stock hundreds of varieties daily. Their enduring popularity stems from portability, affordability, and adaptability—making them a staple in bento boxes and on-the-go meals.
In contemporary Japan, onigiri sales exceed billions annually, reflecting their role in fast-paced lifestyles. Families prepare them fresh at home, while vendors experiment with gourmet twists like truffle-infused rice or wagyu beef centers. This blend of tradition and innovation keeps onigiri relevant across generations.
Selecting the Perfect Rice for Authentic Onigiri
The foundation of great onigiri is short-grain Japanese rice, such as sushi rice, which becomes sticky when cooked due to high amylopectin content. Avoid long-grain varieties, as they lack the cohesion needed for shaping. A standard batch starts with 2–3 cups uncooked rice, yielding about 6–9 balls.
- Rinse thoroughly: Wash rice 3–5 times until water runs clear to remove excess starch.
- Cook precisely: Use a 1:1.25 rice-to-water ratio in a rice cooker or pot. Let it steam covered for 10 minutes post-cooking.
- Season lightly: While warm, gently fold in salt or furikake for baseline flavor.
Freshly cooked rice, still warm but cool enough to handle (around 100–120°F), molds best. Cover with a damp cloth to prevent drying during assembly.
Essential Tools and Ingredients for Success
No fancy equipment is required, but a few items elevate the process:
| Tool/Ingredient | Purpose | Tips |
|---|---|---|
| Onigiri mold (plastic or wooden) | Uniform shapes for beginners | Wet before use; available in small, medium, large sizes |
| Roasted nori sheets | Wrapping for grip and flavor | Cut into 1×8-inch strips; toast lightly if needed |
| Bowl of salted water | Prevent sticking | Mix 1 tsp salt in 1/2 cup water |
| Fillings (e.g., umeboshi, tuna mayo) | Flavor bursts | 1–2 tsp per ball; optional for plain versions |
Stock fillings like pickled plums (umeboshi), flaked salmon, or tuna mixed with mayo and soy. Vegan options include furikake seasoning or mashed avocado.
Step-by-Step Guide: Hand-Molding Onigiri
Hand-shaping yields the most authentic results, allowing control over compactness.
- Prep hands: Dip into salted water, rub between palms. Excess moisture prevents cracks; salt adds subtle seasoning.
- Scoop rice: Use 1/3–1/2 cup warm rice per ball (about 100–150g). Place in one palm.
- Form base: Cup hands and gently press rice into a loose oval, keeping it under 1-inch thick.
- Add filling (optional): Press a dimple with thumb, insert 1 tsp filling, then fold rice over to seal.
- Shape triangle: Hold rice in one hand; use the other to press corners into points. Rotate and squeeze lightly—aim for firm but not dense texture.
- Refine: Cup and turn the ball 3–4 times for even sides. It should hold without crumbling.
- Wrap: Place nori strip under the ball, with rough side up, covering one side for easy eating.
Practice yields perfect triangles in under a minute each. Yield: 8–10 from 3 cups uncooked rice.
Using Molds for Effortless, Professional Results
Molds simplify shaping, ideal for filled onigiri.
- Wet mold and hands.
- Fill bottom half with rice, press firmly.
- Add filling in center indent.
- Top with more rice to 3/4 full.
- Press lid down with gentle force until secure.
- Release onto damp cloth-covered tray.
Clean molds between uses. This method ensures consistent size and filling distribution.
Creative Filling Ideas: From Classic to Modern
Onigiri shine through diverse fillings. Start simple, then innovate.
- Traditional: Umeboshi (sour plum) for tangy contrast; salted cherry salmon (shake).
- Seafood: Tuna mayo (mix canned tuna, Japanese mayo, soy); grilled mackerel flakes.
- Vegetarian: Furikake (seaweed-sesame mix); pickled veggies or edamame.
- Meat lovers: Teriyaki chicken, spicy pork mince.
- Fusion: Cream cheese with smoked salmon; spicy kimchi.
Mix fillings into rice beforehand for even distribution, or stuff centers for surprise bites. Use 1–2 tsp to avoid overflow.
Variations to Elevate Your Onigiri Game
Yaki Onigiri: Crispy Grilled Delight
Brush formed balls with soy sauce mixed with potato starch, then grill or pan-fry until golden crust forms. The exterior caramelizes while inside stays soft—perfect with salmon filling.
Vegan and Gluten-Free Adaptations
Swap mayo for tahini in tuna alternatives; use tamari instead of soy. Furikake or shiso provides bold umami without animal products.
Mini Onigiri for Bento Boxes
Halve rice portions for bite-sized versions. Great for kids’ lunches or party platters.
Storage, Freezing, and Make-Ahead Tips
Fresh onigiri last 1 day refrigerated, wrapped individually. Avoid microwaving with nori, as it sogs—instead, steam or eat cold. For longer storage:
- Freeze uncooked balls on a tray, then bag for up to 1 month.
- Thaw overnight, microwave 30 seconds, and wrap fresh nori.
- Keep rice warm in cooker during assembly for best stickiness.
Pro tip: Damp cloth over tray prevents drying during multi-batch prep.
Common Mistakes and Troubleshooting
| Issue | Cause | Solution |
|---|---|---|
| Rice balls fall apart | Cold rice or insufficient pressing | Use warm rice; squeeze firmer next time |
| Too sticky or bland | Over-rinsed rice or no salt | Rinse minimally; always salt hands |
| Cracks on surface | Dry hands or old rice | Re-wet hands; use day-old cooked rice max |
| Fillings leak | Too much filling | Limit to 1 tsp; seal well |
Frequently Asked Questions (FAQs)
What rice is best for onigiri?
Short-grain Japanese sushi rice for optimal stickiness.
Can I make onigiri without a mold?
Yes, hand-molding is traditional and gives better control.
Are fillings necessary?
No—seasoned rice alone (e.g., with furikake) works great.
How long do onigiri keep?
One day fresh; freeze for a month.
Vegetarian onigiri ideas?
Umeboshi, veggies, or furikake.
Perfecting Flavor: Seasoning Combinations
Experiment with these mixes:
- Umami bomb: Bonito soy sauce flakes + nori.
- Spicy kick: Chili mayo tuna.
- Herbaceous: Shiso furikake + cucumber.
Always taste rice before shaping—adjust salt incrementally.
References
- Onigiri Rice Balls Recipe (Bonito Soy Sauce & Tuna Mayonnaise) — Kikkoman. Accessed 2026. https://www.kikkoman.com/en/cookbook/washoku/onigiri.html
- How to Make Onigiri (Japanese Rice Balls) | Ultimate Guide — Okonomi Kitchen. Accessed 2026. https://www.okonomikitchen.com/vegan-onigiri-japanese-rice-ball-recipe/
- Crispy Yaki Onigiri Recipe (Grilled Rice Balls) — What Great Grandma Ate. Accessed 2026. https://whatgreatgrandmaate.com/yaki-onigiri-recipe-grilled-rice-balls/
- Easy Onigiri Recipe – Japanese Rice Ball Snack — Wander Cooks. Accessed 2026. https://www.wandercooks.com/simple-onigiri-recipe/
- Onigiri (Japanese Rice Balls) (Video) — Just One Cookbook. Accessed 2026. https://www.justonecookbook.com/onigiri-rice-balls/