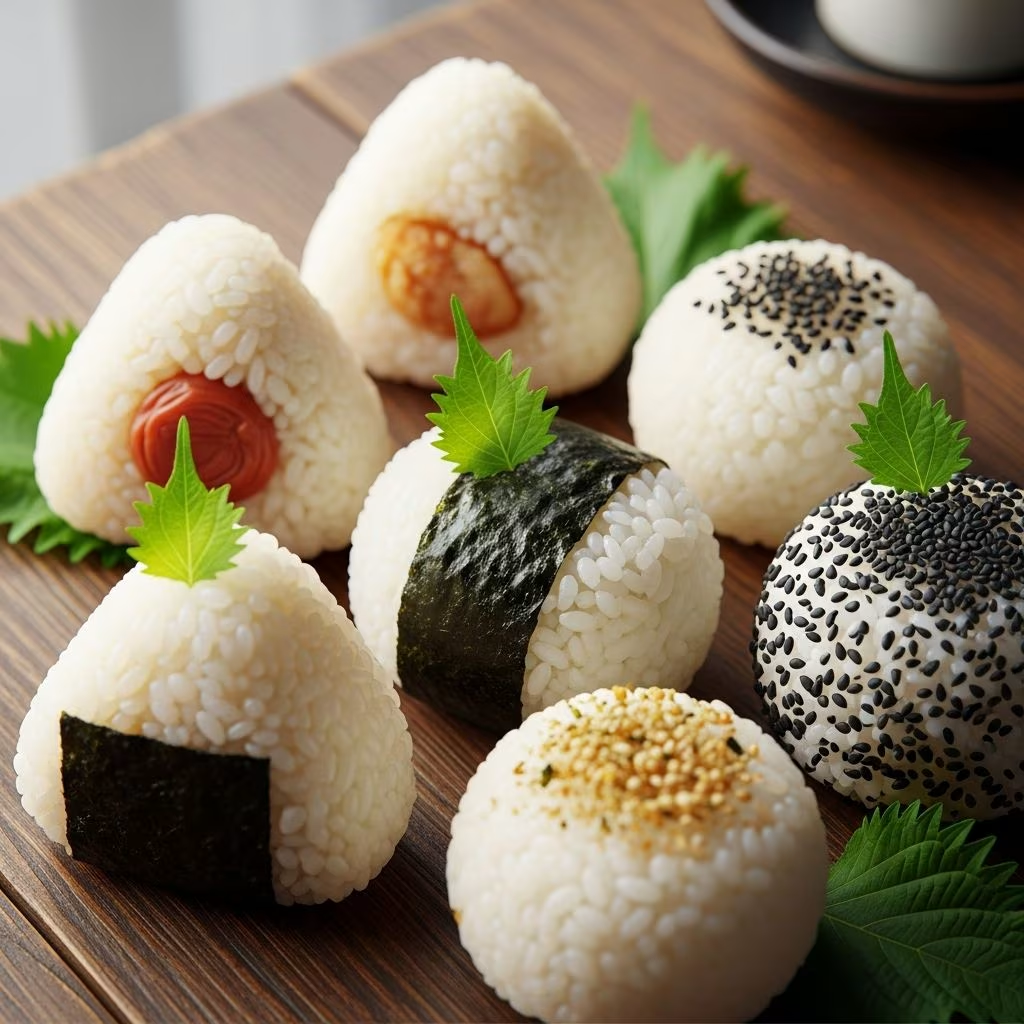
Japanese rice balls, known as onigiri, represent one of the most fundamental and cherished foods in Japanese cuisine. These portable triangular or spherical parcels of seasoned rice have been a staple of Japanese meals for centuries, appearing in everything from casual bento boxes to elegant kaiseki presentations. Whether enjoyed as a quick snack, a light lunch, or a component of a more elaborate meal, onigiri embodies simplicity, versatility, and the Japanese principle of making everyday food both nourishing and beautiful. Understanding how to craft these rice balls properly opens the door to creating authentic Japanese food at home.
Understanding the Foundation: Selecting and Preparing Rice
The success of your onigiri begins long before you shape a single grain. The rice you choose fundamentally determines the texture, cohesion, and overall quality of your finished product. Japanese short-grain rice varieties are essential for this preparation, as their higher starch content allows the grains to stick together naturally without requiring additional binders. Short-grain rice possesses a slightly sticky, glutinous quality that distinguishes it from long-grain varieties used in other Asian cuisines.
Begin by rinsing your rice thoroughly under cold running water. This removes excess surface starch and dust, yielding cleaner-tasting rice with a more refined texture. Place approximately 3 cups of rinsed rice into a rice cooker along with water up to the appropriate marking line. The water-to-rice ratio is crucial—too much water produces mushy, overly soft rice that lacks structural integrity, while insufficient water results in rice that remains hard and fails to bind properly.
Cook the rice according to your rice cooker’s instructions, which typically requires 20 to 30 minutes. Once the cooking cycle completes, resist the urge to immediately begin shaping. Allow the rice to rest inside the covered cooker for 5 to 10 minutes. This resting period allows residual heat to distribute evenly throughout the rice batch and helps develop the ideal consistency for shaping.
A critical success factor that many beginners overlook involves maintaining proper rice temperature and moisture. Work with rice that remains warm to the touch but has cooled enough to handle comfortably. The heat helps the grains remain pliable and cohesive, preventing them from drying out or becoming brittle during the shaping process.
Creating Your Work Environment
Successful onigiri preparation requires thoughtful workspace organization. Before removing rice from the cooker, establish a dedicated assembly area with all necessary materials arranged within arm’s reach. This prevents unnecessary delays that could allow your rice to cool prematurely.
Your basic setup should include:
- A small bowl filled with water for wetting your hands
- Another small bowl or dish containing salt for seasoning
- Your chosen fillings arranged in individual small containers
- Nori (seaweed) sheets, pre-cut into appropriate strips or squares
- Furikake (seasoning mixture) if desired for flavor enhancement
- A clean tray or baking sheet lined with parchment paper for holding finished rice balls
- A damp cloth or kitchen towel to keep cooked rice covered and fresh
The moisture-retaining cloth deserves particular attention. Keep this cloth draped over your rice bowl as you work, exposing only the amount of rice you need for each individual ball. This prevents the rice from oxidizing and drying out, which compromises both texture and the ease with which grains bind together. Additionally, keep a second damp cloth ready to place over your finished rice balls as they accumulate on the serving tray.
Two Fundamental Shaping Methods
The approach you choose for shaping your onigiri depends on personal preference, equipment availability, and the particular aesthetic you wish to achieve. Both methods produce equally authentic and delicious results.
The Traditional Hand-Molding Technique
Hand-shaping represents the most traditional and commonly practiced method in Japanese households. This approach requires no special equipment beyond your own hands, making it accessible to any home cook.
Begin by dampening your hands thoroughly with water, then gently rub your pointer and middle fingers through a small amount of salt. The salted fingertips will season the exterior of your rice ball while preventing rice from adhering to your skin. Scoop approximately one-third to one-half cup of warm rice into the center of your palm.
Gently cup the rice with your non-dominant hand underneath, forming a cradle, while your dominant hand positions itself on top with fingers slightly bent. Using a gentle but purposeful pressing motion, begin forming the rice into a triangular shape. Professional technique involves keeping your bottom hand slightly open to support and flatten the sides of the forming triangle, while your top hand creates the three corners characteristic of the onigiri silhouette.
For filled onigiri, create a small indentation in the center of the rice, insert your chosen filling—approximately one-half to one tablespoon—and then cover it completely with additional rice. Rotate the rice ball gradually as you shape, ensuring even pressure distribution and symmetrical corners. The goal is to achieve gentle, firm compression that holds the rice together without squeezing so intensely that you crush individual grains or create an overly dense texture.
The Mold-Pressing Method
Plastic onigiri molds have become increasingly popular and offer advantages in consistency and ease of use. These two-part devices typically consist of a base chamber and a removable lid with a push-button release mechanism.
For mold-shaped rice balls, begin by placing a small quantity of salted, seasoned rice into the mold’s bottom chamber, pressing gently to create an even layer. Create a small depression in this rice layer and insert your filling. Add additional rice until the mold chamber is approximately three-quarters full. Place the lid securely on top and press downward with moderate firmness until you feel slight resistance—an indication that the rice ball has formed properly within the mold.
Remove the lid and invert the mold over your prepared tray or plate. Press the button mechanism to release the completed rice ball. This method produces consistently sized spheres or triangles depending on your mold’s design, making it particularly useful when preparing multiple rice balls for events or meal preparation.
Exploring Flavor Profiles and Filling Options
While plain salted rice balls hold their own appeal, incorporating fillings transforms onigiri into more complex and satisfying creations. The traditional Japanese approach to fillings emphasizes preservation methods that enhance flavor through fermentation or concentrated seasoning.
Classic and Contemporary Fillings
Umeboshi, a pickled plum that has been a cornerstone of Japanese cuisine for generations, represents perhaps the most traditional onigiri filling. These intensely salty, sour plums provide a bold flavor contrast to mild rice. A single whole umeboshi or half of a larger specimen suffices as a filling.
Tuna mixed with mayonnaise offers a creamier, more modern filling that appeals to contemporary palates. Combine tinned tuna drained of brine with mayonnaise, adding miso paste and sesame seeds for authentic Japanese flavor depth. This combination provides moisture and richness that complements the rice’s subtle sweetness.
Seasoned salmon constitutes another beloved filling, particularly when preparing grilled onigiri. The fish’s natural oils and distinct flavor create memorable taste combinations when enclosed within warm rice.
Bonito with soy sauce represents a traditional preparation that layers umami flavors. This approach involves mixing dried bonito flakes with soy sauce to create a concentrated, savory filling that requires only a small portion per rice ball.
Beyond these established options, creative cooks might explore furikake seasoning mixtures sprinkled throughout the rice rather than confined to a central filling, or combine pickled vegetables with seasoned rice for vegetarian preparations.
Finishing Touches: Nori Wrapping and Presentation
Wrapping your completed rice ball with nori adds both visual appeal and textural contrast. The roasted seaweed provides a crispy, umami-rich exterior that complements the soft rice interior.
Pre-cut nori strips sized for onigiri wrapping are readily available, or you can cut larger nori sheets into appropriate dimensions. Position the nori strip with its shiny (non-rough) side facing outward, placing the rice ball approximately one-third of the way up the strip. Fold the bottom portion of the nori upward around the rice ball’s lower half, creating a clean band that exposes the top portion of rice. This presentation reveals the rice ball’s shape while securing the nori in place.
Some preparations skip nori wrapping entirely, instead applying furikake directly to the rice ball’s exterior for color and flavor. Others garnish the top with a small pinch of sesame seeds or arrange nori strips in decorative patterns.
Professional Tips for Optimal Results
Achieving restaurant-quality onigiri requires attention to several technical details that separate adequate rice balls from exceptional ones.
- Temperature management: Work exclusively with rice that remains warm to hot rather than allowing it to cool completely. Warm rice maintains the adhesive properties necessary for proper shaping.
- Moisture control: Keep all rice covered with a damp cloth between portions to prevent surface drying. This single practice transforms results more dramatically than any other adjustment.
- Gentle pressure: Resist the temptation to compress your rice balls tightly. The ideal onigiri possesses a slightly airy interior that remains cohesive without becoming dense or gummy.
- Salt distribution: Apply salt to your fingertips rather than directly to rice grains, ensuring even seasoning distribution without creating concentrated salt pockets.
- Fresh ingredients: Use newly cooked rice exclusively. Refrigerated or day-old rice has lost the starch qualities necessary for proper binding and produces substandard results.
- Appropriate rice quantity: Using too much rice creates unwieldy, difficult-to-shape portions, while insufficient rice yields fragile balls that disintegrate during handling.
Grilled Variations and Advanced Preparations
Beyond the standard preparations, grilled onigiri—known as yaki onigiri—offers intriguing variations. These rice balls receive a thin coating of soy sauce on their exterior before pan-frying or grilling, creating a caramelized crust that provides textural complexity and deepened flavor.
To prepare grilled onigiri, shape your rice balls slightly flatter than traditional triangles, creating a disc or puck-like form that maximizes surface area for browning. Brush or dab soy sauce onto both sides and cook in a hot skillet with minimal oil until a golden-brown crust forms on each side. The result combines crispy exterior elements with the soft rice interior, offering textural contrast appealing to many palates.
Frequently Asked Questions
What type of rice works best for onigiri preparation?
Short-grain Japanese rice varieties possess the optimal starch content and texture for onigiri creation. Medium-grain rice may work in limited circumstances, but long-grain varieties lack sufficient starch for proper binding.
Can I prepare onigiri using leftover or refrigerated rice?
While technically possible, using old or cold rice significantly compromises results. Cold rice has lost its adhesive properties, requiring substantial pressure that can crush grains and produce overly dense rice balls. Fresh, warm rice yields superior texture and easier handling.
How long do finished onigiri remain fresh?
Room-temperature onigiri maintain acceptable quality for 2 to 4 hours when properly covered with a damp cloth. Refrigeration extends shelf life but alters texture. Consuming within a few hours of preparation yields optimal results.
Are onigiri molds worth purchasing?
Molds produce consistent shapes and reduce hand fatigue, proving particularly valuable when preparing large quantities. However, skilled hand-shaping achieves equally authentic results without special equipment.
What filling quantities should I use?
Approximately one-half to one tablespoon of filling per rice ball maintains proper proportions. Excessive filling makes shaping difficult and can compromise structural integrity.
Should nori wrapping be applied before or after rice balls cool?
Nori wraps best when applied to still-warm or room-temperature rice balls. The warmth helps the nori adhere slightly without requiring additional adhesives.
Conclusion: Bringing Japanese Culinary Tradition to Your Table
Mastering onigiri preparation connects you to centuries of Japanese culinary tradition while providing practical skills for creating nutritious, portable meals. The techniques discussed here—from rice selection through final presentation—represent the accumulated knowledge of generations of Japanese home cooks. With practice and attention to the foundational principles of proper rice preparation, moisture management, and gentle shaping, you will develop the confidence to create authentic, delicious rice balls rivaling those found in Japanese restaurants and convenience stores. Whether you shape them by hand following traditional methods or employ modern molds for consistency, your homemade onigiri will reward your efforts with delicious results that transform simple rice into something genuinely special.
References
- Onigiri (Japanese Rice Balls) Recipes and Preparation Guide — Just One Cookbook. 2024. https://www.justonecookbook.com/onigiri-rice-balls/
- How to Make Onigiri (Japanese Rice Balls) | Ultimate Guide — Okonomikitchen. 2024. https://www.okonomikitchen.com/vegan-onigiri-japanese-rice-ball-recipe/
- Easy Onigiri Recipe – Japanese Rice Ball Snack — Wandercooks. 2024. https://www.wandercooks.com/simple-onigiri-recipe/
- Onigiri Rice Balls Recipe (Bonito Soy Sauce & Tuna Mayonnaise) — Kikkoman. 2024. https://www.kikkoman.com/en/cookbook/washoku/onigiri.html
- Crispy Yaki Onigiri Recipe (Grilled Rice Balls) — What Great Grandma Ate. 2024. https://whatgreatgrandmaate.com/yaki-onigiri-recipe-grilled-rice-balls/