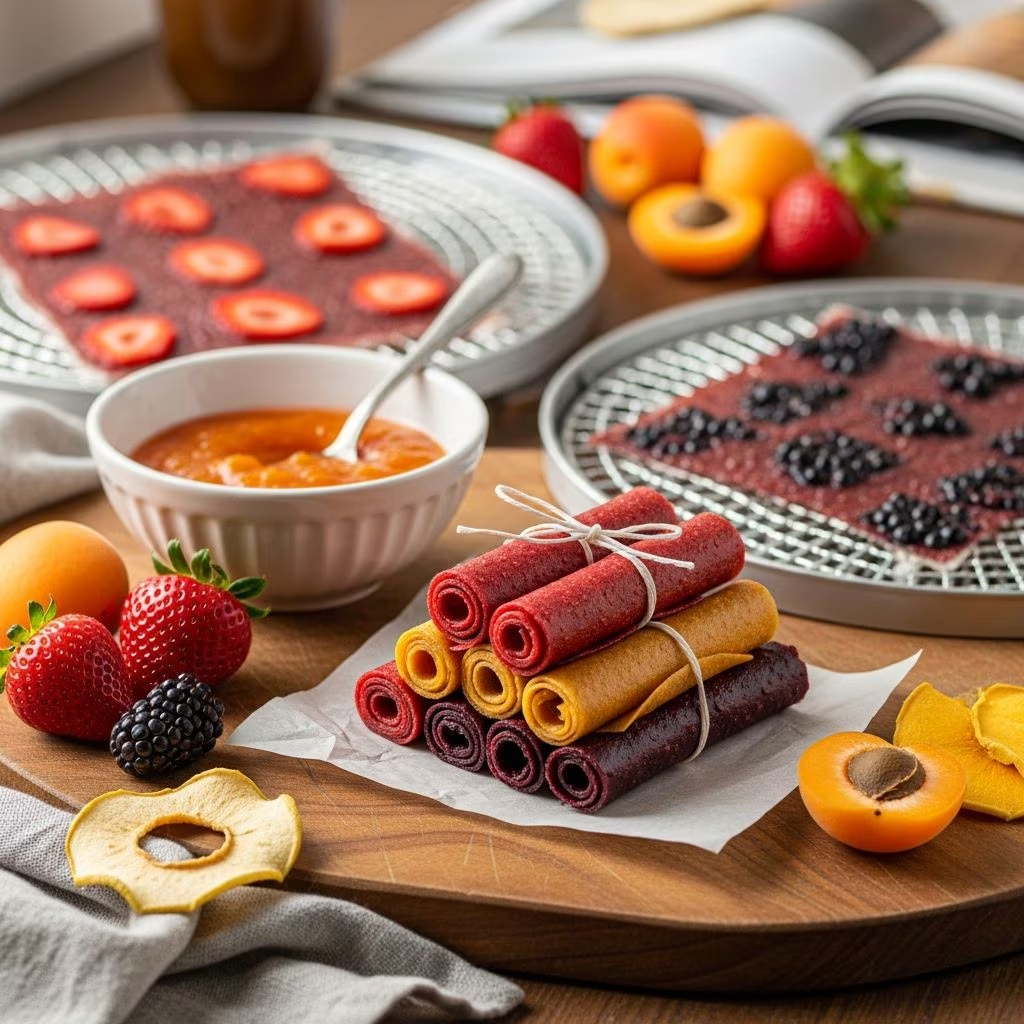
Fruit leather offers a chewy, flavorful snack made entirely from pureed fruits dehydrated into flexible sheets. This guide explores everything from selecting fruits to perfecting drying techniques, ensuring you can produce batches that rival commercial products while controlling ingredients for better health.
Why Choose Homemade Fruit Leather?
Store-bought versions often contain added sugars, preservatives, and artificial colors, but homemade fruit leather uses real fruit as the base. It’s naturally rich in vitamins, fiber, and antioxidants, making it an ideal on-the-go snack for children, hikers, or anyone craving something sweet without guilt.
The process encourages creativity: mix fruits for unique flavors or keep it single-fruit for purity. With minimal equipment like a blender and oven, it’s accessible and cost-effective, yielding multiple servings from seasonal produce.
Selecting the Best Fruits
Opt for ripe or slightly overripe fruits to maximize natural sweetness and flavor intensity. Berries like strawberries, raspberries, and blueberries work exceptionally well due to their high water content and vibrant taste. Stone fruits such as peaches, mangoes, and apricots provide tropical notes, while apples and pears offer milder, versatile bases.
- Berries: Strawberries and raspberries blend smoothly; sieve seeds for silkier texture.
- Tropical: Mango and pineapple add exotic flair; balance acidity with a touch of sweetener.
- Apples/Pears: Cook lightly first for easier pureeing and concentrated flavor.
- Tip: Use 2 cups of fruit chunks to yield one standard 13×15-inch sheet.
Frozen or canned fruits are viable alternatives; thaw or drain excess liquid to achieve pourable consistency. Avoid overly watery fruits unless reducing on the stovetop.
Essential Ingredients and Preparation
The beauty lies in simplicity: fruit puree forms the core, with optional enhancers for taste and preservation.
| Ingredient | Amount (for 13×15″ sheet) | Purpose |
|---|---|---|
| Fresh Fruit (diced) | 2-4 cups | Main body and flavor |
| Lemon Juice or Ascorbic Acid | 2 tsp or 1/8 tsp per 2 cups | Prevents browning, brightens color |
| Honey, Sugar, or Agave | 1-2 tbsp (optional) | Enhances sweetness if fruit is tart |
Start by washing fruits thoroughly, removing peels, pits, cores, and stems. Chop into chunks for blending. For light-colored fruits like apples or pears, add lemon juice immediately after pureeing to halt oxidation.
Step-by-Step Pureeing Process
- Wash and Prep: Rinse under cool water; pat dry. Cut away blemishes.
- Blend Smooth: Use a high-speed blender or food processor. Add minimal water or juice if needed for blending. Aim for a thick, pourable puree—no large chunks.
- Strain (Optional): For seedless leather, pass through a fine sieve, especially with berries.
- Taste and Adjust: Sweeten sparingly; blend again to incorporate.
This yields about 2 cups of puree per sheet, ensuring even drying.
Oven-Drying Method: Accessible and Reliable
No dehydrator? Your oven suffices at low temperatures (170-225°F). This method suits beginners and takes 3-6 hours.
- Preheat: Set to lowest setting (ideally 170-200°F). Position rack in center.
- Prepare Pan: Line a rimmed baking sheet (11×17″ ideal) with parchment or silicone mat. Avoid wax paper, as it burns.
- Spread Evenly: Pour puree; use an offset spatula for a thin layer (1/8-inch thick). Focus on uniform middle, as it dries slowest.
- Dry: Bake until no longer tacky, edges lift slightly. Test center; cool fully before peeling.
- Optional Boost: Simmer puree 5-10 minutes stovetop to evaporate water, halving bake time.
Results in pliable sheets ready for cutting after 4+ hours cooling.
Dehydrator Technique for Precision
Dehydrators excel for consistent results, operating at 135-140°F for 6-12 hours.
- Line trays with parchment or fruit leather sheets.
- Spread puree thinly.
- Dehydrate until leathery, no wet spots. Rotate trays midway for evenness.
Ideal for large batches; yields professional texture without oven monitoring.
Flavor Variations to Try
Experiment beyond basics for exciting twists:
- Mixed Berry Blast: Strawberries, blueberries, raspberries with honey.
- Tropical Paradise: Mango, pineapple, coconut extract.
- Apple Cinnamon: Pureed apples, dash of cinnamon, no sugar needed.
- Peach Ginger: Peaches with fresh grated ginger for zing.
- Green Power: Kiwi, spinach puree (masked by sweeter fruits).
Layer flavors by spreading purees sequentially, drying partially between.
Finishing, Cutting, and Storing
Once dried and cooled (overnight best), peel from liner. If sticky, dry longer.
- Cut: Use pizza cutter or scissors into strips (1-2″ wide).
- Roll: With parchment for no-stick rolls; secure with twist ties.
Store in airtight containers at room temp (up to 1 week), fridge (1 month), or freezer (up to 1 year). Rehydrate slightly if too brittle.
Troubleshooting Common Issues
| Problem | Cause | Solution |
|---|---|---|
| Sticky Center | Too thick or under-dried | Spread thinner; extend drying 1-2 hours | Brown Spots | Oxidation | Add more lemon juice; cover while pureeing | Brittle Leather | Over-dried | Reduce time; store with slight moisture | Uneven Drying | Thick edges | Use ruler for 1/8″ uniformity |
Nutrition and Health Benefits
A 1-oz serving delivers fiber for digestion, vitamins A and C for immunity, and natural sugars for energy—far superior to processed snacks. Low-calorie (50-80 kcal) and customizable for low-sugar diets.
Per National Center guidelines, home drying preserves nutrients better than canning.
Scaling Up for Gifts or Bulk
Double recipes for multiple sheets. Use ex果 dehydrator for 10+ trays. Package rolls in cellophane bags with ribbons for homemade gifts—shelf-stable and personal.
Frequently Asked Questions
Can I make fruit leather without sugar?
Yes, ripe fruits provide ample sweetness; omit sweeteners entirely.
Is a dehydrator necessary?
No, ovens work well at low heat.
How long does it last?
1 week pantry, 1 month fridge, 1 year frozen.
Can I use canned fruit?
Yes, drain well and add lemon juice.
Why add lemon juice?
Prevents darkening and enhances flavor.
References
- Homemade Strawberry Fruit Leather — MOMables. Accessed 2026. https://www.momables.com/how-to-make-fruit-leather/
- Fruit Leather (Easy Recipe) — Wholesome Yum. Accessed 2026. https://www.wholesomeyum.com/fruit-leather/
- Fruit Leathers — National Center for Home Food Preservation, University of Georgia Extension (.edu). Accessed 2026. https://nchfp.uga.edu/how/dry/recipes/fruit-leathers/
- How to Make Fruit Leather — Brod & Taylor. Accessed 2026. https://brodandtaylor.com/blogs/recipes/fruit-leather
- Homemade Fruit Leather Recipe (3 Ingredients, No Dehydrator) — YouTube (Bigger Bolder Baking). Accessed 2026. https://www.youtube.com/watch?v=LTwpYyRG0R8