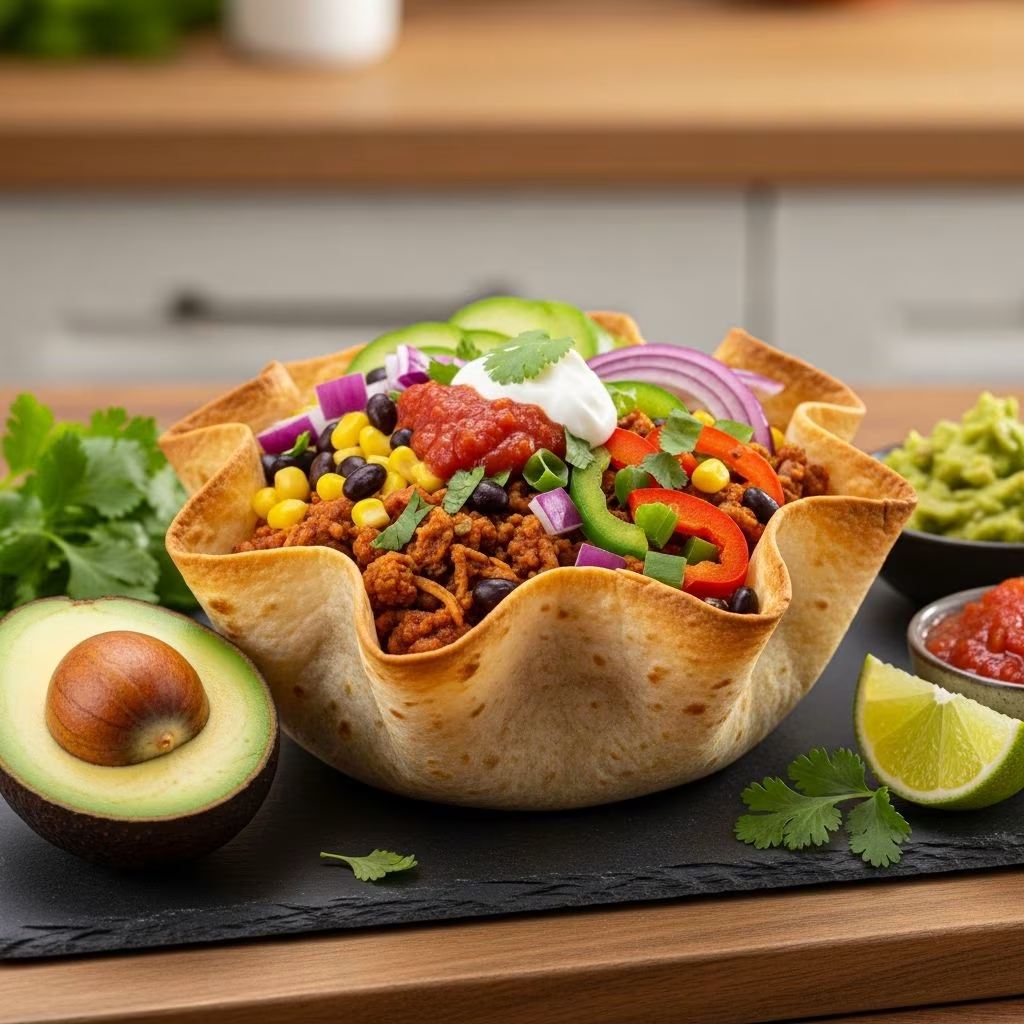
Creating edible serving vessels from tortillas represents an innovative approach to presenting burrito fillings and salad toppings. Rather than relying on traditional deep-frying methods that add unnecessary oil and calories, oven-baking offers a healthier alternative that delivers equally impressive crispness and presentation value. This technique transforms simple flour tortillas into dramatic golden bowls that serve as both container and complement to your favorite fillings.
Understanding the Fundamentals of Crispy Tortilla Vessels
The foundation of creating successful tortilla bowls involves understanding how flour tortillas respond to heat when shaped and baked. When a tortilla is exposed to dry oven heat while molded into a bowl shape, the moisture evaporates from the flour, creating a rigid structure that becomes brittle and golden brown. This transformation occurs through the Maillard reaction, where proteins and sugars in the tortilla develop complex flavors and brown coloration. The key to achieving uniform crispness lies in maintaining consistent oven temperature and monitoring bake time carefully.
Unlike fried tortilla bowls that absorb cooking oil, baked versions allow the natural tortilla flavors to shine while providing a lighter final dish. The baking process also offers better control over the final texture, enabling you to achieve varying levels of crispness depending on your preferences and serving style.
Essential Equipment and Preparation Methods
Success with homemade tortilla bowls begins with selecting the right equipment and preparation techniques. Several methods exist for shaping tortillas during baking, each offering distinct advantages depending on your kitchen setup and available resources.
Method One: Using Dedicated Tortilla Basket Molds
Specialized tortilla basket molds represent the most straightforward approach for beginners. These heat-safe forms hold the tortilla in place throughout the baking process, requiring minimal monitoring. When using this method, select flour tortillas measuring approximately 8 inches in diameter to fit properly within the molds. Coat both the interior of the mold and the tortilla itself with cooking spray to prevent sticking and ensure even browning. Position the mold on a baking sheet and place in a preheated 400-degree Fahrenheit oven for approximately 10 to 12 minutes until the tortilla transitions from pale yellow to golden brown.
Method Two: The Inverted Cookware Technique
For those without specialized equipment, an inverted oven-safe saucepan or heat-resistant bowl provides an effective alternative. This versatile method requires minimal additional equipment while producing equally impressive results. Begin by inverting your chosen cookware on a baking sheet, then carefully wrap aluminum foil around and beneath it to create a smooth, heat-conducting surface. Place a 12-inch flour tortilla atop the foil-wrapped pan, then use your palms to gently press the tortilla downward and around the curved surface. Create deliberate pleats and folds where the tortilla meets the pan to ensure it conforms naturally to the shape.
Brush the tortilla generously with vegetable oil or cooking spray to promote even browning and prevent dry spots. Bake for 10 to 12 minutes at 400 degrees Fahrenheit until golden brown and crispy throughout. The larger 12-inch tortilla provides sufficient material to drape completely around the inverted pan, creating defined bowl walls with adequate depth for generous fillings.
Method Three: The Ramekin or Glass Jar Approach
Smaller oven-safe vessels including ramekins, small bowls, or even inverted heat-resistant glass jars work effectively for individual-sized tortilla bowls. This approach suits recipes calling for 8-inch tortillas and creates more intimate presentation options. Lightly brush the exterior of your chosen vessel with oil before placing the tortilla atop it, then gently press the tortilla downward to conform to the shape. Some cooks prefer baking at a slightly lower temperature of 350 to 375 degrees Fahrenheit with slightly extended bake times ranging from 12 to 18 minutes. The specific timing depends on tortilla thickness, moisture content, and your oven’s characteristics.
Temperature Guidelines and Baking Parameters
Achieving consistent results requires understanding how oven temperature influences the final outcome. Most recipes recommend baking tortilla bowls at either 350, 375, or 400 degrees Fahrenheit, with variations primarily reflecting the size of the tortilla and the depth of the intended vessel.
| Baking Temperature | Recommended Tortilla Size | Approximate Bake Time | Best For |
|---|---|---|---|
| 350°F (175°C) | 8 inches | 12-15 minutes | Smaller portions, delicate tortillas |
| 375°F (190°C) | 8-10 inches | 15-18 minutes | Standard home recipes |
| 400°F (200°C) | 8-12 inches | 10-12 minutes | Rapid baking, thicker tortillas |
Monitor your tortilla bowls during the final few minutes of baking, as the transition from pale to golden brown can occur rapidly. Watch for the edges to develop deeper brown coloration and the surface to appear dull rather than glossy, indicating adequate moisture removal. Allow the molded tortilla to rest within its shaping vessel for 5 to 10 minutes after removing from the oven before attempting removal, as this cooling period permits the structure to set and become less fragile.
Ingredient Considerations and Oil Application
While tortillas contain some natural fat content, applying additional oil or cooking spray proves essential for developing crispness and achieving attractive browning. Vegetable oil, canola oil, or cooking spray all work effectively, with choice primarily reflecting personal preference and dietary considerations. Apply oil generously but evenly across the entire tortilla surface to ensure uniform browning and prevent thin spots that might remain soft rather than crispy.
For enhanced flavor, some cooks brush tortillas with seasoned butter or sprinkle them with Tex-Mex seasonings before baking. This addition introduces complementary flavors that elevate the overall dish, though such embellishments remain entirely optional depending on intended fillings and presentation preferences.
Advance Preparation and Storage Solutions
One significant advantage of baked tortilla bowls involves the ability to prepare them ahead of serving time. Once completely cooled to room temperature, tortilla bowls can be carefully stored in airtight containers for up to three days. Store them in a single layer when possible to prevent cracking or crushing, with parchment paper separating bowls if stacking becomes necessary. This advance preparation capability makes tortilla bowls particularly valuable for entertaining, allowing you to complete the time-intensive shaping and baking steps well before guests arrive.
Building Flavorful Fillings for Your Tortilla Presentations
The crispy tortilla vessel serves as a foundation for countless filling combinations, each offering different culinary experiences and nutritional profiles. The hearty nature of the baked tortilla bowl permits generous layering of proteins, vegetables, and accompaniments without structural failure.
Creating Savory Bean Foundations
Refried beans provide an excellent base layer for tortilla bowl burritos, offering both substance and traditional flavor. Homemade refried beans begin with cooked dried beans or canned beans that are mashed with broth, seasonings, and aromatics until achieving creamy consistency. This approach differs from traditional frying methods, resulting in lighter preparations. Layer the warm bean mixture as the first component inside your tortilla bowl, creating a flavorful base that prevents the vessel from becoming soggy while adding nutritional value.
Protein Options and Preparation Methods
Ground beef seasoned with chili powder, cumin, and garlic represents a classic filling that pairs beautifully with tortilla bowls. Brown the meat thoroughly, then add tomato paste and black beans to create a cohesive, flavorful component. Alternatively, shredded chicken, turkey, or even plant-based proteins offer equally satisfying options. The key involves ensuring your protein maintains moisture and flavor without creating excess liquid that would compromise tortilla integrity.
Fresh Vegetable Toppings and Garnishes
Crisp lettuce, diced tomatoes, shredded cheese, diced onions, and fresh cilantro add textural contrast and nutritional value to tortilla bowl presentations. Layer vegetables strategically, positioning softer components near the bowl’s center and firmer items toward the rim to maintain textural variety throughout consumption. Consider incorporating roasted vegetables or sautéed peppers for added depth and complexity.
Complementary Sauces and Flavor Enhancers
Creamy sauces including sour cream-based preparations, yogurt-based dressings, or specialty chipotle crema add moisture and flavor sophistication to tortilla bowl burritos. A simple chipotle crema combines sour cream with minced chipotle peppers in adobo sauce, creating a smoky, slightly spicy accompaniment that enhances both the tortilla and fillings. Apply such sauces strategically, drizzling over completed assemblies rather than layering them throughout, to maintain tortilla crispness for as long as possible during consumption.
Frequently Asked Questions About Tortilla Bowl Preparation
What thickness of tortilla works best for bowl shaping?
Standard flour tortillas designed for burritos or general use work optimally. Avoid extra-thin tortillas intended for wraps, as they may tear during shaping, or overly thick artisanal varieties that resist molding. Most recipes specify 8 to 12-inch diameter tortillas, which provide adequate surface area while remaining manageable during manipulation.
Can whole wheat tortillas substitute for all-purpose flour varieties?
Whole wheat tortillas can work but often require slightly reduced baking times since they contain higher fiber content and may brown more quickly. Start checking at the minimum recommended time and adjust accordingly. Some whole wheat tortillas contain higher moisture content, potentially extending bake times slightly.
Why does my tortilla bowl remain soft rather than becoming crispy?
Insufficient baking time represents the most common culprit. Ensure you’re baking long enough for complete moisture evaporation, monitoring the final minutes carefully. Applying inadequate oil or cooking spray can also result in partial crisping. Additionally, opening the oven door frequently during baking allows heat to escape, extending the process unnecessarily.
How can I prevent my tortilla from tearing while shaping?
Warming tortillas slightly before shaping increases their flexibility, reducing tear risk. Additionally, handling them gently and creating gradual, gentle folds rather than sharp creases prevents stress fractures. If a small tear develops, it typically won’t compromise the final result as the tortilla will crisp and harden regardless.
Can tortilla bowls be made with corn tortillas instead of flour?
While technically possible, corn tortillas present challenges due to their increased brittleness and reduced flexibility compared to flour varieties. They break more easily during shaping and may develop uneven crispness patterns. Flour tortillas remain the preferred choice for this application.
Serving Suggestions and Presentation Tips
Present your completed tortilla bowl burritos immediately after assembly for optimal texture and appearance. The contrast between the warm filling and cool, crispy tortilla vessel creates an engaging eating experience. Serve on colorful plates or platters to highlight the golden tortilla bowls, and consider adding fresh garnishes like cilantro sprigs or lime wedges for visual appeal and flavor options.
For entertaining purposes, assemble tortilla bowls immediately before serving to maximize crispness preservation. If advance assembly becomes necessary, store warm fillings separately and combine components just before presentation. This approach maintains textural distinction and prevents the tortilla from absorbing moisture and softening.
Conclusion: Mastering the Art of Homemade Tortilla Vessels
Creating crispy tortilla bowl burritos at home represents an accessible culinary technique that elevates everyday ingredients into restaurant-quality presentations. By understanding the fundamental principles of tortilla shaping and baking, experimenting with available equipment, and customizing fillings to your preferences, you can master this impressive skill. Whether preparing casual family dinners or impressing dinner guests, homemade tortilla bowls offer a satisfying, healthier alternative to deep-fried versions while delivering genuine visual drama and textural satisfaction.
References
- Crispy Burrito Baskets — ChefAlli.com. 2024. https://chefalli.com/crispy-burrito-baskets/
- Crispy Basket Burritos – For Once, Oven-Baked is Better Than Fried — Food Wishes. 2017. https://foodwishes.blogspot.com/2017/09/crispy-basket-burritos-for-once-oven.html
- Loaded Beef Burrito Bowls with Crispy Tortilla Shells — Dished by Kate. 2024. https://dishedbykate.com/loaded-beef-burrito-bowls/
- Homemade Baked Tortilla Bowls for Taco Salad — Mind Over Munch. 2024. https://mindovermunch.com/recipes/homemade-baked-tortilla-bowls/
- Homemade Tortilla Bowls — Weekend at the Cottage. 2024. https://weekendatthecottage.com/homemade-tortilla-bowls/
- Homemade Baked Taco Salad Shells — Sustainable Cooks. 2024. https://www.sustainablecooks.com/baked-tortilla-bowls/