Creating ciabatta bread at home represents an accessible entry point into artisan baking. This Italian staple has earned its place in kitchens worldwide due to its remarkable combination of textural qualities and straightforward ingredient list. Unlike many traditional breads that require specialized equipment or extensive technical knowledge, ciabatta welcomes both novice and experienced bakers with its forgiving nature and rewarding results.
Understanding Ciabatta: Origins and Characteristics
Ciabatta emerged from northern Italy as a response to the popularity of French baguettes. Bakers sought to create a distinctly Italian alternative that showcased regional flour and techniques. The name itself derives from the Italian word meaning “slipper,” a reference to the bread’s characteristic flat, elongated shape. This rustic loaf distinguishes itself through several defining features that make it instantly recognizable and highly desirable for numerous culinary applications.
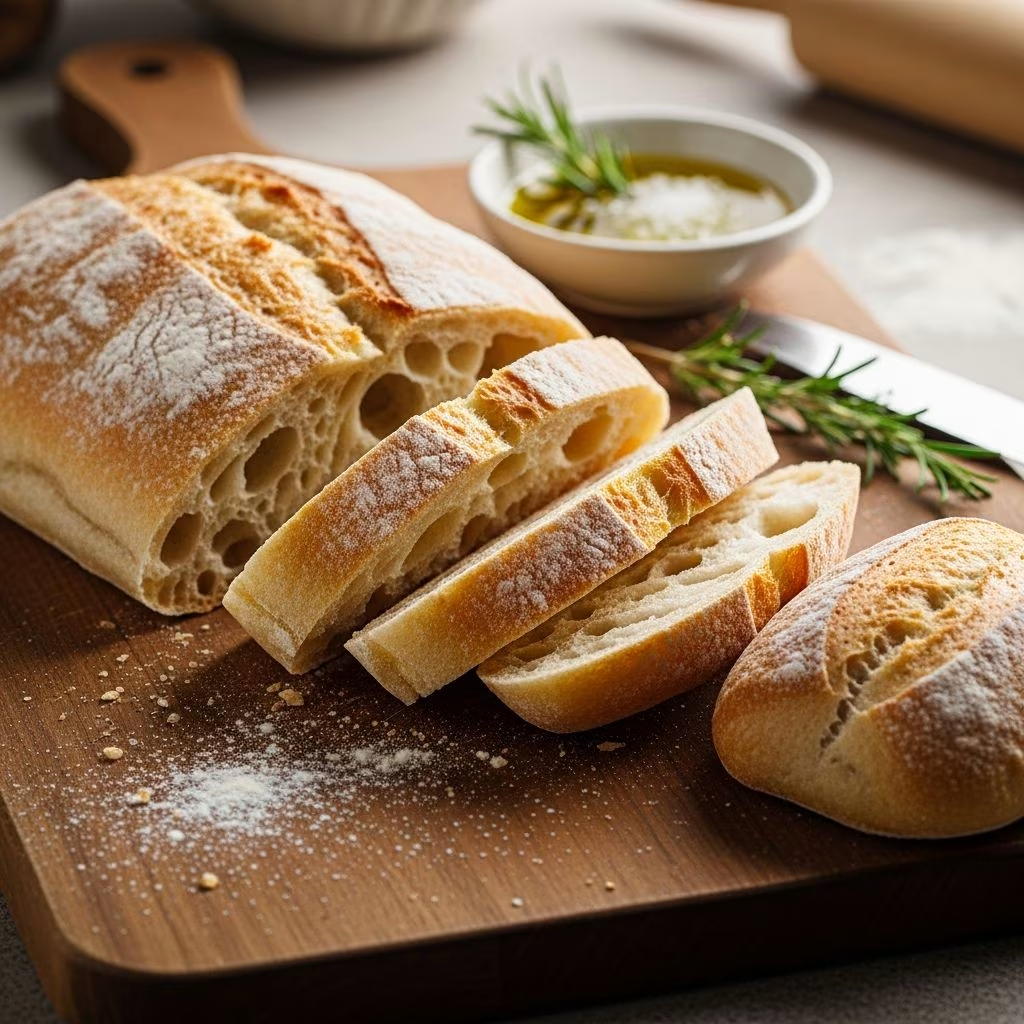
The hallmark of authentic ciabatta lies in its contrasting textures. The exterior presents a thin, crackling crust with a rich golden-brown hue that shatters satisfyingly when bitten. Beneath this crispy exterior, the interior reveals an airy, open crumb structure marked by irregular air pockets of varying sizes. This porous quality, achieved through high-hydration dough and extended fermentation, creates an exceptionally light bread that absorbs flavors beautifully while maintaining structural integrity.
Essential Ingredients for Quality Ciabatta
The beauty of ciabatta baking lies in its minimalist ingredient philosophy. Traditional recipes call for merely four foundational components, though minor variations exist among different bakers and regional interpretations.
- Bread flour: The protein content in bread flour (typically 12-14%) develops gluten networks essential for creating the characteristic open crumb structure. All-purpose flour works as a substitute, though bread flour delivers superior results.
- Water: Ciabatta requires substantial water content, typically comprising 75-85% of the flour weight. This high hydration level produces the signature porous interior and contributes to the bread’s moisture retention.
- Yeast: Active dry yeast or instant yeast both perform effectively. The quantity remains minimal, usually between 1/8 teaspoon for preferments and up to 2 teaspoons for direct methods.
- Salt: Fine sea salt or standard table salt strengthens gluten development and regulates fermentation pace. Typical quantities range from 1/2 to 1 tablespoon per loaf batch.
Some bakers incorporate optional additions such as olive oil, sugar, or milk to enhance flavor complexity and crust characteristics. These modifications represent personal preference rather than requirement.
Fermentation Methods: Choosing Your Path
Successful ciabatta baking depends primarily on fermentation strategy rather than intensive kneading. Two primary approaches yield excellent results, each offering distinct advantages.
The Two-Day Preferment Method
This traditional approach involves creating a biga, a stiff preferment made from flour, minimal yeast, and water that rests for 8-24 hours. This extended fermentation develops flavor complexity and improves dough extensibility. On day two, bakers combine the ripe biga with additional flour, water, yeast, and salt to create the final dough. This method requires planning ahead but delivers exceptional flavor depth and bread personality.
The Direct Method with Extended Bulk Fermentation
Direct methods combine all ingredients simultaneously, eliminating the preferment step. Instead, bakers achieve complexity through extended bulk fermentation at room temperature lasting 12-18 hours. This approach suits those who prefer simplicity and straightforward timing. The long fermentation compensates for the absence of a preferment, developing adequate flavor and achieving proper dough maturation.
Step-by-Step Dough Development Process
Initial Mix and Rest
Begin by combining flour, yeast, salt, and water in a mixing bowl. Mix until all dry ingredients become fully hydrated, approximately 1-2 minutes. The dough will appear shaggy and rough initially. Cover the bowl with plastic wrap and allow a 20-30 minute autolyse period, during which flour continues absorbing water and gluten begins developing naturally without additional mixing.
Building Strength Through Stretch and Fold Technique
After the rest period, perform a series of stretch and fold movements. Wet your hand, grab one side of the dough, stretch it toward the center, and fold it over. Rotate the bowl and repeat this action three times, working around the bowl systematically. This technique, performed every 20-30 minutes for the first hour, develops gluten strength without traditional kneading. Typically, three to four sets of stretches and folds create adequate structure.
Bulk Fermentation and Proofing
After completing stretch and fold repetitions, cover the bowl and allow the dough to ferment at room temperature for 12-18 hours. The dough should approximately double in volume and exhibit visible bubbles indicating active fermentation. Cooler room temperatures require longer fermentation times, while warmer environments accelerate the process. Properly fermented dough appears puffy, shows surface bubbles, and feels airy when gently pressed.
Shaping and Final Preparation
Once bulk fermentation reaches completion, gently transfer the dough to a heavily floured work surface. Avoid aggressive handling that would deflate the carefully developed air structure. Using minimal movement, shape the dough into a rectangular form approximately 8 by 10 inches. Pat gently rather than press forcefully, maintaining as many air pockets as possible.
Using a bench scraper or sharp knife, divide the rectangle lengthwise into two equal pieces. For ciabatta rolls, cut each rectangle into four portions, creating eight rolls. Space shaped pieces on parchment-lined baking sheets with adequate separation to prevent merging during final proof.
Cover shaped pieces with a clean towel or proofing cover for 30-60 minutes. The final proof duration depends on room temperature and dough vitality. Properly proofed ciabatta shows gentle puffiness and springs back slowly when poked.
Baking Techniques for Optimal Crust and Crumb
Oven Preparation and Temperature
Preheat your oven to 450-500°F (230-260°C), placing a baking steel or stone inside if available. A preheated steel significantly enhances crust development through direct heat contact. Allow at least 45 minutes for proper preheating, ensuring the steel reaches full temperature.
Steam Generation for Crust Development
Steam plays a crucial role in ciabatta baking. During the initial bake phase, moisture in the oven environment gelatinizes surface starches, creating conditions for crust expansion and browning. Create steam by placing a shallow pan containing boiling water on the oven floor or lowest rack. Alternatively, spray the oven walls with water before loading the bread. This steam input should occur only during the first 15-20 minutes of baking.
Baking Process and Doneness Assessment
Transfer parchment-lined ciabatta to the preheated steel using a pizza peel. Bake for 20-25 minutes total. During the first 15-20 minutes, maintain steam in the oven. Remove steam pans, vent the oven, and reduce temperature to 425°F (220°C) for the final 5-10 minutes if additional browning is desired. The finished bread should display a deep golden-brown crust and emit a hollow sound when tapped on the bottom.
Comparing Ciabatta Variations
| Variation Type | Crust Characteristics | Hydration Level | Best Applications |
|---|---|---|---|
| Traditional High-Hydration | Thin, crispy, shattering | 75-85% | Sandwiches, dipping bread |
| Soft, Pan-Baked Style | Thick, oily, herb-topped | 60-70% | Appetizers, side bread |
| Roll Format | Medium crisp, golden | 70-80% | Individual servings, panini |
Troubleshooting Common Baking Challenges
Dense Crumb Structure
Dense ciabatta typically results from insufficient bulk fermentation, inadequate gluten development through stretch and folds, or dough that didn’t reach full maturity before baking. Extend fermentation times gradually and ensure dough exhibits visible bubbles before shaping. Perform additional stretch and fold repetitions during the first hour of bulk fermentation.
Flat, Spread-Out Loaves
Over-fermented dough loses structure and spreads excessively during baking. Monitor fermentation carefully, reducing timing if your kitchen runs warm. Additionally, ensure adequate strength development through proper stretch and fold execution. Use parchment paper to support the dough during final proof if spreading occurs prematurely.
Pale or Burnt Crust
Pale crust indicates insufficient oven temperature, inadequate steam, or shortened baking time. Ensure thorough oven preheating and maintain steam throughout the first baking phase. Burnt crust suggests excessively high temperature; reduce by 25°F and extend baking time slightly. Remove steam pans earlier if browning proceeds too aggressively.
Storage and Serving Recommendations
Fresh ciabatta reaches peak quality within hours of baking. Cool completely before storing to prevent condensation and crust softening. For short-term storage up to two days, keep bread in a paper bag at room temperature, which maintains crust crispness better than plastic bags. Properly stored ciabatta maintains acceptable quality for 48 hours but deteriorates gradually thereafter.
For longer preservation, slice and freeze cooled ciabatta in airtight containers for up to three months. Toast slices directly from frozen to restore crust quality and crumb texture. Ciabatta excels as sandwich bread due to its structural integrity and flavor neutrality that complements diverse fillings. The open crumb soaks up oils and juices magnificently, creating superior sandwich experiences compared to many commercial alternatives.
Frequently Asked Questions
Can I use all-purpose flour instead of bread flour?
Yes, all-purpose flour produces acceptable ciabatta, though results differ slightly. Bread flour’s higher protein content develops stronger gluten networks, creating more dramatic open crumb. All-purpose flour yields slightly denser, less extensible dough but still produces respectable bread with proper technique.
What hydration level works best for beginners?
Starting at 75% hydration (75g water per 100g flour) provides more workable dough than 85% hydration while still developing good open crumb. As experience builds, gradually increase hydration for more dramatic structure development and lighter texture.
How can I determine when fermentation is complete?
Properly fermented dough approximately doubles in volume, exhibits visible surface bubbles, and gently springs back slowly when poked without collapsing completely. These visual indicators prove more reliable than strict timing.
Does ciabatta require special baking equipment?
Baking steel or stone significantly improves results but isn’t mandatory. A standard preheated baking sheet produces acceptable ciabatta, though crust development won’t match steel results. Invest in steel if pursuing serious bread baking.
Why did my ciabatta turn out gummy inside?
Gummy interiors indicate insufficient baking time or oven temperature too low. Ensure thorough preheating and bake for full duration until the bottom sounds hollow when tapped. Cool the bread completely before slicing, as warm bread appears gummier due to retained steam.
References
- Homemade Ciabatta Bread Recipe — Bright Moment Co. 2026. https://abrightmoment.com/homemade-ciabatta-bread-recipe/
- Simple Ciabatta Bread — The Bread Baking Babe. 2026. https://thebreadbakingbabe.com/simple-ciabatta-bread/
- Homemade Ciabatta Bread — Sally’s Baking Addiction. 2026. https://sallysbakingaddiction.com/ciabatta-bread-recipe/
- Easy Ciabatta Bread Recipe | 80% Hydration, Baked on Steel — Baking Steel. 2026. https://bakingsteel.com/blogs/recipes/the-easy-way-to-make-kick-ass-ciabatta-bread
- 4 Ingredient, NO-Knead Ciabatta Bread Recipe — Emma Fontanella. 2026. https://www.emmafontanella.com/easy-no-knead-ciabatta-bread