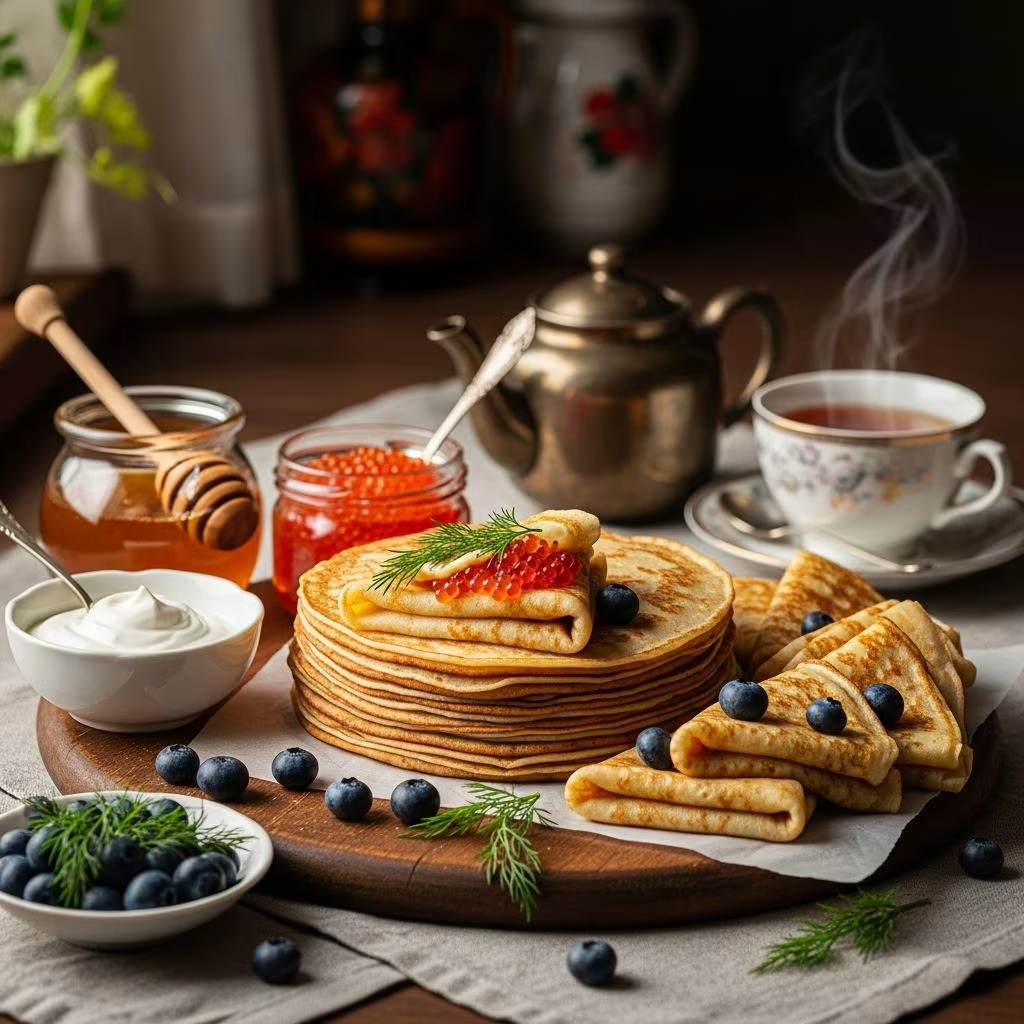
Russian blini represent a cornerstone of Eastern European culinary tradition, offering a versatile canvas for both sweet and savory accompaniments. These delicate, tender pancakes have graced tables for centuries, evolving from simple farmhouse fare into an elegant appetizer worthy of sophisticated entertaining. Unlike their American counterparts, which tend toward thickness and density, authentic blini showcase a refined texture that strikes a perfect balance between substance and delicacy. Learning to prepare them properly opens doors to countless flavor combinations and dining experiences.
Understanding What Makes Blini Distinctive
Blini occupy a unique space in the pancake family, sharing characteristics with both traditional pancakes and French crêpes. The defining feature of authentic Russian blini lies in their preparation method and ingredient composition. The batter relies on yeast for lift, creating a distinctly fluffy yet tender result that distinguishes them from other pancake varieties. This fermentation process develops subtle flavor complexity while contributing to their characteristic airy structure.
The texture of properly prepared blini should be delicate enough to fold gracefully without tearing, yet sturdy enough to support various toppings without collapsing. This textural balance requires understanding the interplay between ingredients and technique. Traditional recipes emphasize the importance of specific ingredient ratios, resting periods, and cooking temperatures to achieve this ideal consistency.
Essential Ingredients and Their Functions
Creating successful blini begins with understanding how each component contributes to the final product:
- Flour — Forms the protein structure that gives blini their characteristic texture. Some traditional recipes incorporate buckwheat flour, which imparts a subtle earthiness and darker hue.
- Eggs — Provide binding power and richness. Separating eggs allows cooks to incorporate whipped egg whites for additional lift and airiness.
- Dairy Components — Milk, cream, and sometimes buttermilk or kefir contribute moisture and richness. These ingredients also interact with leavening agents to create the desired texture.
- Butter — Melted butter adds richness and helps develop flavor depth in the finished pancakes.
- Leavening Agents — Instant yeast, baking soda, or both can be employed depending on the specific recipe variation.
- Sugar — A small quantity balances flavors and aids in browning during cooking.
- Salt — Enhances overall flavor profile and strengthens gluten development.
The Two-Stage Batter Preparation Method
Professional preparation of blini typically involves a two-stage approach that maximizes texture and flavor development. Understanding this process ensures consistent, superior results.
Stage One: Initial Batter Creation
Begin by combining room-temperature liquid ingredients in a large mixing bowl. The order of combination matters less than ensuring thorough mixing and preventing lumps from forming. When incorporating flour, do so gradually while whisking continuously. This methodical approach prevents the formation of dense pockets that would compromise the final texture. The resulting batter at this stage should resemble heavy cream in consistency—thin enough to pour easily, yet substantial enough to coat the pan evenly.
If using buttermilk or kefir as your dairy component, introduce it in portions to prevent overwhelming the mixture too quickly. Continue whisking until the batter appears completely smooth and lump-free before proceeding to the next stage.
Stage Two: Resting and Rising
Allow the batter to rest for 20 minutes to 2 hours, depending on your specific recipe and whether yeast has been incorporated. This resting period serves multiple purposes: it allows flour particles to fully hydrate, permits leavening agents to activate and develop, and creates small bubbles on the surface that indicate readiness for cooking. The exact timing depends on room temperature and the particular fermentation approach employed.
For recipes incorporating separated eggs, the final step involves gently folding whipped egg whites into the prepared batter just before cooking. Whip the egg whites with a pinch of salt until soft peaks form, then incorporate them carefully in batches to preserve the air you’ve worked to incorporate. This technique creates additional lift, resulting in extraordinarily fluffy pancakes.
Achieving Pan Perfection: Temperature and Oil Management
The cooking phase determines whether your carefully prepared batter becomes exceptional blini or disappointing results. Several critical factors deserve attention:
Pan Selection and Preheating
A non-stick skillet or crepe pan works best, though well-seasoned cast iron produces excellent results in experienced hands. Importantly, the pan must reach adequate temperature before batter introduction. Test readiness by sprinkling a water droplet on the surface; if it immediately vaporizes and dances across the pan, you’ve achieved the necessary heat level.
Oil Application Technique
Use minimal oil—just enough to prevent sticking without creating a greasy surface. Many accomplished cooks prefer wiping their pans with oil-dampened paper towels rather than pouring oil directly. This approach provides even coating while avoiding excessive oil accumulation. Some traditional recipes recommend clarified butter as an alternative to vegetable oil, which imparts subtle flavor enhancement.
The Cooking Process Explained
Once your pan reaches proper temperature and oil coating, cooking becomes straightforward:
- Pour approximately 1 tablespoon to 1/4 cup batter into the pan center, depending on desired blini size and pan dimensions.
- If preparing smaller appetizer-sized portions, use about 1 tablespoon per pancake. For larger crêpe-style blini, use 1/4 cup or more.
- Immediately tilt the pan in a circular motion so batter spreads evenly across the bottom. This step requires practice—speed and confidence matter more than perfect technique initially.
- Cook over medium heat until the top surface appears dry and small bubbles form, typically 1-2 minutes.
- Flip carefully using a spatula or by the traditional hand-flip method once you develop confidence.
- Cook the second side until it achieves light golden coloration, usually 30 seconds to 1 minute.
- Transfer to a plate lined with paper towels while proceeding with remaining batter.
Resist the temptation to stack finished blini directly atop one another immediately after cooking, as residual steam creates sogginess. Paper towels absorb excess moisture while the pancakes cool slightly.
Recipe Variations and Flavor Profiles
Traditional blini recipes allow for creative adaptations while maintaining their essential character:
| Variation | Key Characteristics | Best Pairings |
|---|---|---|
| Buckwheat Blini | Darker color, nutty flavor profile | Sour cream, mushrooms, smoked salmon |
| All-Purpose Flour Blini | Lighter color, subtle wheat flavor | Caviar, crème fraîche, fresh herbs |
| Buttermilk-Based Blini | Tangy undertones, tender crumb | Cured meats, pickled vegetables, sour cream |
| Yeast-Leavened Blini | Fluffy texture, complex fermented notes | Traditional caviar service, smoked fish |
Serving and Pairing Suggestions
The versatility of blini extends to their presentation possibilities. These pancakes bridge sweet and savory applications seamlessly:
Savory Applications
- Crown with sour cream and caviar for an elegant appetizer presentation
- Layer with smoked salmon, crème fraîche, and fresh dill
- Top with sautéed mushrooms and caramelized onions for vegetarian sophistication
- Serve alongside cured meats and pickled vegetables as part of a charcuterie experience
- Pair with herbed crème fraîche and smoked trout for brunch entertaining
Sweet Variations
- Dust with powdered sugar and serve with jam or preserves
- Top with fresh berries and whipped cream for an elegant dessert
- Create a blini cake by stacking with jam between layers and frosting the exterior
- Serve with honey and fresh fruit for a sophisticated breakfast
Storage and Make-Ahead Guidance
Blini maintain quality at room temperature for approximately one hour after preparation. For longer storage, several methods work effectively:
- Refrigeration — Stack cooked blini between parchment paper in an airtight container for up to three days
- Freezing — Layer cooled pancakes with parchment between each, place in freezer bags, and freeze for up to two months
- Reheating — Thaw frozen blini at room temperature, then gently warm in a low oven or briefly in a skillet
- Batter Preparation — Some recipes allow batter storage in the refrigerator for 24 hours before cooking
Troubleshooting Common Challenges
Even experienced cooks encounter occasional difficulties. Understanding common issues and their solutions ensures improved results:
Batter Consistency Problems
If your batter appears too thick, it won’t spread easily across the pan. Add small quantities of milk or water while whisking until you achieve the desired heavy cream consistency. Conversely, excessively thin batter results in pancakes that tear easily. Whisk in additional flour, one tablespoon at a time, until proper consistency returns.
Sticking and Burning Issues
Inadequately oiled pans cause sticking, while excessive oil creates greasy results. Ensure your pan receives even, minimal oil coating before each pancake. If browning too quickly or unevenly, reduce heat slightly—blini cook quickly, and high heat often causes burning before the interior sets properly.
Dense or Flat Results
These issues typically indicate insufficient leavening or improper resting time. Ensure your yeast or baking soda hasn’t expired and that you’ve allowed adequate resting time before cooking. Verify that separated egg whites were incorporated gently to preserve their air content.
Frequently Asked Questions
Can I prepare blini batter in advance?
Yes, though timing depends on your specific recipe. Batter containing yeast can typically be refrigerated for up to 24 hours, though this extended resting may require adjusting cooking times slightly. Batter without yeast can be prepared a few hours ahead, covered with plastic wrap.
What distinguishes blini from other Russian pancakes?
The primary distinction lies in fermentation and preparation method. Blini specifically incorporate yeast or significant air incorporation, creating their characteristic fluffy texture, while other Russian pancake varieties may use different leavening approaches.
Is it necessary to separate eggs for successful blini?
While not absolutely required, egg separation creates noticeably fluffier, more tender results. The whipped egg whites contribute significant volume and lightness to the final pancakes.
Which flour works best for authentic blini?
All-purpose flour produces consistently excellent results and remains the most common choice. Buckwheat flour creates a more traditional Russian variation with distinctive nutty flavor and darker color.
How thin should my blini be?
This depends on your preference and intended use. Appetizer-sized blini should be approximately 1/4 inch thick, while larger crêpe-style versions may reach 1/8 inch thickness. Thinner pancakes showcase toppings beautifully, while thicker versions provide more substantial texture.
Mastering Your Technique Through Practice
Like any culinary skill, preparing exceptional blini improves with practice and attention to detail. Your first batch may present challenges, but understanding the underlying principles—proper batter consistency, adequate pan temperature, minimal oil use, and timely flipping—positions you for success. Each attempt teaches valuable lessons about your specific stove, pan, and preferences.
The beauty of blini lies in their adaptability to personal taste and creative interpretation while maintaining their essential character. Whether you prepare them for an intimate gathering or special occasion, these traditional Russian pancakes offer an opportunity to engage with culinary heritage while creating memorable dining experiences.
References
- Homemade Blini (Russian Pancakes) Recipe — Tasting Table. https://www.tastingtable.com/1301239/homemade-blini-russian-pancakes-recipe/
- Russian Crepes Blini (VIDEO) Thin and delicate pancakes — Vikalinka. https://vikalinka.com/russian-crepes-blini/
- Traditional Russian Pancakes (Blinchiki) — Happy Kitchen. https://happykitchen.rocks/ultimate-russian-pancakes/
- Blini (Russian Crepes) — Tara’s Multicultural Table. https://tarasmulticulturaltable.com/blinchiki-russian-crepes/