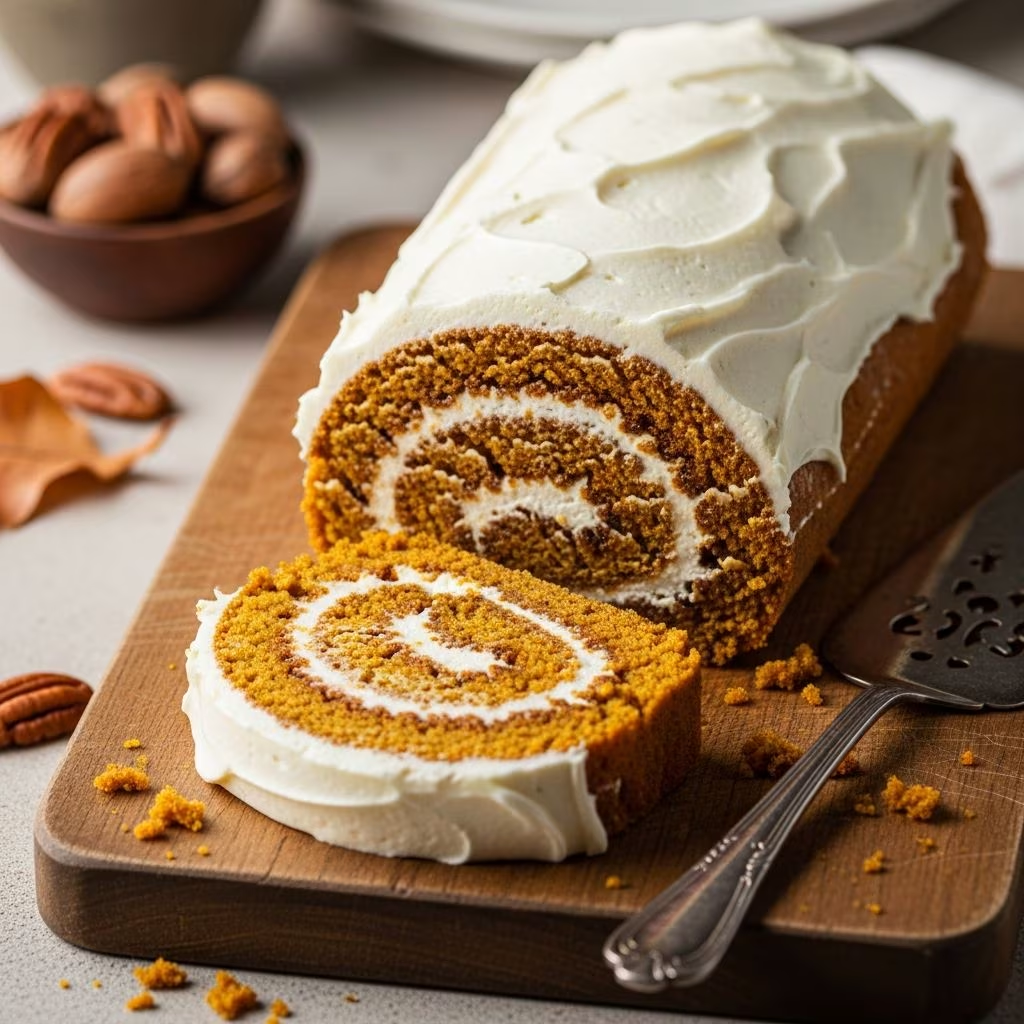
The pumpkin roll stands as one of the most beloved autumn desserts, combining tender spiced cake with rich cream cheese filling in an elegant presentation. This showstopping treat requires precision and technique, but with the right approach, anyone can master it. Whether you’re preparing it for a holiday gathering or simply craving a seasonal indulgence, understanding the fundamentals of pumpkin roll construction will transform your baking experience.
Understanding the Foundation: What Makes a Pumpkin Roll Special
A successful pumpkin roll differs significantly from traditional layer cakes. The cake layer must possess sufficient structure to roll without cracking while maintaining a tender, moist interior. This delicate balance requires careful attention to ingredient ratios and baking times. The filling—typically a smooth cream cheese mixture—provides a cool, tangy contrast to the warm spices of the cake. The combination of these elements creates a dessert that appeals to both casual bakers and seasoned pastry chefs.
The construction process involves creating a thin, flexible cake that can withstand rolling, filling it with a stable frosting, and then chilling to set the shape. Each step builds upon the previous one, making understanding the science behind the process crucial for consistent results.
Essential Equipment and Pan Preparation
Beginning your pumpkin roll journey with proper equipment setup ensures success before mixing a single ingredient. The correct pan size becomes paramount—a 10×15-inch jelly roll pan provides the ideal dimensions for creating a cake with the right thickness and flexibility.
Preparing Your Baking Surface
- Preheat your oven to the specified temperature, typically between 350°F and 375°F
- Line the jelly roll pan with parchment paper, allowing 1-2 inches of overhang on the longer sides
- Spray the parchment paper thoroughly with cooking spray or nonstick oil to prevent sticking
- Have a clean kitchen towel or additional parchment ready for rolling the cake after baking
- Prepare all ingredients and equipment before beginning to mix, following the mise en place principle
The parchment paper serves multiple functions: it prevents the delicate cake from sticking, makes removal from the pan effortless, and facilitates the rolling process. The overhang on the sides allows you to lift the entire baked cake from the pan without damage.
Ingredient Selection and Preparation
Creating an authentic pumpkin roll requires understanding what each ingredient contributes to the final product. The quality of these components directly impacts both taste and texture.
The Dry Component
The dry ingredients provide structure and flavor. Using all-purpose flour rather than cake flour creates a sturdier crumb that can withstand rolling. Combine the following in a medium bowl:
- All-purpose flour (typically 3/4 to 1 cup) for structural support
- Baking soda and baking powder as leavening agents to create a tender crumb
- Ground cinnamon (1-1.5 teaspoons) as the primary spice
- Pumpkin pie spice blend or individual spices like nutmeg, ginger, cloves, and allspice
- Salt (1/4 to 1/2 teaspoon) to enhance all flavors
Whisking these ingredients together distributes the leavening agents evenly and prevents lumps. This step, though simple, significantly impacts the cake’s rise and crumb structure.
The Wet Component and Pumpkin Selection
The wet ingredients create the base batter and bind all components together. Start with these elements in a separate large bowl:
- Three large eggs at room temperature for better emulsification
- Granulated sugar (1 cup) for sweetness and structure
- Pure pumpkin puree (2/3 to 3/4 cup)—this distinction matters significantly
- Vanilla extract (1 teaspoon) for depth of flavor
A critical distinction exists between pure pumpkin puree and canned pumpkin pie filling. Pure pumpkin contains no added spices or sugar, giving you complete control over seasoning. Using pie filling would result in an overly sweet, heavily spiced cake that lacks balance. Quality matters here—premium brands like Libby’s provide consistent results.
The Mixing Method and Batter Development
Proper mixing technique determines whether your cake will achieve the desired tender texture. Beat the wet ingredients together thoroughly until well combined and lightened in color. This process typically takes 2-3 minutes with an electric mixer on medium speed.
Once the wet ingredients are prepared, gently fold in the dry ingredients. This is not the moment for aggressive mixing. Stir just until no dry streaks remain, being careful not to overdevelop the gluten, which would result in a tough, dense cake. The batter should appear thick and slightly lumpy rather than completely smooth.
Spreading and Initial Baking
Spread the batter evenly into your prepared pan using an offset spatula or the back of a spoon. Work deliberately to create an even layer—thicker spots will bake faster while thinner areas may dry out. The goal is uniform thickness across the entire pan.
Bake at your preheated oven temperature for 12-18 minutes, depending on your specific oven and exact batter thickness. The cake is done when a toothpick inserted in the center comes out clean and the top springs back lightly when touched.
The Critical Rolling Process
This stage distinguishes successful pumpkin rolls from cracked failures. Timing and technique prove essential here.
Immediate Post-Baking Steps
Remove the cake from the oven and immediately prepare a clean kitchen towel by dusting it generously with powdered sugar. This prevents the cake from sticking and makes the rolling process smoother. As soon as the cake is cool enough to handle (within 2-3 minutes), turn the pan over onto the prepared towel so the parchment paper is now on top.
Carefully peel away the parchment paper—if it resists, let the cake cool for another minute. With the parchment removed, the cake is ready for rolling. Starting at one of the shorter ends, roll the cake tightly into a log shape using the towel as your guide. The towel will roll along with the cake but can be removed after the initial roll is formed.
Understanding the No-Crack Method
The secret to crack-free rolls involves several factors working in concert:
- Proper parchment preparation prevents the cake from sticking and tearing
- Rolling immediately while still warm allows the cake to be pliable rather than brittle
- Rolling tightly from the start ensures even distribution of pressure
- Allowing the roll to cool completely before filling prevents the frosting from melting
Place your rolled cake seam-side down on a wire rack to cool completely. This typically takes 1-2 hours at room temperature.
Creating the Cream Cheese Filling
While the cake cools, prepare the filling that defines this dessert. All ingredients should be at room temperature for proper emulsification and smooth texture.
Filling Components and Proportions
| Ingredient | Quantity | Function |
|---|---|---|
| Cream Cheese | 8 oz (1 package), softened | Base ingredient providing tang and body |
| Butter | 2-3 tablespoons, softened | Adds richness and improves spreadability |
| Powdered Sugar | 1-1.5 cups, sifted | Sweetens and stabilizes the filling |
| Vanilla Extract | 1/2-1 teaspoon | Enhances flavor complexity |
Beat the softened cream cheese and butter together until smooth and creamy, approximately 2 minutes. Gradually add the sifted powdered sugar, beating continuously to incorporate air and prevent lumps. Finally, add vanilla extract and mix until fully combined. The result should be a thick, spreadable frosting with no visible sugar crystals.
Assembly and Final Preparation
Once the cake has cooled completely, unroll it gently on your work surface. The roll will likely have maintained its spiral shape, which is perfectly normal. Spread the cream cheese filling evenly over the entire cake surface, leaving a small border around the edges. Re-roll the cake using the same technique as before, this time incorporating the filling within each layer.
Place the filled roll seam-side down on a serving plate or cake board. Cover loosely with plastic wrap and refrigerate for at least 2 hours, preferably overnight. This chilling period allows the frosting to set firmly and the flavors to meld together, resulting in clean slices when serving.
Storage and Serving Recommendations
Pumpkin rolls maintain their quality for several days when properly stored. Keep the finished roll in the refrigerator in an airtight container for up to 5 days. For longer storage, wrap it thoroughly in plastic wrap and then aluminum foil before freezing for up to 3 months.
Before serving, dust the top with additional powdered sugar for an attractive presentation. A sharp knife dipped in hot water and wiped clean between each slice ensures clean, attractive portions. Serve slightly chilled or at room temperature, though refrigerated slices hold their shape better.
Troubleshooting Common Issues
Cake Cracks During Rolling
This typically results from rolling too slowly or rolling the cooled cake rather than warm. Always roll immediately after removing from the oven while the cake remains pliable. If cracks occur, don’t worry—the filling will cover any imperfections when reassembled.
Dry or Dense Texture
Overbaking is the primary culprit. Check for doneness starting at 12 minutes rather than waiting the full time. The cake should be moist and springy, not dry to the touch.
Filling Separation or Greasiness
This indicates the cream cheese or butter wasn’t sufficiently softened before mixing. Always allow these ingredients to reach room temperature. Additionally, avoid adding eggs or liquid ingredients to the filling, as cream cheese filling should contain only the four basic components.
Variations and Creative Adaptations
Once you’ve mastered the classic version, numerous variations allow for personalization. Replace standard powdered sugar dusting with decorative patterns using food coloring and edible markers. Add chopped nuts to the filling for textural contrast. Experiment with different spice ratios to create a filling that better suits individual preferences. Some bakers incorporate bourbon or rum extract for an adult version, while others add a hint of maple syrup to complement the pumpkin flavor.
Frequently Asked Questions
Can I make pumpkin roll ahead of time?
Yes, pumpkin rolls are excellent make-ahead desserts. Bake and fill them up to two days in advance, storing in the refrigerator. You can also freeze the baked, filled roll for up to three months before thawing overnight in the refrigerator.
What if I don’t have a jelly roll pan?
The specific 10×15-inch dimensions matter because they create the correct cake thickness. A standard baking sheet is too small, and the cake would be too thick to roll properly. Invest in a proper jelly roll pan for best results.
Can I use fresh pumpkin instead of canned?
Yes, homemade pumpkin puree works well, though you must reduce the liquid content slightly as fresh puree typically contains more moisture than canned. Use approximately 1/2 to 2/3 cup of fresh puree depending on its thickness.
Why is my filling lumpy?
Lumps in the filling usually indicate unsifted powdered sugar or cold cream cheese. Always sift the sugar before adding and ensure all ingredients reach room temperature before mixing.
Conclusion
Mastering the pumpkin roll elevates your baking repertoire and provides a show-stopping dessert that impresses guests and family alike. The process requires attention to detail and understanding the reasoning behind each step, but once you’ve successfully created your first roll, subsequent attempts become increasingly intuitive. With practice and these comprehensive guidelines, you’ll develop the skills to produce a beautiful, delicious pumpkin roll that becomes your signature autumn dessert.
References
- Easy Pumpkin Roll Recipe — Tastes Better From Scratch. 2024. https://tastesbetterfromscratch.com/classic-pumpkin-roll/
- Easy Pumpkin Roll Recipe with Cream Cheese Filling — The Recipe Critic. 2024. https://therecipecritic.com/pumpkin-roll-recipe/
- Pumpkin Roll Recipe — Sally’s Baking Addiction. 2024. https://sallysbakingaddiction.com/pumpkin-roll/
- Grandma’s Easy Pumpkin Roll Cake Recipe — Melissa K. Norris. 2024. https://melissaknorris.com/pumpkin-roll-recipe-from-grandma-with-fresh-pumpkin/
- Pumpkin Roll Recipe — Preppy Kitchen. 2024. https://preppykitchen.com/pumpkin-roll/
- Pumpkin Roll Recipe — Down Redbud Drive. 2024. https://www.downredbuddrive.com/foolproof-pumpkin-roll/