Grilling pork chops can seem straightforward, but achieving consistently tender, flavorful results requires understanding several key techniques. One of the most effective approaches involves using a dry rub—a blend of spices that adheres directly to the meat’s surface, creating a flavorful crust while keeping the interior moist and succulent. This comprehensive guide explores everything you need to know about preparing restaurant-quality grilled pork chops at home.
Understanding the Foundation: Selecting Quality Pork Chops
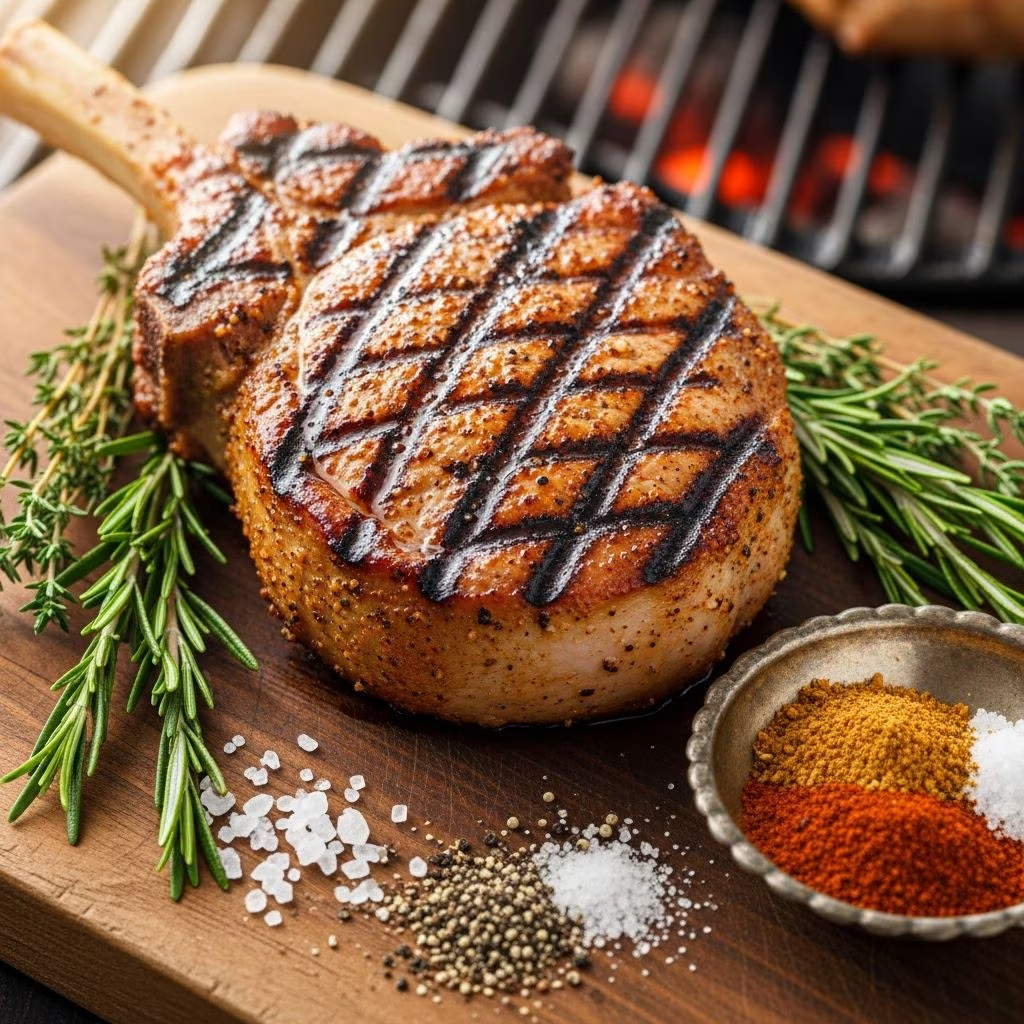
The foundation of exceptional grilled pork chops begins with choosing the right cuts. Bone-in pork chops are significantly superior to their boneless counterparts, as the bone contributes additional flavor and helps maintain moisture during cooking. When selecting chops at the market, aim for pieces that are between one and one-and-a-half inches thick. This thickness allows the exterior to develop a proper crust while the interior remains juicy and tender. Thinner cuts tend to dry out quickly, while extremely thick chops may cook unevenly.
The quality of the pork itself matters considerably. Look for chops with good marbling—visible fat distributed throughout the meat—as this intramuscular fat renders during cooking and enhances flavor and texture. Avoid chops that appear gray or have excessive surface moisture, as these indicate older cuts that have been sitting for too long.
Preparation Techniques That Make a Difference
Proper preparation separates mediocre results from outstanding ones. Before applying any seasoning, pat your pork chops thoroughly dry using paper towels. Moisture on the surface prevents the spice rub from adhering properly and inhibits the development of a flavorful crust during grilling.
Many professional grilling enthusiasts recommend brining pork chops for six to eight hours before cooking. This process involves submerging the meat in a saltwater solution, which allows the muscle fibers to absorb additional moisture and salt. The result is meat that remains juicier and more tender throughout the cooking process, even if you slightly exceed your target temperature.
After brining, allow your pork chops to come to room temperature for approximately thirty minutes before grilling. This ensures even cooking throughout the meat. Cold meat placed directly on a hot grill will develop an overcooked exterior while the interior remains undercooked. Room-temperature meat cooks more uniformly and predictably.
Creating the Perfect Dry Rub Blend
A successful dry rub combines multiple spices that work synergistically to enhance the pork’s natural flavors while adding complexity and depth. The most versatile dry rub formulations include a sweet component, savory elements, and aromatic spices that complement pork’s subtle flavor profile.
Essential Components of an Effective Rub
- Sweetness: Brown sugar serves as the primary sweet element, caramelizing on the meat’s surface to create an attractive, flavorful crust. The sugar also helps form a desirable char while preventing excessive browning.
- Smokiness: Smoked paprika adds depth and a subtle smoky undertone that enhances the grilled flavor profile, even when using a gas grill rather than charcoal.
- Heat: Ground chili powder or chipotle chile powder introduces a gentle spiciness that doesn’t overwhelm but rather complements the other flavors.
- Aromatics: Garlic powder and onion powder contribute pungent, savory notes that add complexity without introducing moisture to the rub.
- Depth: Dry mustard powder and ground cumin add earthy, warm undertones that tie the entire flavor profile together.
- Foundation: Salt enhances all flavors while allowing the meat to retain moisture through the curing process inherent in salting.
- Finishing touch: Freshly cracked black pepper adds brightness and a subtle bite that prevents the overall flavor from becoming one-dimensional.
Rub Application Technique
Combine all dry ingredients in a small bowl, stirring thoroughly until evenly mixed. The mixture should have a consistent texture without clumping. Apply the rub generously to all surfaces of the pork chops, pressing it firmly into the meat so it adheres properly rather than falling off during grilling. Don’t be timid with the seasoning—a substantial coating creates the best crust and flavor development.
After applying the rub, allow the seasoned chops to rest at room temperature for fifteen to twenty minutes. This waiting period allows the salt in the rub to begin penetrating the meat’s surface, seasoning it more thoroughly than if you grilled immediately.
Grill Setup and Temperature Management
Two-zone grilling represents the most effective approach for cooking pork chops to perfection. This technique involves creating areas of both direct and indirect heat on your grill, allowing you to sear the meat rapidly while finishing it gently without burning the exterior.
Establishing Your Heat Zones
For a charcoal grill, arrange coals to one side, leaving the other side empty. On a gas grill, light only half the burners, leaving the others off. Preheat your entire grill to medium-high heat—approximately 400 degrees Fahrenheit—for at least ten minutes before adding the pork chops. This extended preheat time ensures the grates are thoroughly heated, which is essential for developing proper sear marks and a flavorful crust.
Clean your grill grates thoroughly before cooking. Use a grill brush or crumpled foil to remove any food residue or rust. Clean grates prevent sticking and allow better heat transfer to the meat. If desired, lightly oil the grates using a high-heat oil, which creates a natural non-stick surface.
Cooking Process: From Sear to Finish
The Initial Sear
Place your seasoned pork chops on the hottest part of the grill—the direct heat side—and leave them undisturbed for two to three minutes. Resisting the urge to move the meat during this phase allows a proper crust to develop through a process called the Maillard reaction, where proteins and sugars combine to create complex, flavorful compounds. Only turn the chops once you can lift them easily without resistance, indicating the crust has set.
Sear the second side for an additional two to three minutes, maintaining consistent heat. Watch carefully during this searing phase, as the sugar in the dry rub can burn if subjected to excessive heat for too long. You want a golden-brown crust, not black char.
Gentle Finishing Phase
After achieving a proper sear on both sides, move the pork chops to the indirect heat side of the grill. Reduce the heat to medium if possible, close the grill cover, and continue cooking for four to seven additional minutes per side, depending on chop thickness. The indirect heat allows the interior to cook through gently without further browning the exterior.
Cook the chops to an internal temperature of 145 degrees Fahrenheit, checked using an instant-read meat thermometer placed in the thickest part of the meat, avoiding the bone. This temperature represents the USDA-recommended safe internal temperature for pork while still maintaining a slightly pink, juicy center.
Resting and Serving
After removing pork chops from the grill, allow them to rest on a cutting board for five to ten minutes before serving. During this resting period, the meat’s muscle fibers relax, and juices redistribute throughout the cut. Serving immediately after cooking causes juices to run out of the meat onto the plate, resulting in drier chops.
The resting period also allows carryover cooking to occur, where the internal temperature rises slightly as residual heat continues penetrating from the exterior. Account for this when removing chops from the grill—remove them when the internal temperature reaches 143 degrees Fahrenheit, knowing they’ll reach the safe 145-degree target during resting.
Troubleshooting Common Issues
| Problem | Cause | Solution |
|---|---|---|
| Dry, tough texture | Overcooking past 145°F internal temperature | Use meat thermometer and remove at 143°F to account for carryover cooking |
| Rub burns or turns black | Heat too high or chops remain on direct heat too long | Use medium-high rather than maximum heat; move to indirect heat after searing |
| Uneven cooking | Inconsistent thickness or starting from cold temperature | Select similarly-sized chops and bring to room temperature before grilling |
| Pale crust without flavor | Meat too wet before grilling or rub not pressed in firmly | Pat chops very dry and press rub into meat with force |
| Chops stick to grates | Grates not hot enough or not oiled | Preheat thoroughly and oil grates lightly before cooking |
Customizing Your Dry Rub
While the classic sweet and savory profile works excellently, pork’s mild flavor readily accepts bold spice combinations. Consider experimenting with different profiles based on your preferences and available ingredients.
For a southwestern-inspired version, incorporate additional chipotle powder, cumin, and a touch of oregano. Mexican cuisine’s warm spices complement pork beautifully. For an Asian-influenced rub, combine ginger powder, five-spice powder, and a small amount of ground clove. This creates an entirely different flavor experience while maintaining the fundamental technique.
The key principle remains consistent: combine complementary spices that work together harmoniously rather than competing for attention. Taste your rub mixture before applying it to the meat. It should be balanced, with no single spice overwhelming the others.
Frequently Asked Questions
Can I use boneless pork chops?
While technically possible, boneless chops produce inferior results compared to bone-in varieties. Bones contribute significant flavor and help maintain moisture during cooking. If boneless is your only option, reduce cooking time slightly, as they cook faster than bone-in cuts.
Should I use a meat thermometer?
Absolutely. A meat thermometer removes guesswork and ensures consistent results. Many home cooks have ruined pork chops by cooking them far beyond the safe temperature due to outdated recommendations suggesting well-done pork. Modern pork is safe at 145 degrees Fahrenheit.
Can I make the dry rub in advance?
Yes, mix the dry rub ingredients several days ahead and store in an airtight container. Apply it to pork chops immediately before grilling for best results, though you can apply it up to an hour ahead and refrigerate if necessary.
What’s the best way to store leftover grilled pork chops?
Refrigerate cooled pork chops in an airtight container for up to three days. Reheating gently in a low oven or briefly on the grill to avoid drying them further. Alternatively, slice and incorporate into other dishes like grain bowls or salads.
Can I use a charcoal grill instead of gas?
Charcoal grills work excellently for this technique. Many enthusiasts prefer charcoal’s flavor contribution and heat characteristics. Simply arrange coals to create direct and indirect heat zones as described in the setup section.
Conclusion
Mastering grilled pork chops with dry rub seasoning combines proper meat selection, thoughtful preparation, and careful heat management. By understanding how each element—from brining to two-zone cooking to precise temperature monitoring—contributes to the final result, you’ll consistently produce restaurant-quality chops that impress family and guests. The techniques outlined here apply whether you’re grilling two chops for a weeknight dinner or a dozen for a gathering. Practice builds confidence and intuition, allowing you to adjust for variables like your specific grill’s characteristics. With these fundamentals in place, you’re equipped to create memorable grilled pork chop experiences time after time.
References
- Cooking Techniques for Pork — National Pork Board. Retrieved April 2026. https://www.porkboard.org/
- Guide to Grilling: Techniques and Methods — Weber-Stephen Products. Retrieved April 2026. https://www.weber.com/
- Safe Minimum Internal Temperature Chart — U.S. Department of Agriculture Food Safety and Inspection Service. Retrieved April 2026. https://www.fsis.usda.gov/