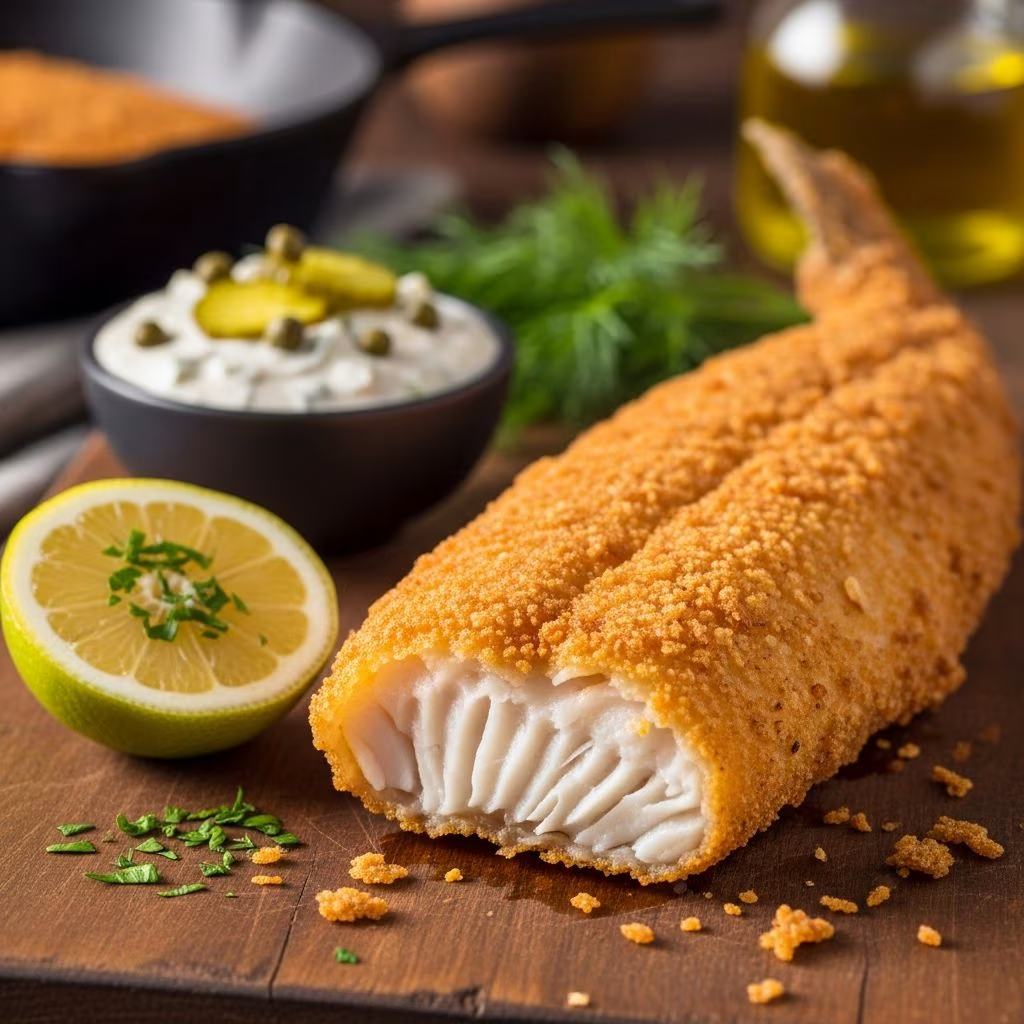
Walleye stands as one of North America’s most prized freshwater fish, celebrated for its delicate flavor and tender flesh. When prepared with proper technique, this mild-flavored fish transforms into a spectacular dish that rivals restaurant offerings. The key to exceptional fried walleye lies not merely in following a recipe, but in understanding the science behind each step and respecting the ingredient quality. Whether you’re a seasoned angler preparing your latest catch or a home cook seeking to elevate your dinner table, mastering the fundamentals of walleye preparation will consistently deliver impressive results.
Understanding Your Ingredient Foundation
The journey to perfect fried walleye begins long before the fish enters your pan. Walleye fillets require thoughtful preparation and understanding of what transforms raw fish into a culinary masterpiece. The foundation of success rests on three critical elements: fish quality, coating composition, and cooking medium selection.
Selecting and Preparing Fresh Walleye
Begin with the freshest walleye available to you. If using frozen fillets, thaw them completely in the refrigerator, allowing several hours for this process. Fresh thawed fish produces superior results compared to cooking directly from frozen. Once thawed, examine each fillet carefully for any remaining bones or skin that may have been missed during initial processing. Using your fingers or a fine-toothed comb-like fish bone remover, extract any offending bones you discover. This attention to detail prevents unpleasant surprises during consumption.
Pat the fillets thoroughly dry using paper towels. This moisture removal proves essential because water interferes with browning and creates steam that prevents the coating from crisping properly. The drier your fillets, the more effective your coating will adhere and crisp during frying. Some professional cooks allow prepared fillets to rest on paper towels for 10-15 minutes, allowing surface moisture to evaporate completely.
Coating Strategies That Deliver Texture
The coating represents your primary tool for creating textural contrast—the crispy exterior that gives way to moist, tender flesh. Multiple approaches yield excellent results, each offering distinct advantages.
Traditional Breaded Coating: Combine all-purpose flour with panko breadcrumbs and seasonings. This approach delivers excellent crispness with manageable technique requirements. Panko breadcrumbs create larger air pockets than traditional breadcrumbs, resulting in superior crunchiness. The ratio of flour to breadcrumbs typically ranges from equal parts to slightly more breadcrumb than flour.
Saltine Cracker Method: Crushed saltine crackers create an exceptionally crispy and flavorful crust. This old-school approach produces distinctive texture and subtle salty notes that complement walleye beautifully. Crush crackers by hand into varied sizes—some fine crumbs mixed with larger pieces—to create interesting textural layers.
Beer Batter Approach: For deep frying applications, beer batter creates a light, airy crust with appealing golden color. Combine flour, seasonings, beaten eggs, and beer to form a batter with pancake-like consistency. The carbonation in beer creates tiny bubbles that expand during frying, producing an exceptionally light coating.
Essential Seasoning Combinations
Walleye’s mild flavor profile welcomes savory seasonings that enhance rather than overwhelm. Consider these proven combinations:
- Garlic powder, onion powder, paprika, salt, and black pepper
- Old Bay seasoning for coastal-inspired flavor
- Italian herbs with parmesan cheese for Mediterranean influence
- Cayenne pepper for those preferring subtle heat
- Lemon zest combined with fresh or dried dill for brightness
The Science of Cooking Oil Selection
Oil choice directly impacts both cooking results and flavor development. Select oils with high smoke points, ensuring they remain stable at the elevated temperatures required for proper frying. The best oils for walleye frying include canola, grapeseed, peanut, rice bran, safflower, and avocado oil. Each option allows you to reach temperatures between 325-350°F without degradation.
Avoid low smoke-point oils such as olive oil, which breaks down at frying temperatures and creates acrid flavors that overwhelm delicate fish. Reserve premium extra virgin olive oil for finishing preparations rather than cooking applications.
Oil quantity requires careful attention. For pan-frying, use enough oil to reach approximately one-third up the height of your fillets. This depth ensures proper browning while allowing you to flip and maneuver fish without excessive oil splash. Too little oil results in uneven cooking and incomplete browning; excessive oil creates greasy results and poses safety concerns.
Setting Up Your Efficient Dredging Station
Professional cooks establish organized dredging stations that streamline the coating process and minimize mess. Arrange three shallow dishes in a row, each containing different coating component.
Station One—Egg Mixture: Beat whole eggs with a splash of water or milk. Some cooks add a dash of hot sauce or Worcestershire for additional flavor complexity. This wet component acts as adhesive, helping dry ingredients stick to fish.
Station Two—Flour Base: Combine all-purpose flour with your chosen seasonings. Whisk thoroughly to distribute seasonings evenly throughout.
Station Three—Breadcrumb Mixture: Place your chosen breadcrumb or cracker mixture in the final dish. If using multiple types of breadcrumbs, combine them before plating.
Working with one fillet at a time, dip thoroughly into the egg mixture, ensuring complete coverage. Allow excess egg to drip back into the dish for 2-3 seconds. This prevents overly thick, soggy coating. Transfer to the flour mixture, coating both sides and edges thoroughly. Press gently to help flour adhere. Finally, coat completely in the breadcrumb mixture, pressing to secure the coating against the fish surface.
Place coated fillets on a clean plate. If preparing multiple fillets in advance, stack them with parchment paper between layers to prevent sticking. Coated fish can rest for 15-20 minutes before frying, allowing the coating to set.
Mastering Pan-Frying Technique
Pan-frying represents the most accessible method for home cooks, delivering excellent results without specialized equipment.
Temperature Management
Preheat your cooking oil to 325-350°F, measuring with a reliable thermometer. If you lack a thermometer, test oil readiness by dropping a small piece of breadcrumb into the hot oil. Proper temperature produces immediate, vigorous sizzling and causes the breadcrumb to turn golden within 30 seconds.
Maintaining consistent temperature throughout cooking proves critical. Use medium to medium-high heat, adjusting as needed. Most home burners run hot, so starting at medium-high and reducing heat if oil smokes excessively works well. The goal is steady, controlled frying rather than explosive heat.
Cooking Process and Timing
Carefully place coated fillets into preheated oil, working in batches to avoid crowding. Overcrowding dramatically reduces oil temperature and creates steam that prevents proper browning. Plan to fry 2-4 fillets per batch depending on pan size.
Cook the first side undisturbed for approximately 3 minutes, resisting the urge to move fish around. During this time, the coating browns and begins crisping. Using a thin spatula or fish turner, carefully flip each fillet. Cook the second side for an additional 3 minutes until golden brown throughout.
Fish reaches safe internal temperature at 145°F. Use an instant-read thermometer inserted into the thickest portion of the fillet to verify doneness. At this temperature, fish flakes easily when pressed with a fork and appears opaque throughout.
Post-Cooking Treatment
Immediately transfer cooked walleye to a paper towel-lined plate to drain excess oil. Paper towels absorb surface oil without trapping steam like enclosed containers would. For those serving multiple batches, place finished fillets on a wire rack set over a baking sheet in a 200°F oven. This prevents fillets from becoming soggy while you complete remaining batches, as the rack allows air circulation underneath, preventing steam accumulation.
Flavor Enhancement and Serving Suggestions
While perfectly fried walleye stands beautifully alone, thoughtful accompaniments elevate the dining experience.
Compound Butter Finishing
Create finishing butter by softening unsalted butter and mixing with minced garlic, fresh lemon juice, and chopped fresh herbs such as dill, parsley, or chives. Top each hot fillet with a pat of this mixture, allowing it to melt and create an elegant sauce that complements the crispy coating.
Serving Accompaniments
Fresh lemon wedges remain the classic pairing, providing bright acidity that cuts through richness. Consider these additional options:
- Tartar sauce mixed with fresh herbs and lemon zest
- Coleslaw providing crisp, refreshing contrast
- Roasted or fried potatoes for hearty satisfaction
- Steamed green vegetables adding nutritional balance
- Simple tomato-based salsas for unexpected brightness
Frequently Asked Questions
Can I prepare walleye ahead of time?
Coated fillets can rest in the refrigerator for up to 2 hours before frying. This actually improves adherence of the coating. However, fry them just before serving for optimal crispness. Fully cooked walleye can be kept warm in a 200°F oven for up to 15 minutes but tastes best when served immediately.
What’s the difference between pan-frying and deep-frying?
Pan-frying uses minimal oil (⅓ of fillet depth) and requires flipping halfway through. Deep frying submerges fish completely in oil and typically requires baskets for handling. Pan-frying proves more practical for home kitchens and uses less oil while delivering similar crispness.
How do I avoid soggy fried walleye?
Ensure your fillets are thoroughly dry before coating. Use sufficient oil at proper temperature. Avoid overcrowding the pan. Drain on paper towels immediately after cooking, and keep finished batches warm on a wire rack rather than stacking.
Can I use frozen walleye directly?
Thaw frozen fillets completely in the refrigerator before cooking. Cooking from frozen results in uneven texture and incomplete browning. The thawing process typically requires 6-8 hours.
What oil creates the crispiest results?
Oils with neutral flavor and high smoke points work equally well from a technical standpoint. Peanut and avocado oils are particularly prized for their stability and clean finish, though canola and grapeseed oils deliver excellent results at significantly lower cost.
Common Mistakes to Avoid
Insufficient drying: Moisture prevents coating adhesion and browning. Always pat fillets completely dry before coating.
Temperature fluctuations: Oil that’s too cool produces greasy, soggy results. Oil that’s too hot burns the coating before the interior cooks. Use a thermometer for reliability.
Overcrowding the pan: This reduces oil temperature dramatically and creates steam that ruins crispness. Fry in batches as needed.
Flipping too frequently: Resist the urge to move fish around constantly. Each disturbance disrupts browning. Flip once, halfway through cooking.
Poor coating application: Thin, uneven coatings result in inconsistent texture. Press coating firmly onto fish and ensure complete coverage.
Expanding Your Walleye Repertoire
Once you’ve mastered the fundamental fried walleye technique, experiment with variations. Try different coating bases such as ground almonds or crushed pistachios for elegant presentations. Create Asian-inspired versions using panko mixed with sesame seeds and wasabi powder. Develop your own signature spice blend that reflects personal taste preferences. The fundamental principles—dry fish, hot oil, proper temperature, undisturbed cooking—remain constant regardless of flavor variations.
Fried walleye represents accessible, impressive cooking that delivers restaurant-quality results from your home kitchen. By respecting ingredient quality, understanding cooking science, and practicing proper technique, you’ll consistently create crispy, golden, perfectly cooked fillets that showcase why walleye remains a beloved fish across North America.
References
- USDA Food Safety and Inspection Service — United States Department of Agriculture. 2023. Safe Internal Temperature Chart
- Fish and Shellfish Cooking Guidelines — National Center for Home Food Preservation, University of Georgia. 2024. How to Cook Fish Safely
- Culinary Techniques for Fish Preparation — The Culinary Institute of America. 2023. Professional Culinary Education Resources
- Oil Smoke Points and Cooking Applications — International Journal of Culinary Science. 2024. Journal of Culinary Science & Technology
- Panko vs. Traditional Breadcrumbs: Texture and Frying Results — Food Science and Technology International. 2023. Food Science and Technology International
- Deep Frying and Oil Temperature Management — American Culinary Federation. 2024. Professional Chef Resources
- Beer Batter Chemistry and Cooking Applications — Food Chemistry Journal. 2022. Food Chemistry